
This week’s Hammer of Math dives into the realm of geometry, and looks at how much of the board is available for the various area-based secondary objectives in Warhammer 40k.
Probably one of the most challenging aspects of Warhammer 40k Matched Play for a new player is understanding secondary objectives and how their selection and execution will affect gameplay. Some of the objectives are more straightforward than others, particularly those that are specific to what kind of units to kill. For example if you’re facing an army full of Knights then it makes sense to take Bring It Down since every target is a vehicle. On the other hand if your army is full of small units and you’re facing an army of a small number of elite threats then Grind Them Down wouldn’t make much sense since it’s likely that you will lose more units than you are able to destroy each round. The purpose of this article is to help you consider some secondary objectives which take location into account, such as objective markers or the center of the board. I do this by providing some data on how much of the board applies to each style of secondary, and provide some maps at the end that show the coverage. For example, if you see the map for a particular mission you’re playing and you see how the objectives overlap with the center or table quarters then it might help make a decision.
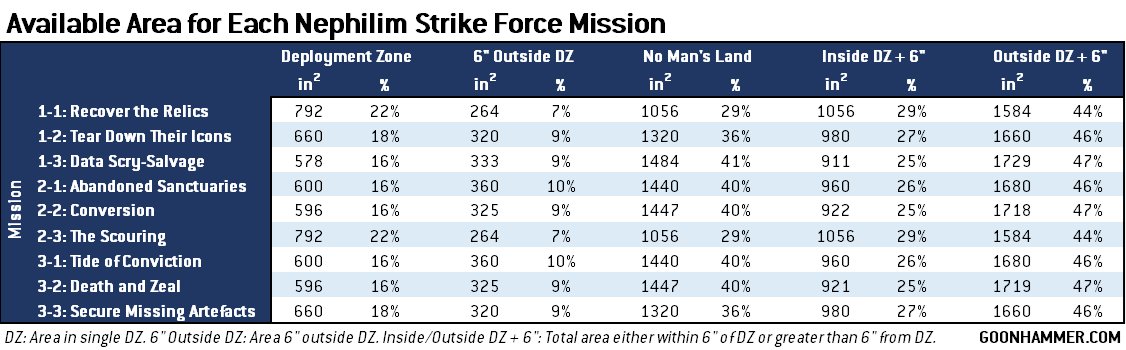
A significant number of objectives (62 as of this article, I counted) require that units be located in a specific region of the board to achieve success. Often this is in the vicinity of an objective marker, but may also be focused on the deployment zone, board quarters, center of the board, or even multiple criteria. Given that competitive play generally revolves around nine missions with varying configurations of deployment zone and objective markers this can lead to a lot of complexity. Within a given table configuration, exactly how much space is available for the various objectives?
Objective Markers
Every matched game in Warhammer 40k uses objective markers, which are 40 mm (1.57″) diameter circles that have a 3″ range of contention. This means that the total circle is an obnoxious 7.57″ in diameter, and has an area of 45 in². For a standard game board that translates to each objective taking up 1.7% of the available area. That means the five or six objectives in a standard Strike Force mission are the most valuable 8.5% to 10.2% of the board. This is particularly true when you take into account the prevalence of objective markers in secondary objectives. 39 secondary objectives across the various factions use objective markers to some extent. Of those, nine require the player to focus on markers that are outside of a single (friendly or opponent) deployment zone, one is specific to no-man’s land, and 12 require some kind of effort that can only be performed once per marker.

Center of the Battlefield
Another key area of contention is the center of the battlefield, often forming a 12″ diameter circle that has an area of 113.1 in² and takes up 4.3% of the battlefield. Seven secondary objectives include this area, and the center also happens to include an objective marker in six out of the nine War Zone Nephilim Strike Force Missions. This means that the center of the battlefield can often be highly contested area, especially given that most battlefield setups include a lot of blocking terrain the middle of the board.
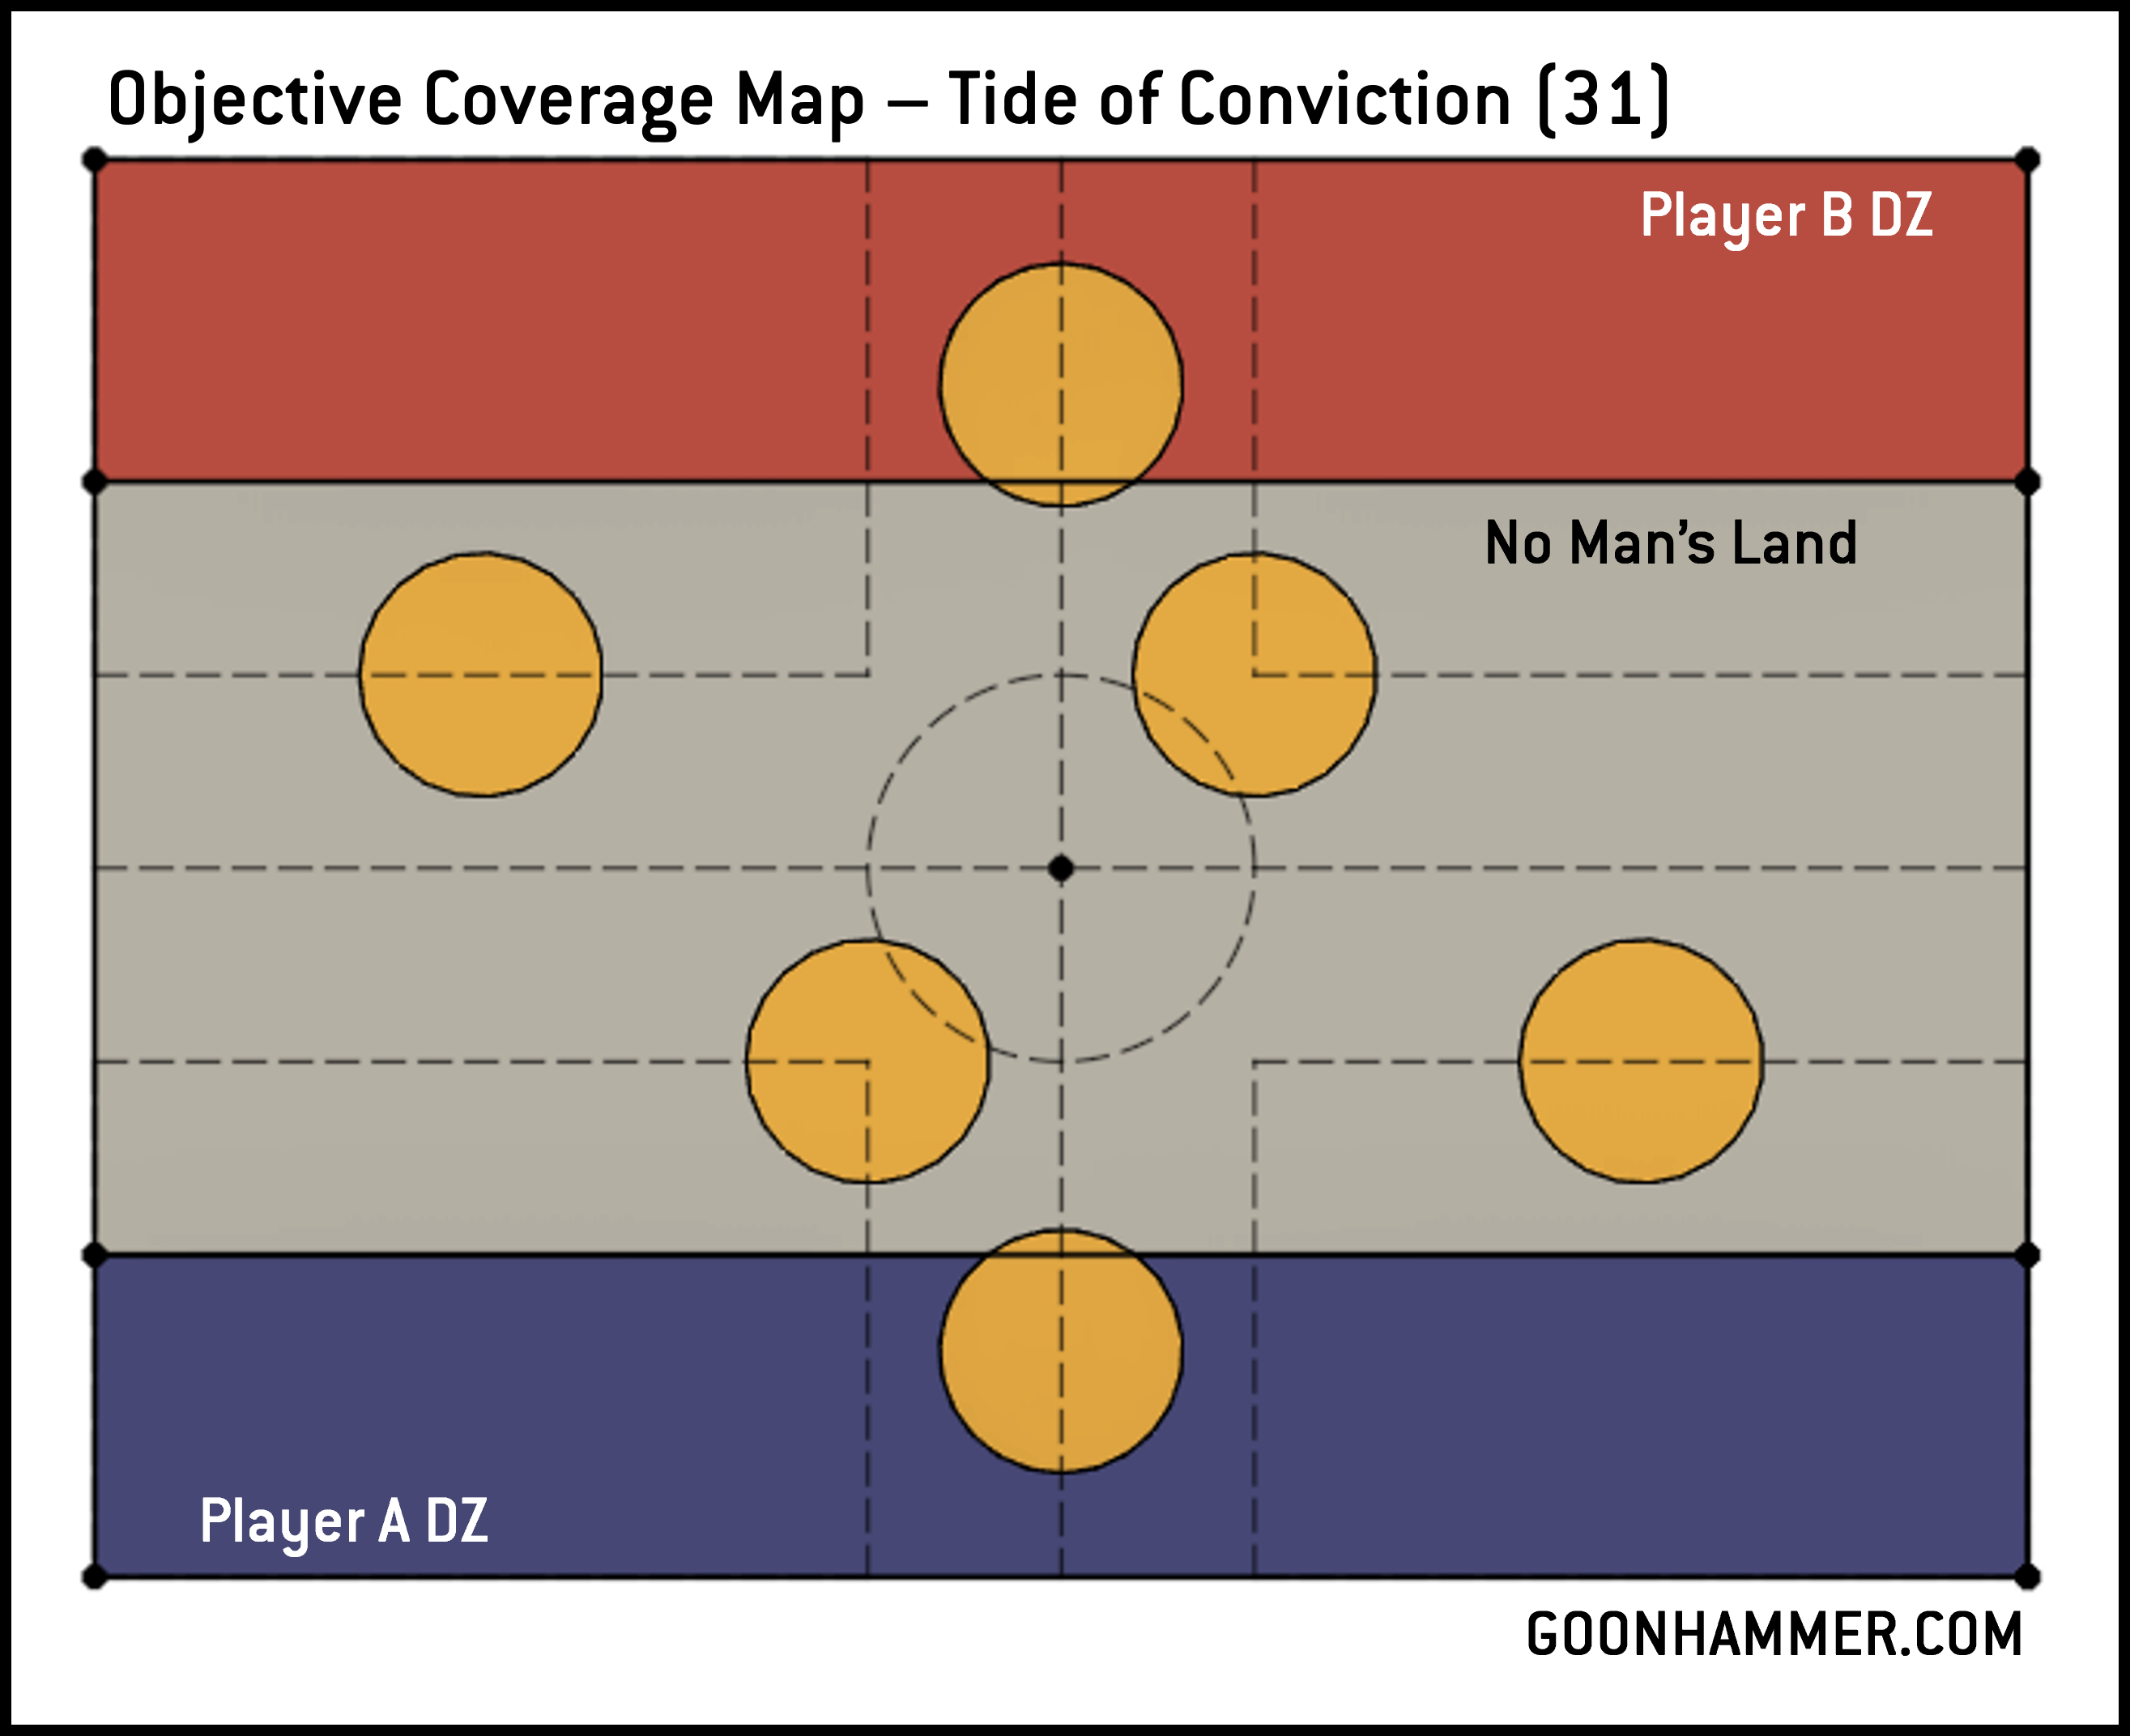
Tide of Conviction is particularly interesting, because although there is no objective marker in the center of the battlefield it’s possible to be within 3″ of two of them and still be wholly within 6″ of the center of the board. It’s easy to see this through simple geometry. The objective markers are located 6″ away from the centerline of each table edge, meaning that the distance from the center of the marker to the center of the battlefield is 8.49″. The radius of the 40mm marker plus the 3″ zone is 3.79″, meaning that the edge of contention is only 4.70″ from the center. That gives you an entire 1.30″ to work with!
Table Quarters
Seven of the secondary objectives include table quarters to some extent. Unsurprisingly a table quarter takes up 25% of the available area, and there are two secondary objectives (Herd the Prey for Drukhari and Purge the Vermin for Necrons) which award points for not having enemy units wholly within each table quarter each turn. Two secondary objectives (Boots on the Ground for Astra Militarum and Reality Rebels for Chaos Daemons) exclude being within 6″ of the center of the battlefield, which means the space in each available quarter is 23.9% of the board.
Four secondary objectives (including two universal ones: Engage on All Fronts and Retrieve Nephilim Data) are also quarter based, but with the catch that you cannot be within 6″ of any other table quarter. In addition to completely excluding any opportunities to engage in the center of the battlefield, this also severely reduces the amount of available area for each quarter. Instead of being a 22″x30″ region that takes up 25% of the board, each “quarter” is now a 16″ x 24″ segment with an area that’s only 384 in². This means that the available area for each quarter is reduced to 58% of the unconstrained area, and that each quarter zone is only 14.5% of the board.

Deployment Zones
The nine missions for Nephilim share five deployment zone configurations, and 17 secondary objectives incorporate deployment zones (outside the context of objective markers) in some way. 11 of them are about being in one or both zones, 3 have a restriction related to a region within 6″ of a deployment zone, 2 explicitly mention No Man’s Land, and the Space Wolves have a secondary objective called Warrior Pride which requires you to not be in your own deployment zone. The charts below show the available area for the deployment zone, region 6″ outside of a single DZ, and No Man’s Land. There’s also columns for the total available area for the secondary objectives which either require you to be within 6″ of a DZ or at least 6″ away.
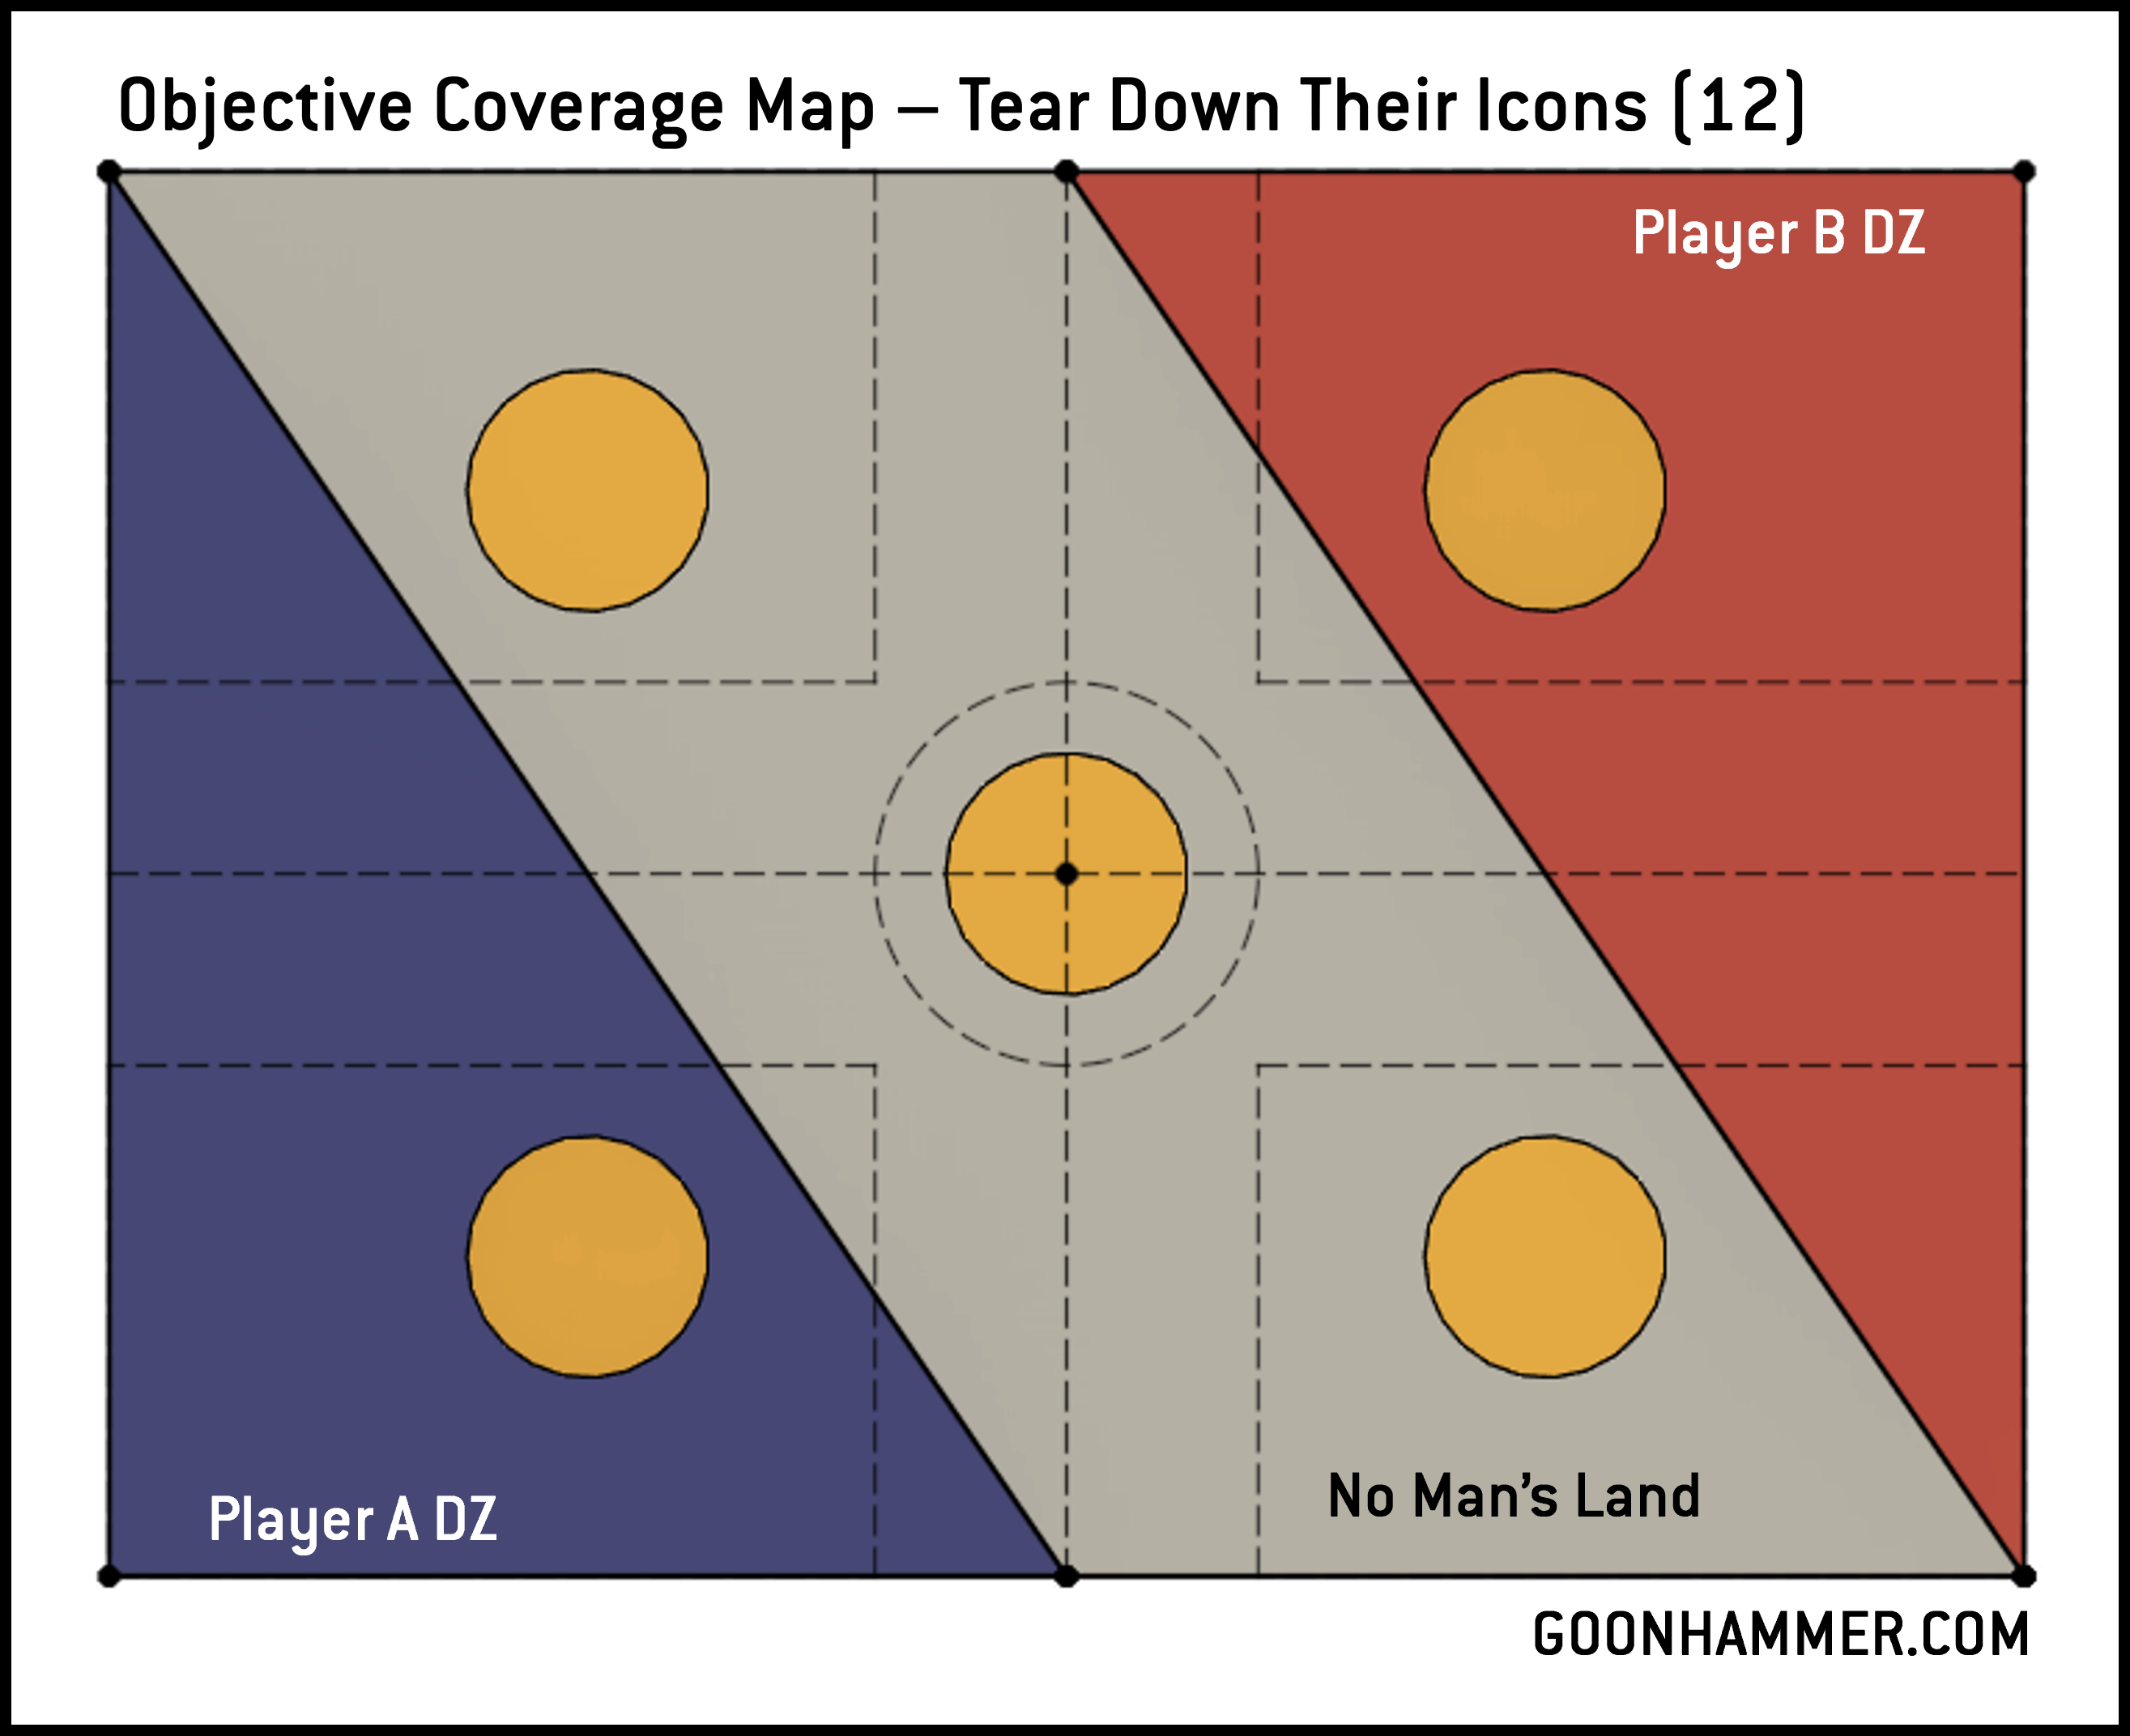
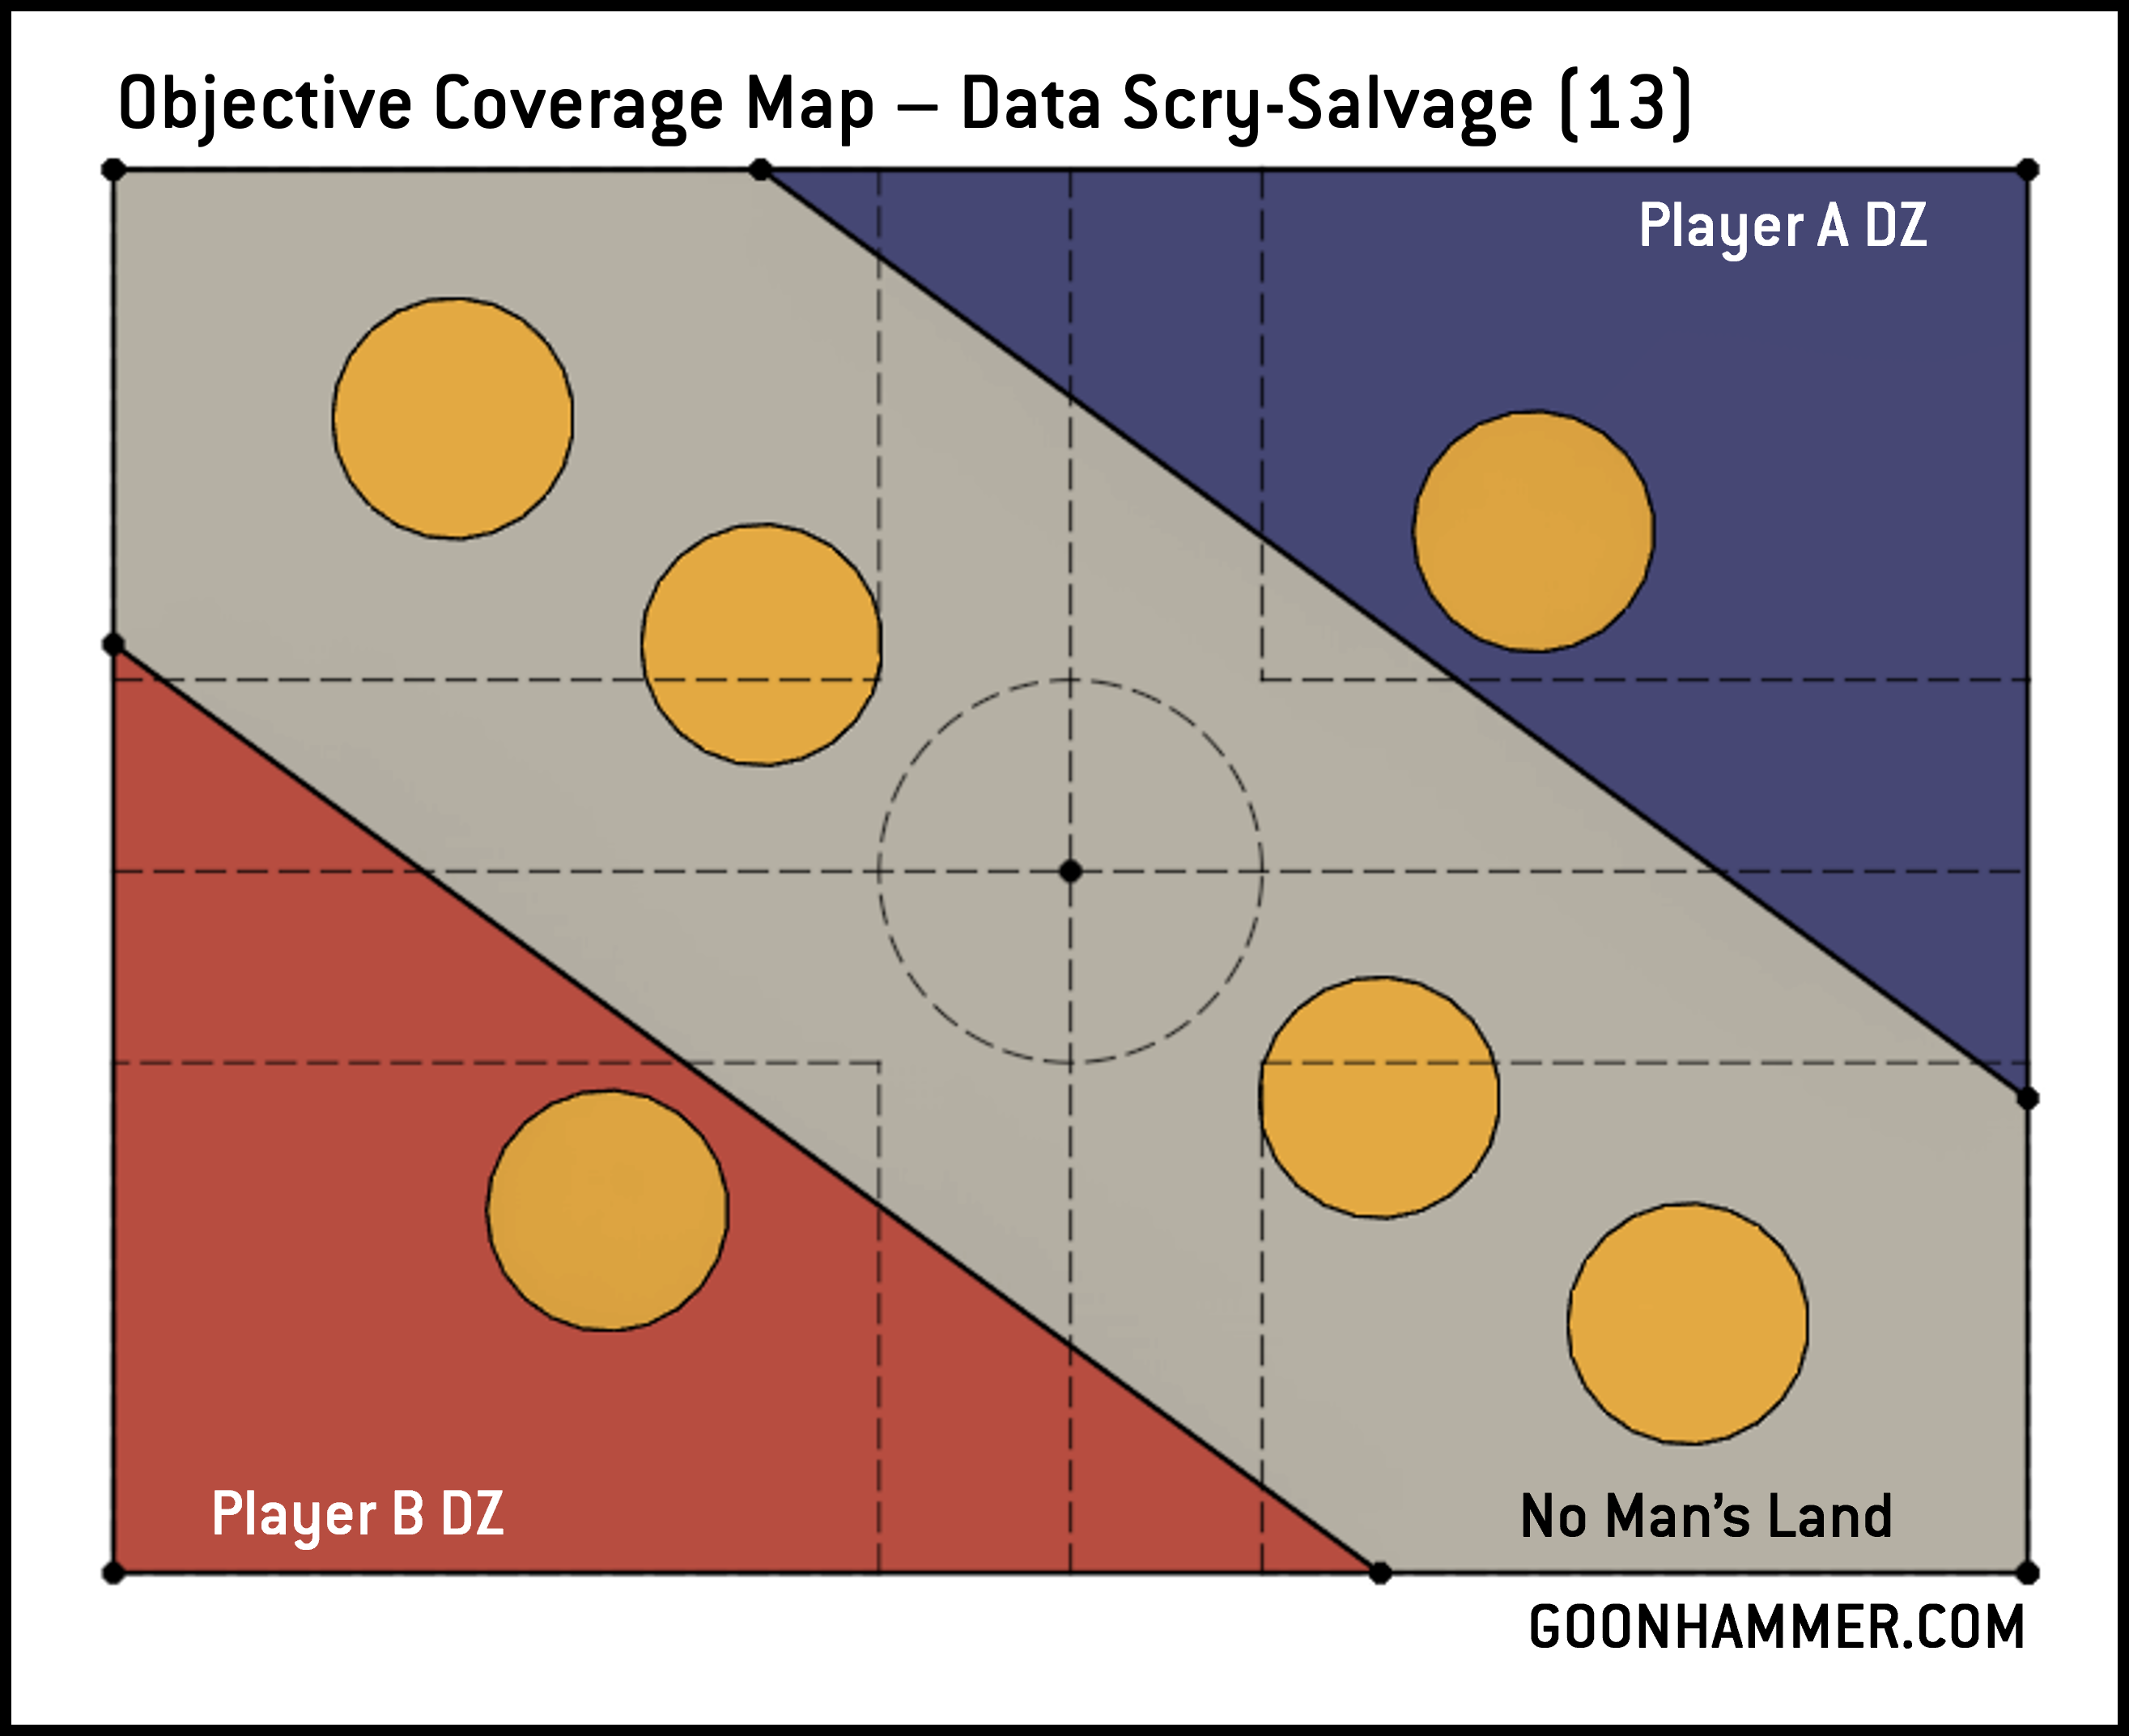
Visual Learning
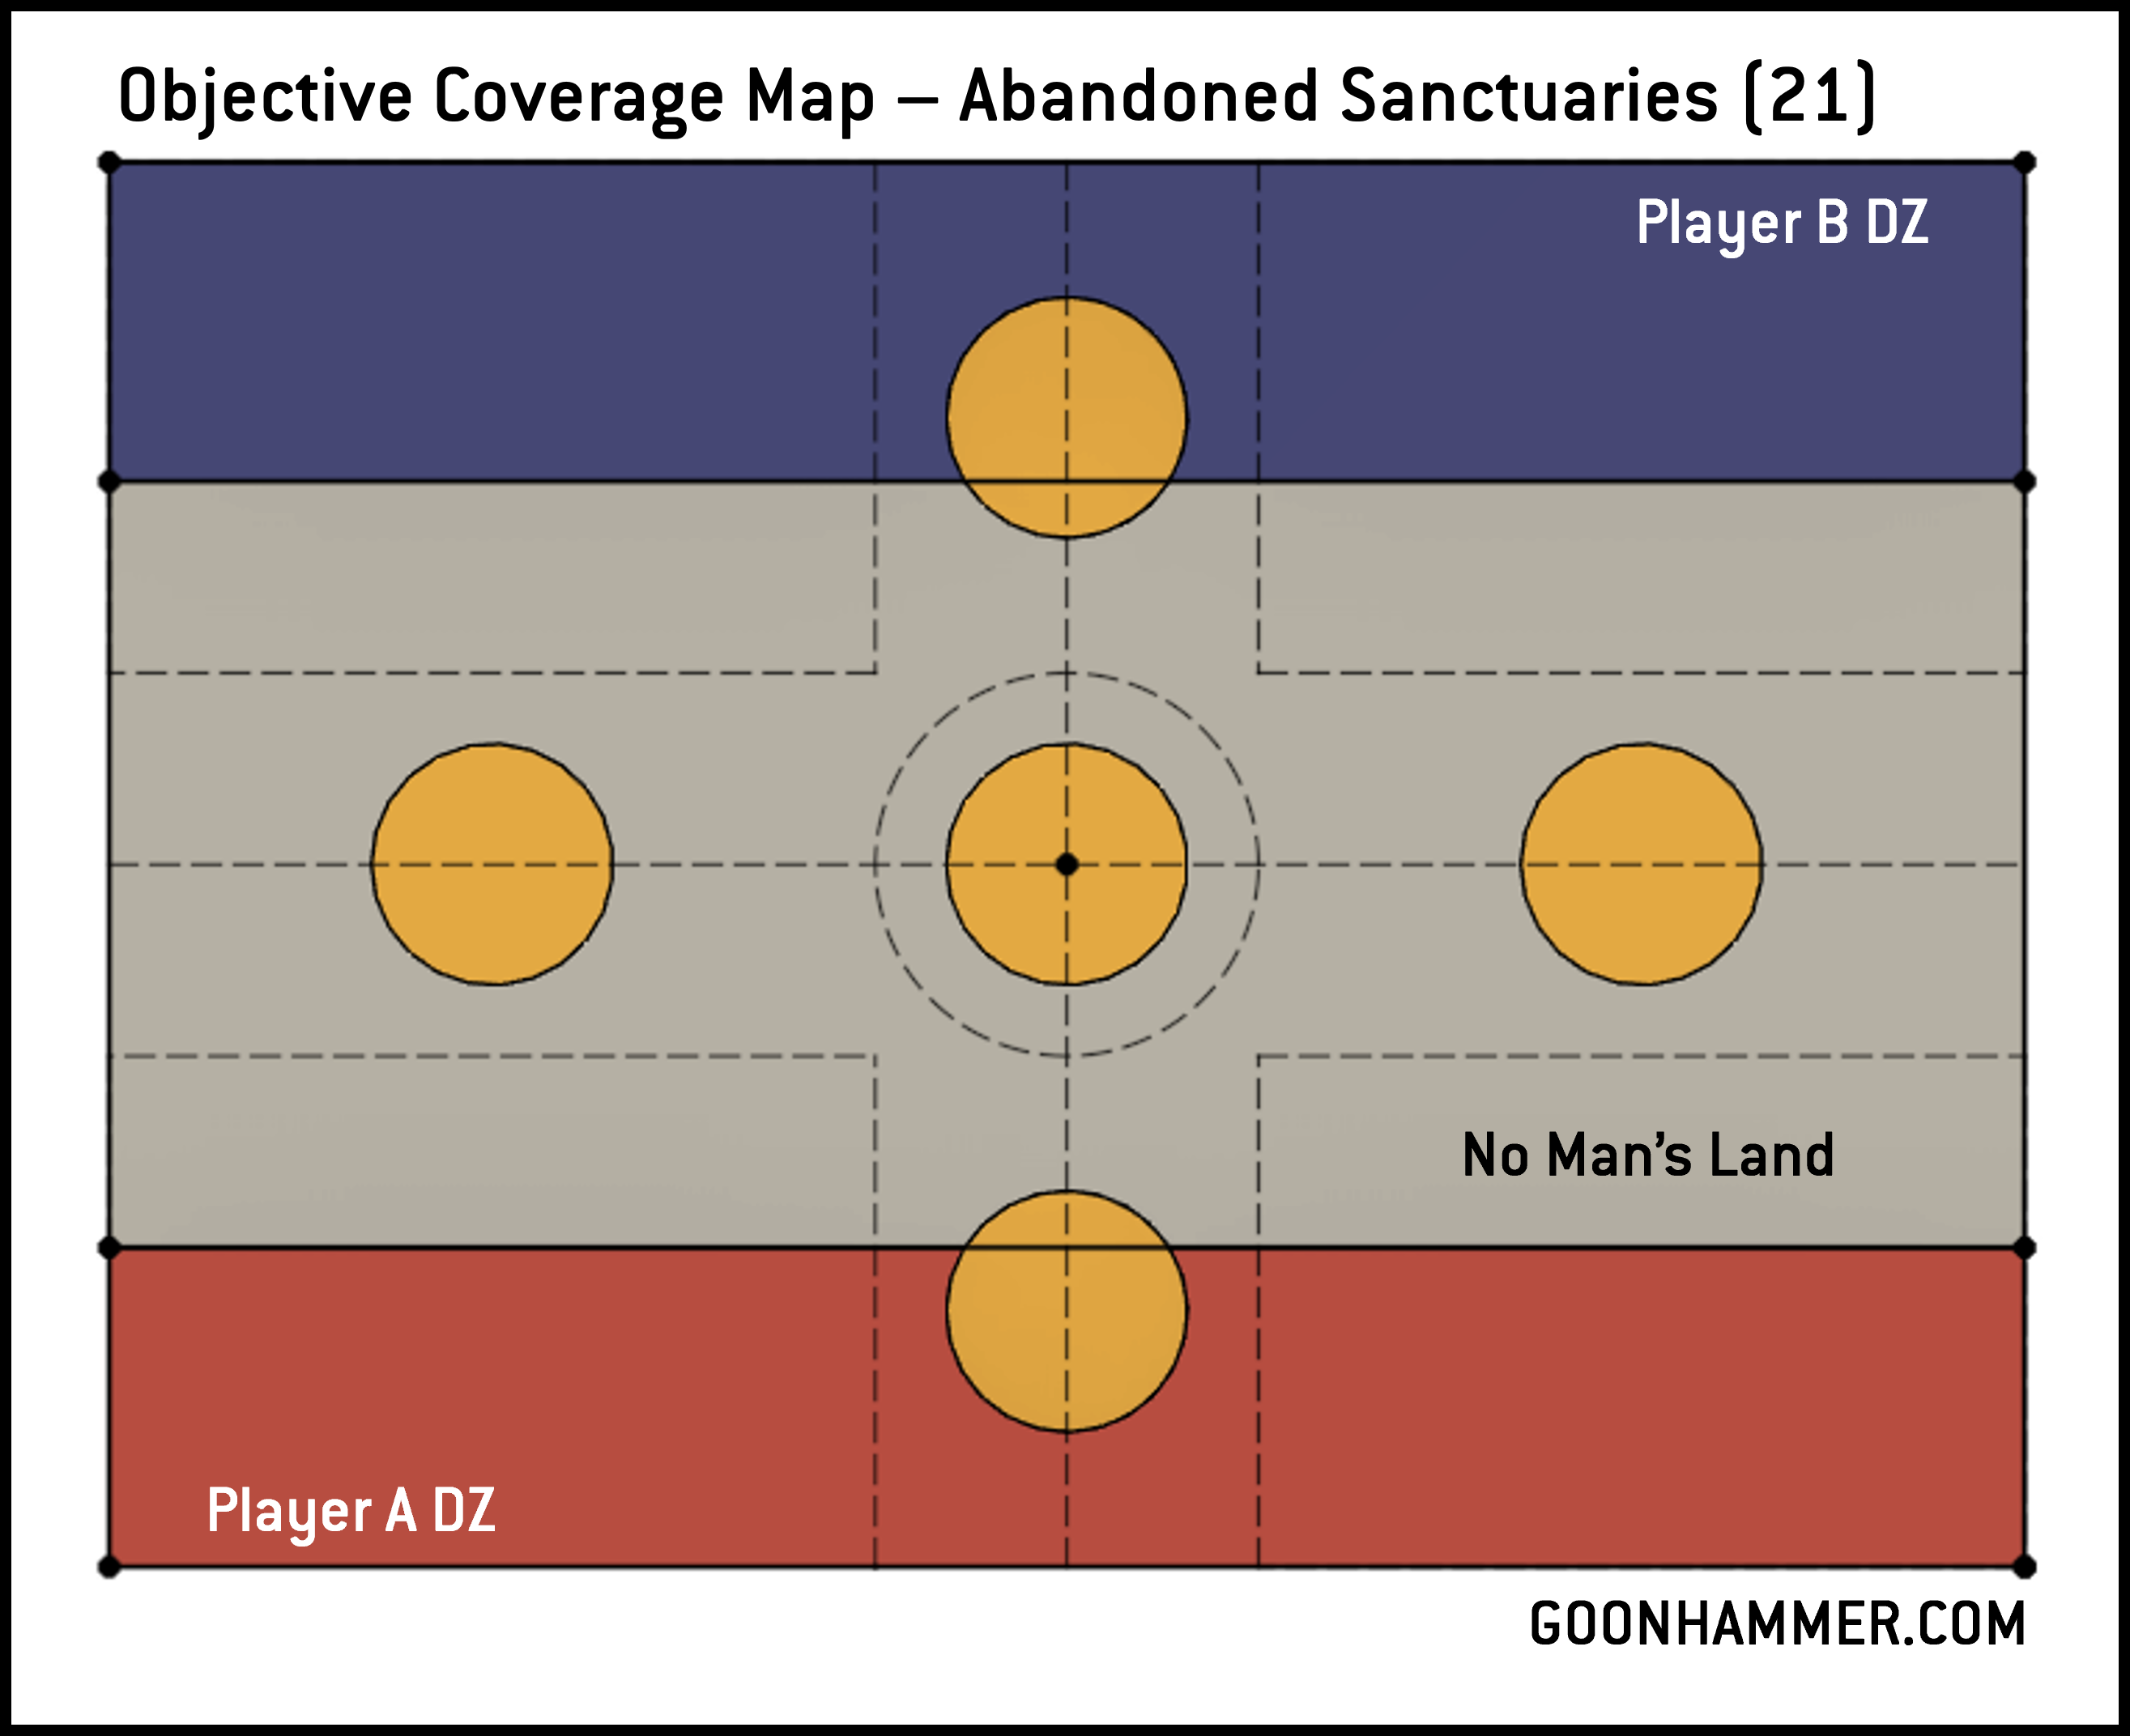
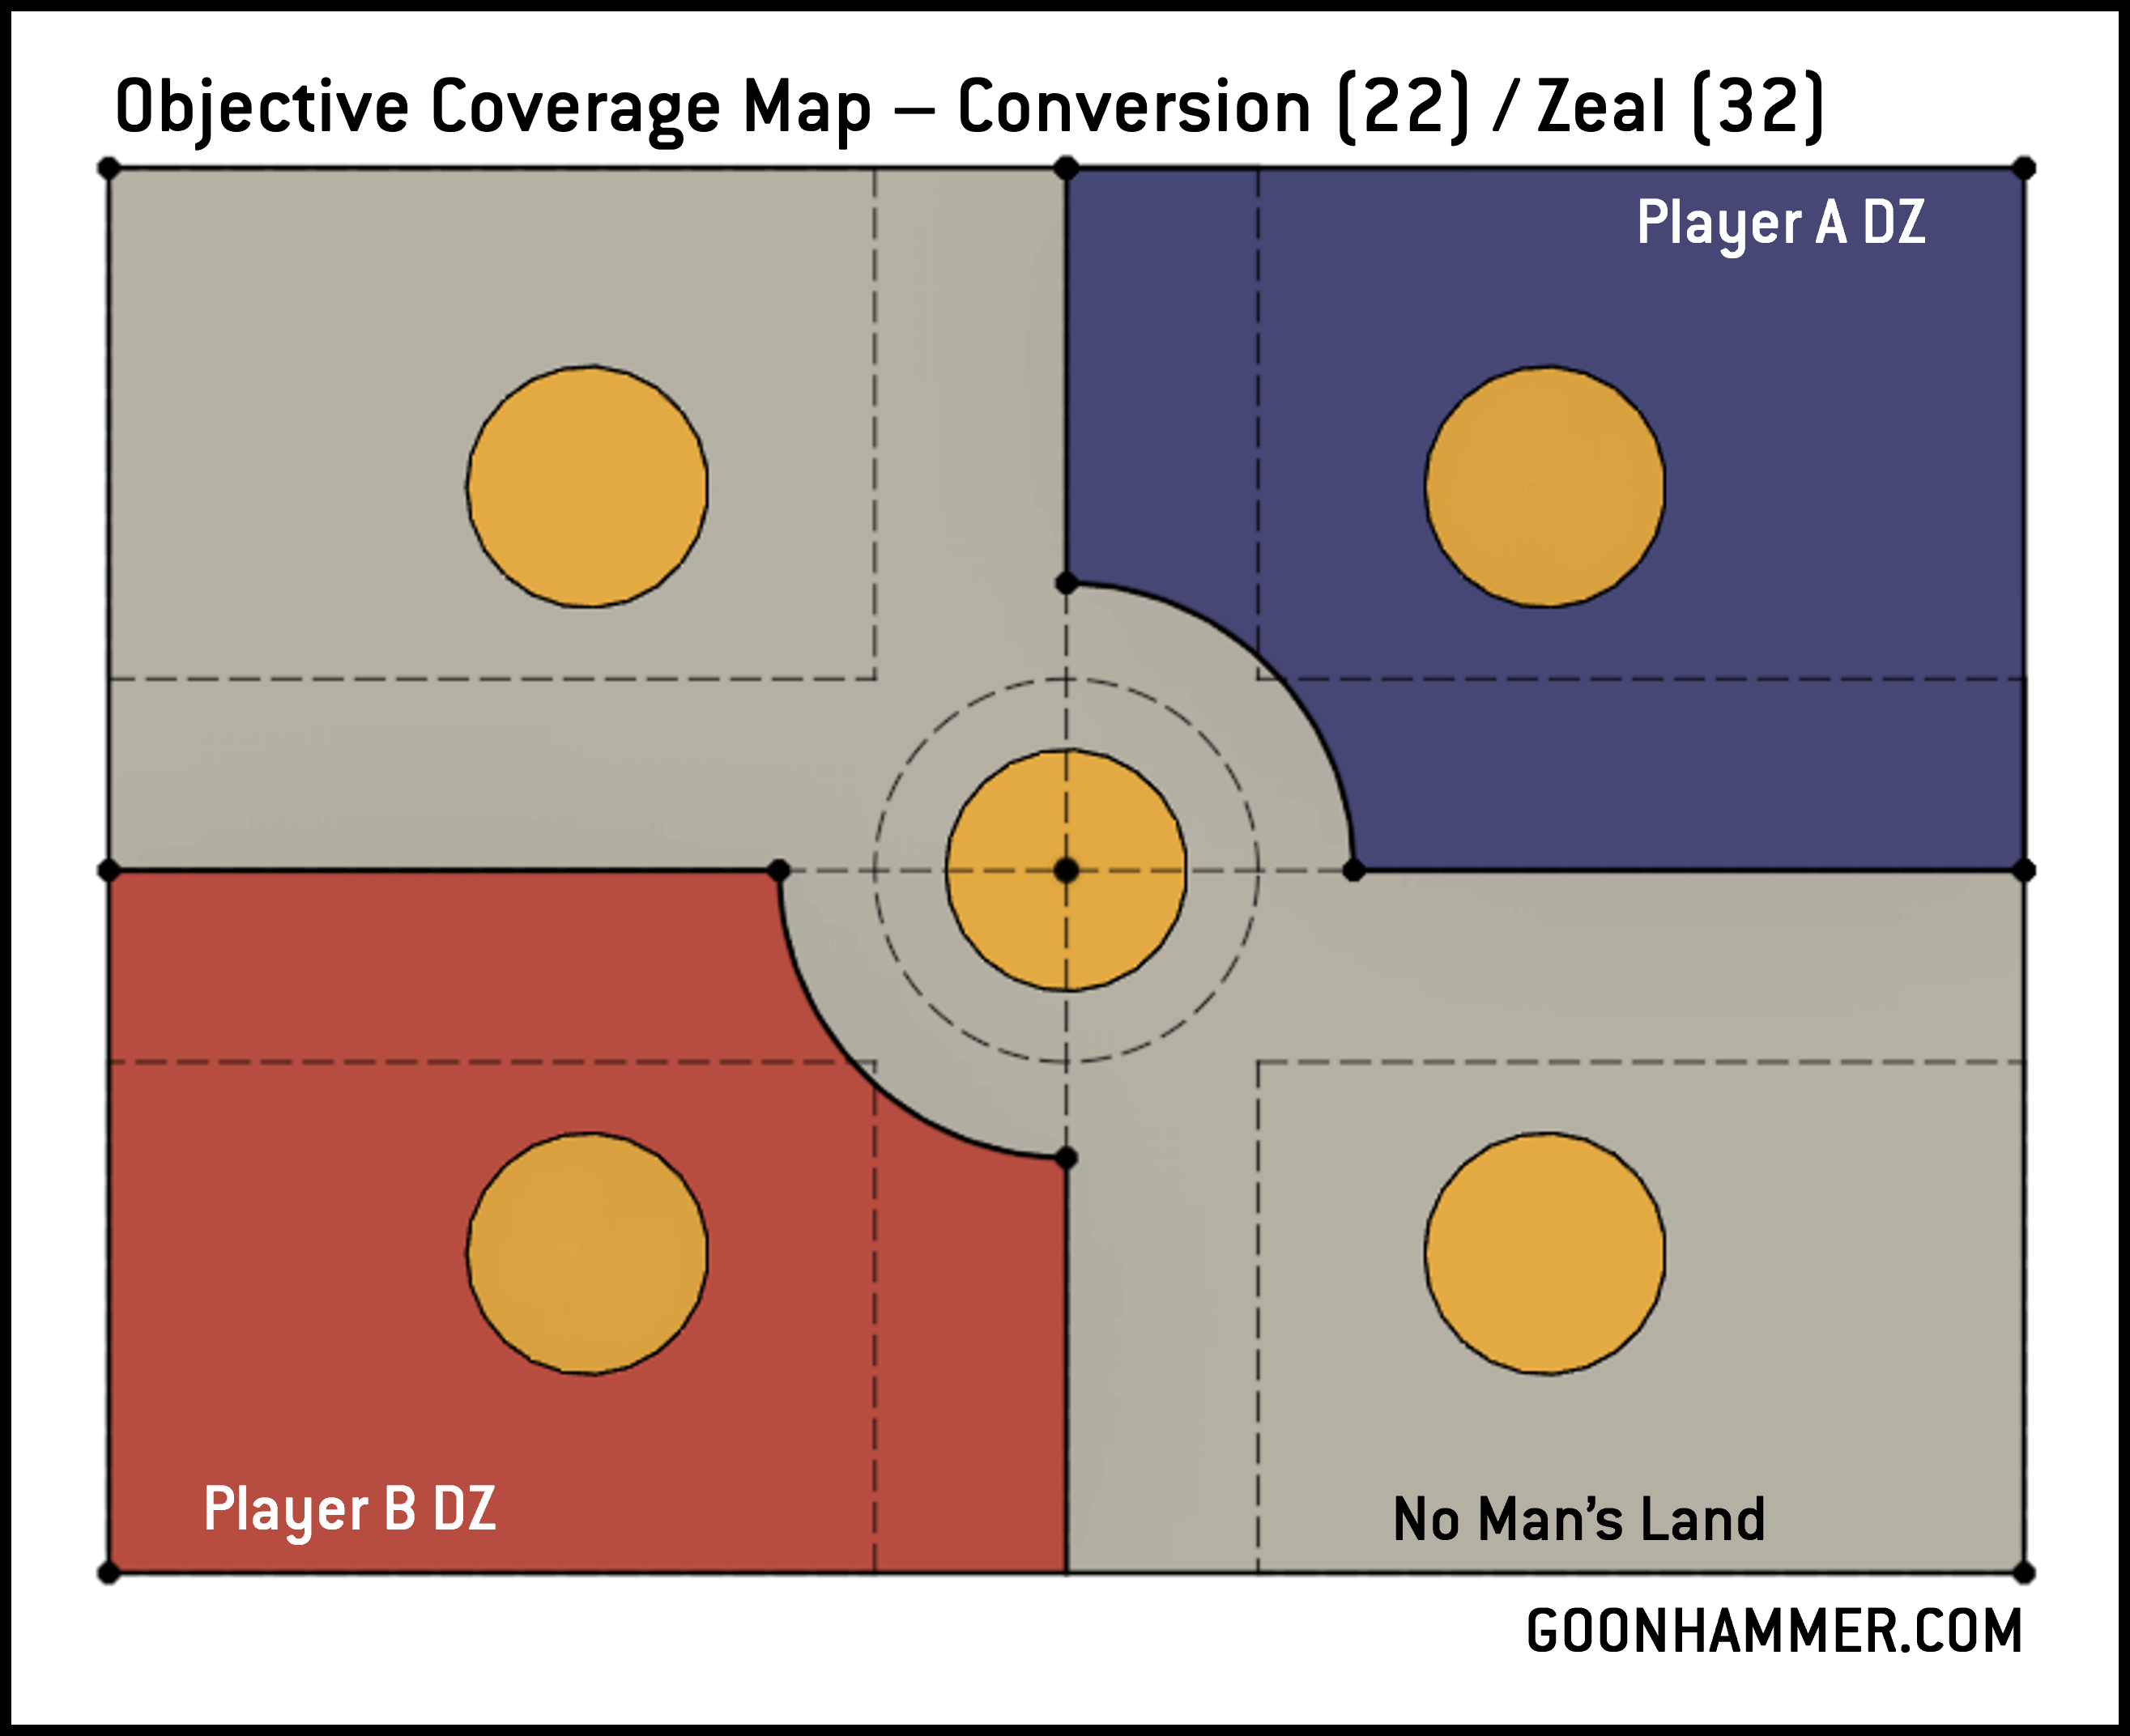
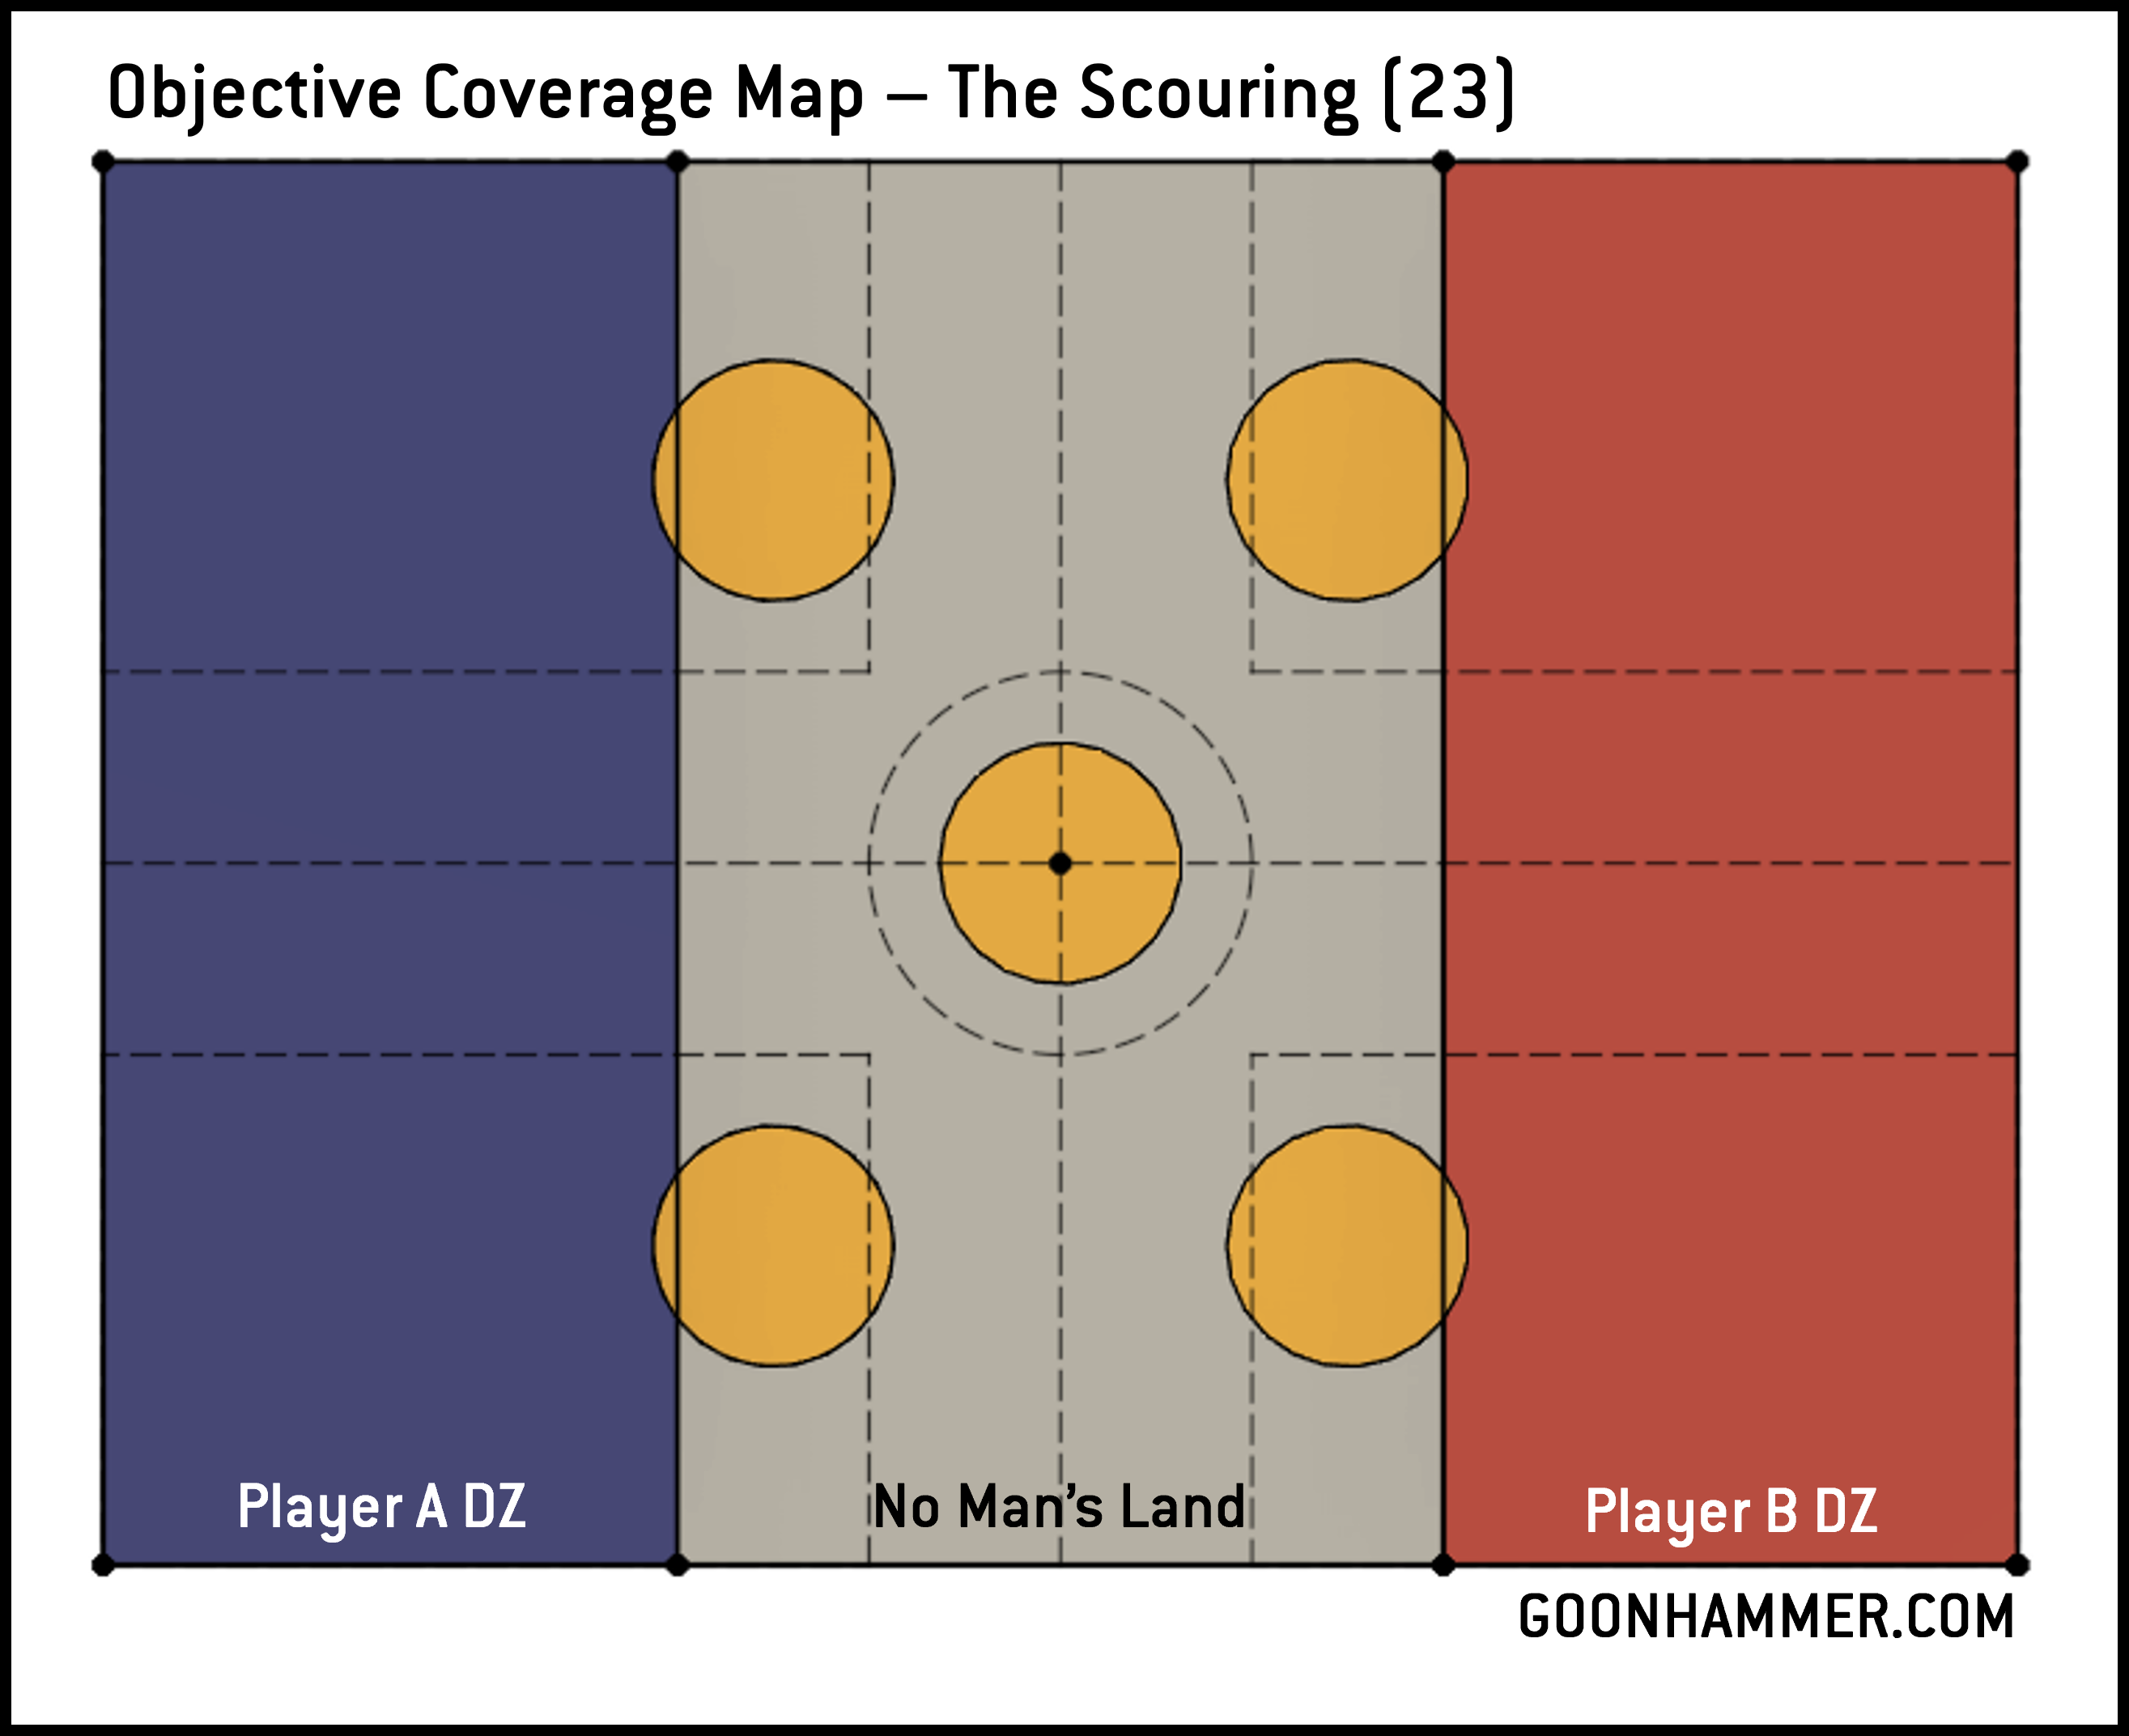
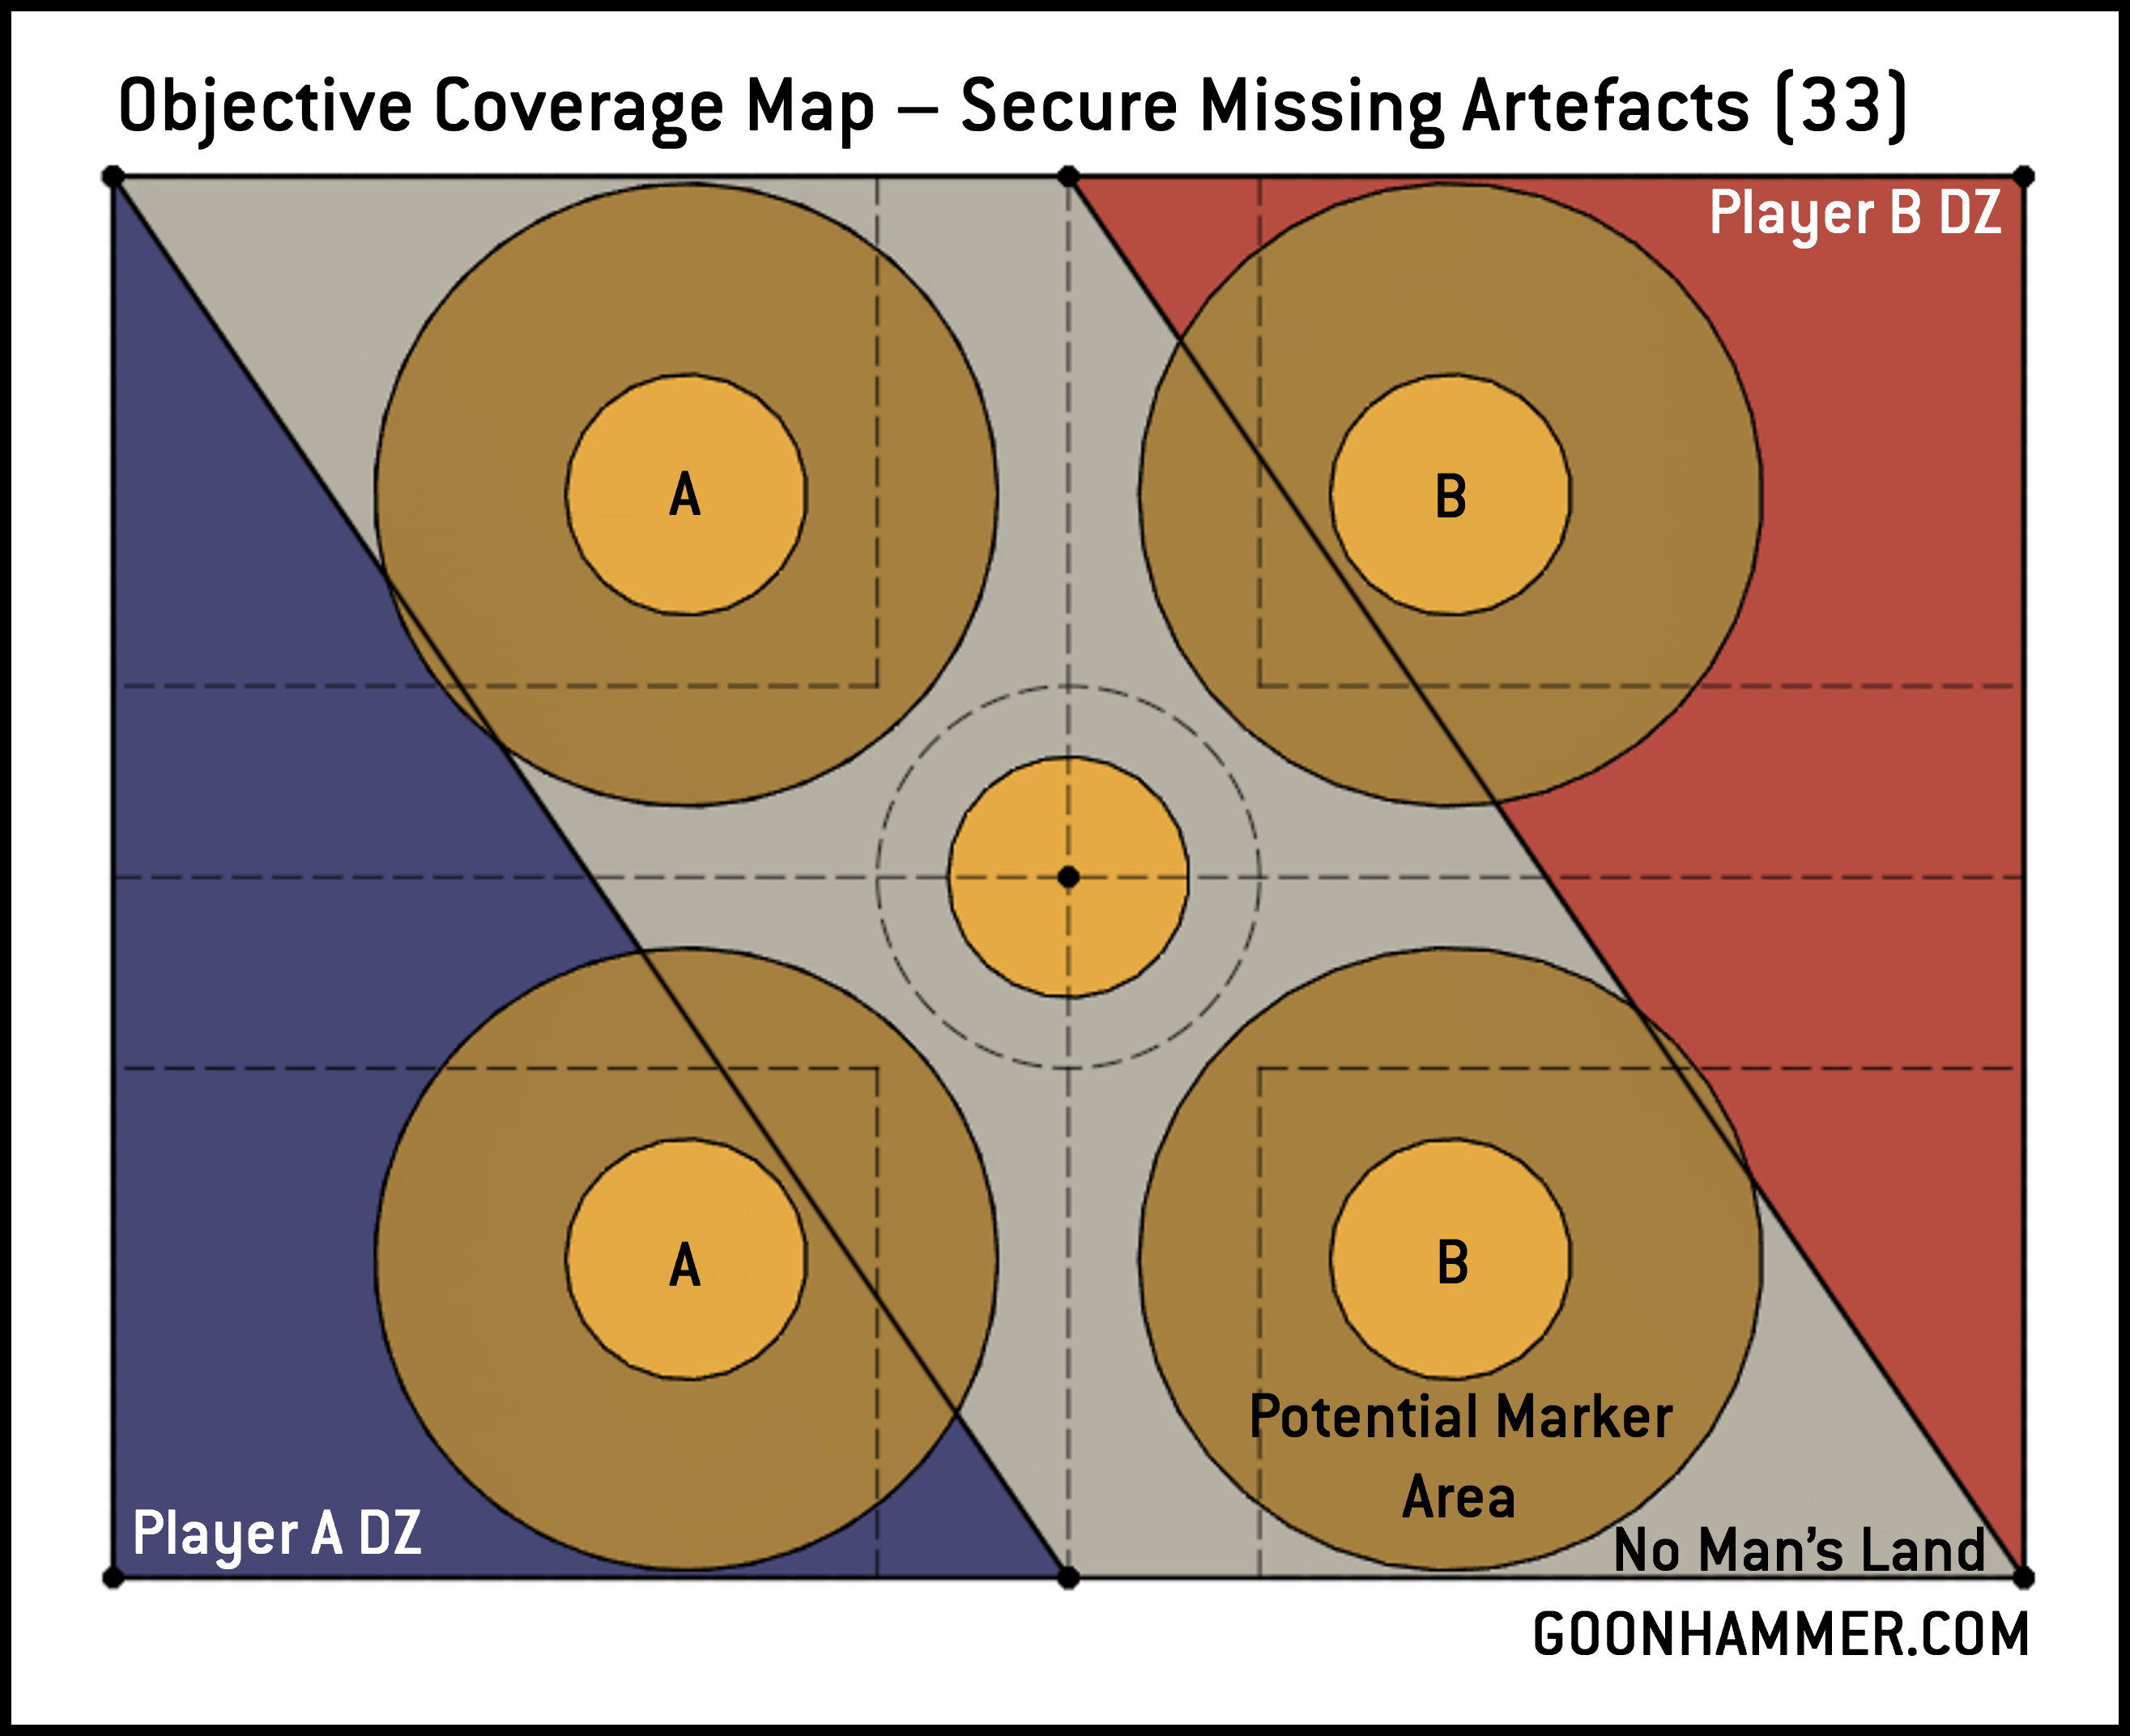
As much as I enjoy raw numbers, sometimes it’s more helpful to have a visual representation of what the various potential regions are for each map. That’s what the maps below are for. They show the configurations for each of the Nephilim Strike Force Missions. The red and blue regions are the deployment zones, the white region is No Man’s Land, and the yellow circles are the objective markers with the control region. The dashed lines show the available areas for central objectives (6″ within the center), as well as table quarters both in terms of the true quarters and objectives with the 6″ exclusion zone.

Wrapping Up
Warhammer 40k can be a pretty obtuse game, especially when you consider matched play and the incredible impact that secondary objectives have on the game. The secondary objectives you choose, along with those your opponent chooses, play a major role in dictating the flow of a game and the viability of success. Hopefully this article provides some insight into how different location-based secondary objectives interact with the board and different missions.
Here are some interesting findings from the images, some of which are courtesy of members of our Patreon Discord.
- Abandoned Sanctuaries is the only map in which it is impossible to contest an objective while wholly within a table quarter and 6″ away from every other quarter.
- Secure Missing Artefacts is incredibly dynamic thanks to the ability to shift an objective marker 6″ horizontally. It’s possible to move all four of the markers such that they can be contested in two zones instead of the zone they’re wholly within at the start.
- The markers wholly in No Man’s Land should be given preference, as the marker can be shifted to allow it to be contested in the deployment zone while the markers wholly within the deployment zone cannot be shifted wholly out of it.
- Should the Attacker reposition a marker located in a deployment zone first, the Defender has a significant advantage in terms of being able to move both of the markers in No Man’s Land to their advantage.
- The actual viability of moving markers will depend on the battlefield configuration, as the marker cannot be moved on or within any Obstacles or Defensible Terrain features.
- Seven of the nine missions (excluding Recover the Relics and Data Scry-Salvage) have an opportunity for a unit that’s wholly within 6″ of the center of the battlefield to contest an objective. Tide of Conviction has the possibility of contesting two.
- Every mission but two has a single objective marker in each deployment zone. The Scouring has two markers that have edges in range of contesting each deployment zone, while Secure Missing Artefacts starts with one marker wholly within each deployment zone but can have a second one shift there.
Thanks for reading! If you have any questions or comments feel free to drop us a note in the Comments below or email us at contact@goonhammer.com. That’s also the best way to suggest topics for future articles.
