
In our Army Showcase series, Goonhammer contributors take a look at the armies we’ve been collecting for years, and the new ones we’ve just finished – what drew us to them, why we keep building and painting, and how they play on the table. This week SRM is talking about his Cursed City set!
The Painter: Campbell “SRM” McLaughlin
The Game: Warhammer Quest: Cursed City
Points: I mean I could total it up if I really wanted to but why
Collecting Since: April 2021
Instagram: crumbsmclumbs
The Past
When the nebulous teasers for this game started dripping out, I got pretty excited. The Bloodborne-style baddies, classic Warhammer-style heroes, and spooky scary skeletons really caught my attention. The promise of a dungeon-crawling RPG-style boardgame also interested me, as it would mean I could likely pressgang some of my local non-ham friends into playing. I still had an unbuilt Blackstone Fortress box lying around in a closet, and I promised myself that if I got this set, I’d have to stay on target until it was completed. To keep this plan effective though, I had to set a certain rhythm to the painting and prevent burnout.
First up, I set a general pattern of character, character, mob, repeat. Characters obviously refer to the heroes and the main antagonists. Mobs were generally your typical batches of villains or objectives, but I was able to lump a few more specialized models for some batch painting by having shared tones, so the Vyrkos Blood-born and the Vargskyr for instance. I also earmarked certain characters as rewards for units that seemed a bit more arduous, or for characters I was less excited about. By staggering things this way, it meant I wasn’t going to blow through all the heroes and eat all my dessert right away, burning out before getting to the less exciting models like the bat swarms or objectives.
Secondly, I had to set some repeatable techniques here. I wanted everything to be distinct from GW’s scheme, and I wanted to really give myself space to play with each character. Generally, all my heroes share the same techniques for leather and metallics while giving me free reign over the rest, while my villains all stick to a pretty consistent palette with the same cloth, metallic, and skin colors generally repeated throughout. Finally, everything was tied together with the same basing techniques, which always go a long way towards uniting disparate models. Anyway with all that aside, let’s get to talking the actual models!
The Present
First up, the heroes! I’d say 4 of these models were my favorite model in the set as I painted them, and I only found one to be a less than great experience. They’re really remarkable in just how goddamn good and distinctive they are. I started with what I thought was my favorite hero, then worked my way down. If you want to see how I painted these heroes, check out our recent How to Paint Everything: The Heroes of Cursed City article.
Jelsen Darrock just oozes that old-school Warhammer Fantasy Witch Hunter vibe, so I went forward and tried to replicate that scheme as closely as I could. In the process of doing so, I also made him look like Vash the Stampede, so that’s cool I guess. I knocked him out in a day or two, and found a phenomena that would repeat time and time again with this set: the model almost painted itself! The difference in textures and detail was always just enough to keep things interesting without being overwhelming or tiresome. Very little of the model was hard to access, so getting into every nook and cranny was pretty easy, and before I knew it, my first model was done!

To try and convince my wife to play, I figured I’d follow Darrock up with her favorite model – Quelthas Quailthis Quesadilla Qulathis the Exile. Continuing the classic Warhammer Fantasy feel, I went with a scheme reminiscent of the old 5th edition Woof Elves scheme. The biggest challenge with her was the antlers, which for the most part I’m pretty thrilled with. I wish I skipped the final highlight since it’s a little stark, but I’m chuffed with the blend I got on there. You’ll also likely notice that the wood and brown leather is painted the same way as Jelsen Darrock’s. Keep an eye out for more of these repeated colors and textures!
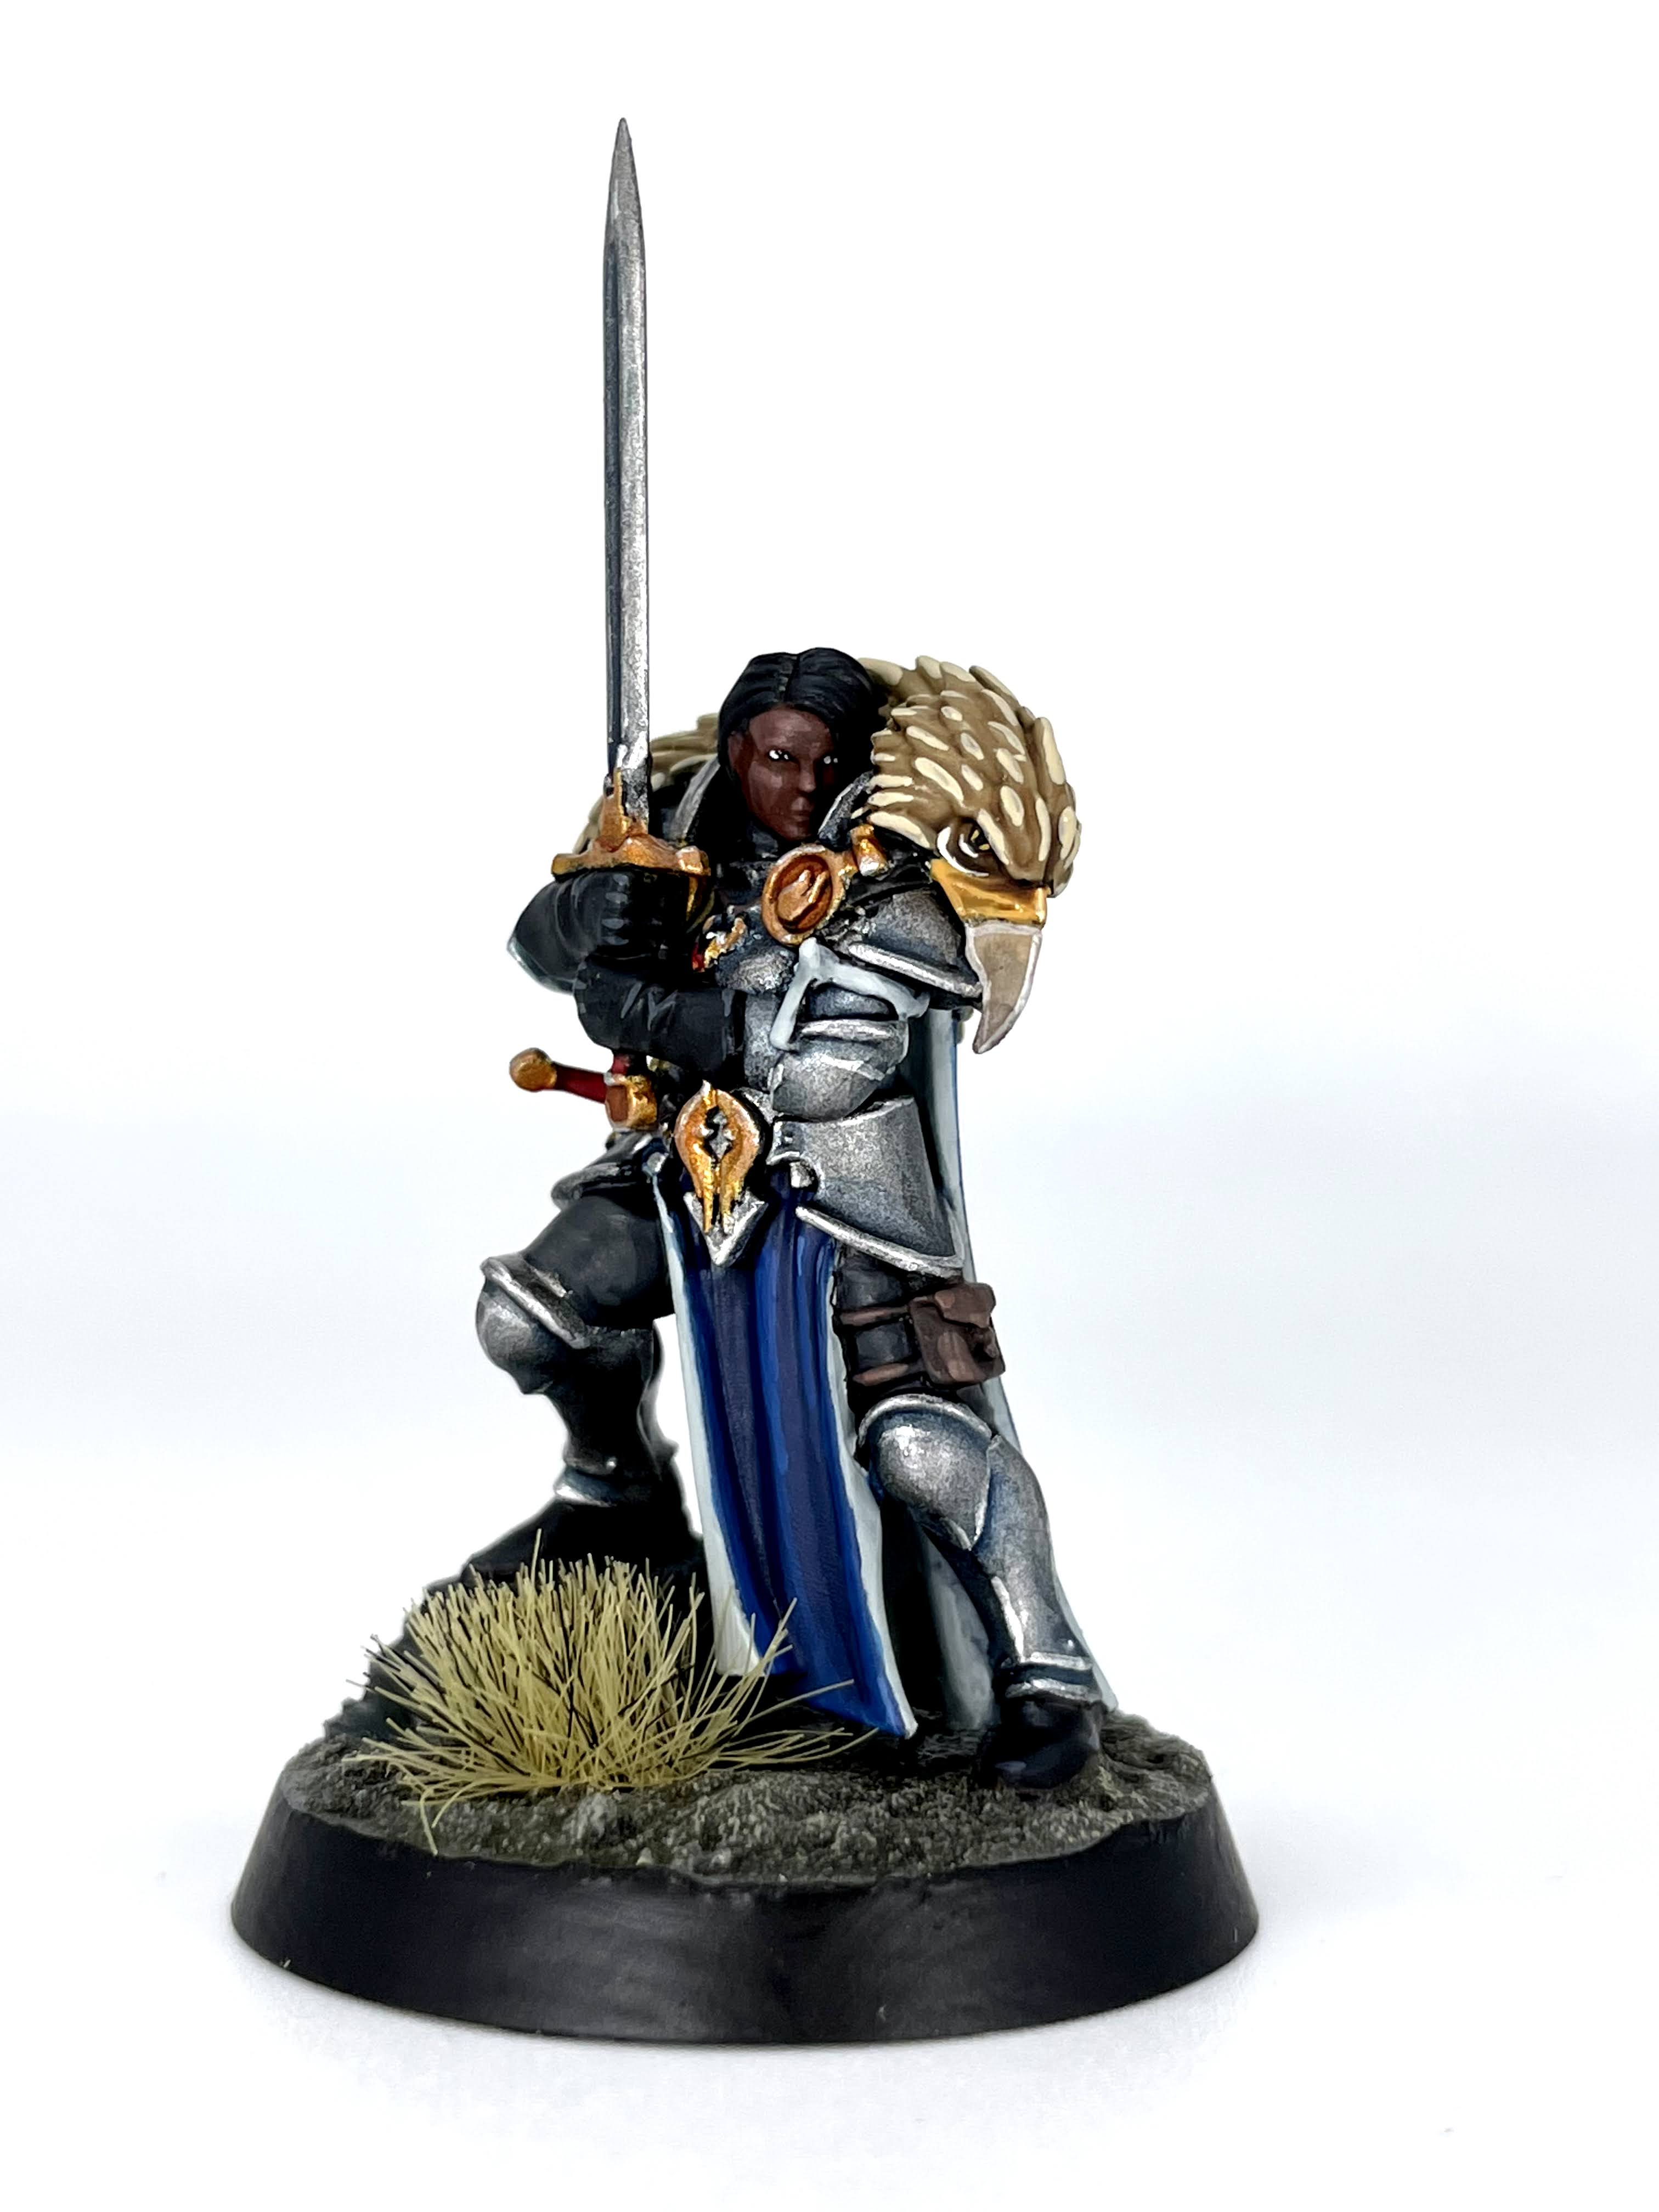
Emelda Braskov was next on the list, and she was my second favorite model in the set. I don’t mean like, in a silver medal way, but that she became my favorite model as I painted her. This would keep happening! I love me some platemail, and I was heavily inspired by the Footmen from Warcraft II, by way of the old Grey Knights scheme from 3rd edition. I got to dip into my precious Guilliman Blue glaze and go for a brighter metal than I used on Darrock, befitting her role as a sort of paladin-type. Warming her up with the gryph pelt was pretty important, as it’s otherwise a pretty cool palette. I hope this aesthetic gets leveraged somewhere else in Age of Sigmar. I know it’s a kind of generic “knight in shining armor” look as opposed to the art deco Stormcast or pike and shotte/Landsknecht stylings of the Empire/Freeguild range, but it really appeals to me.
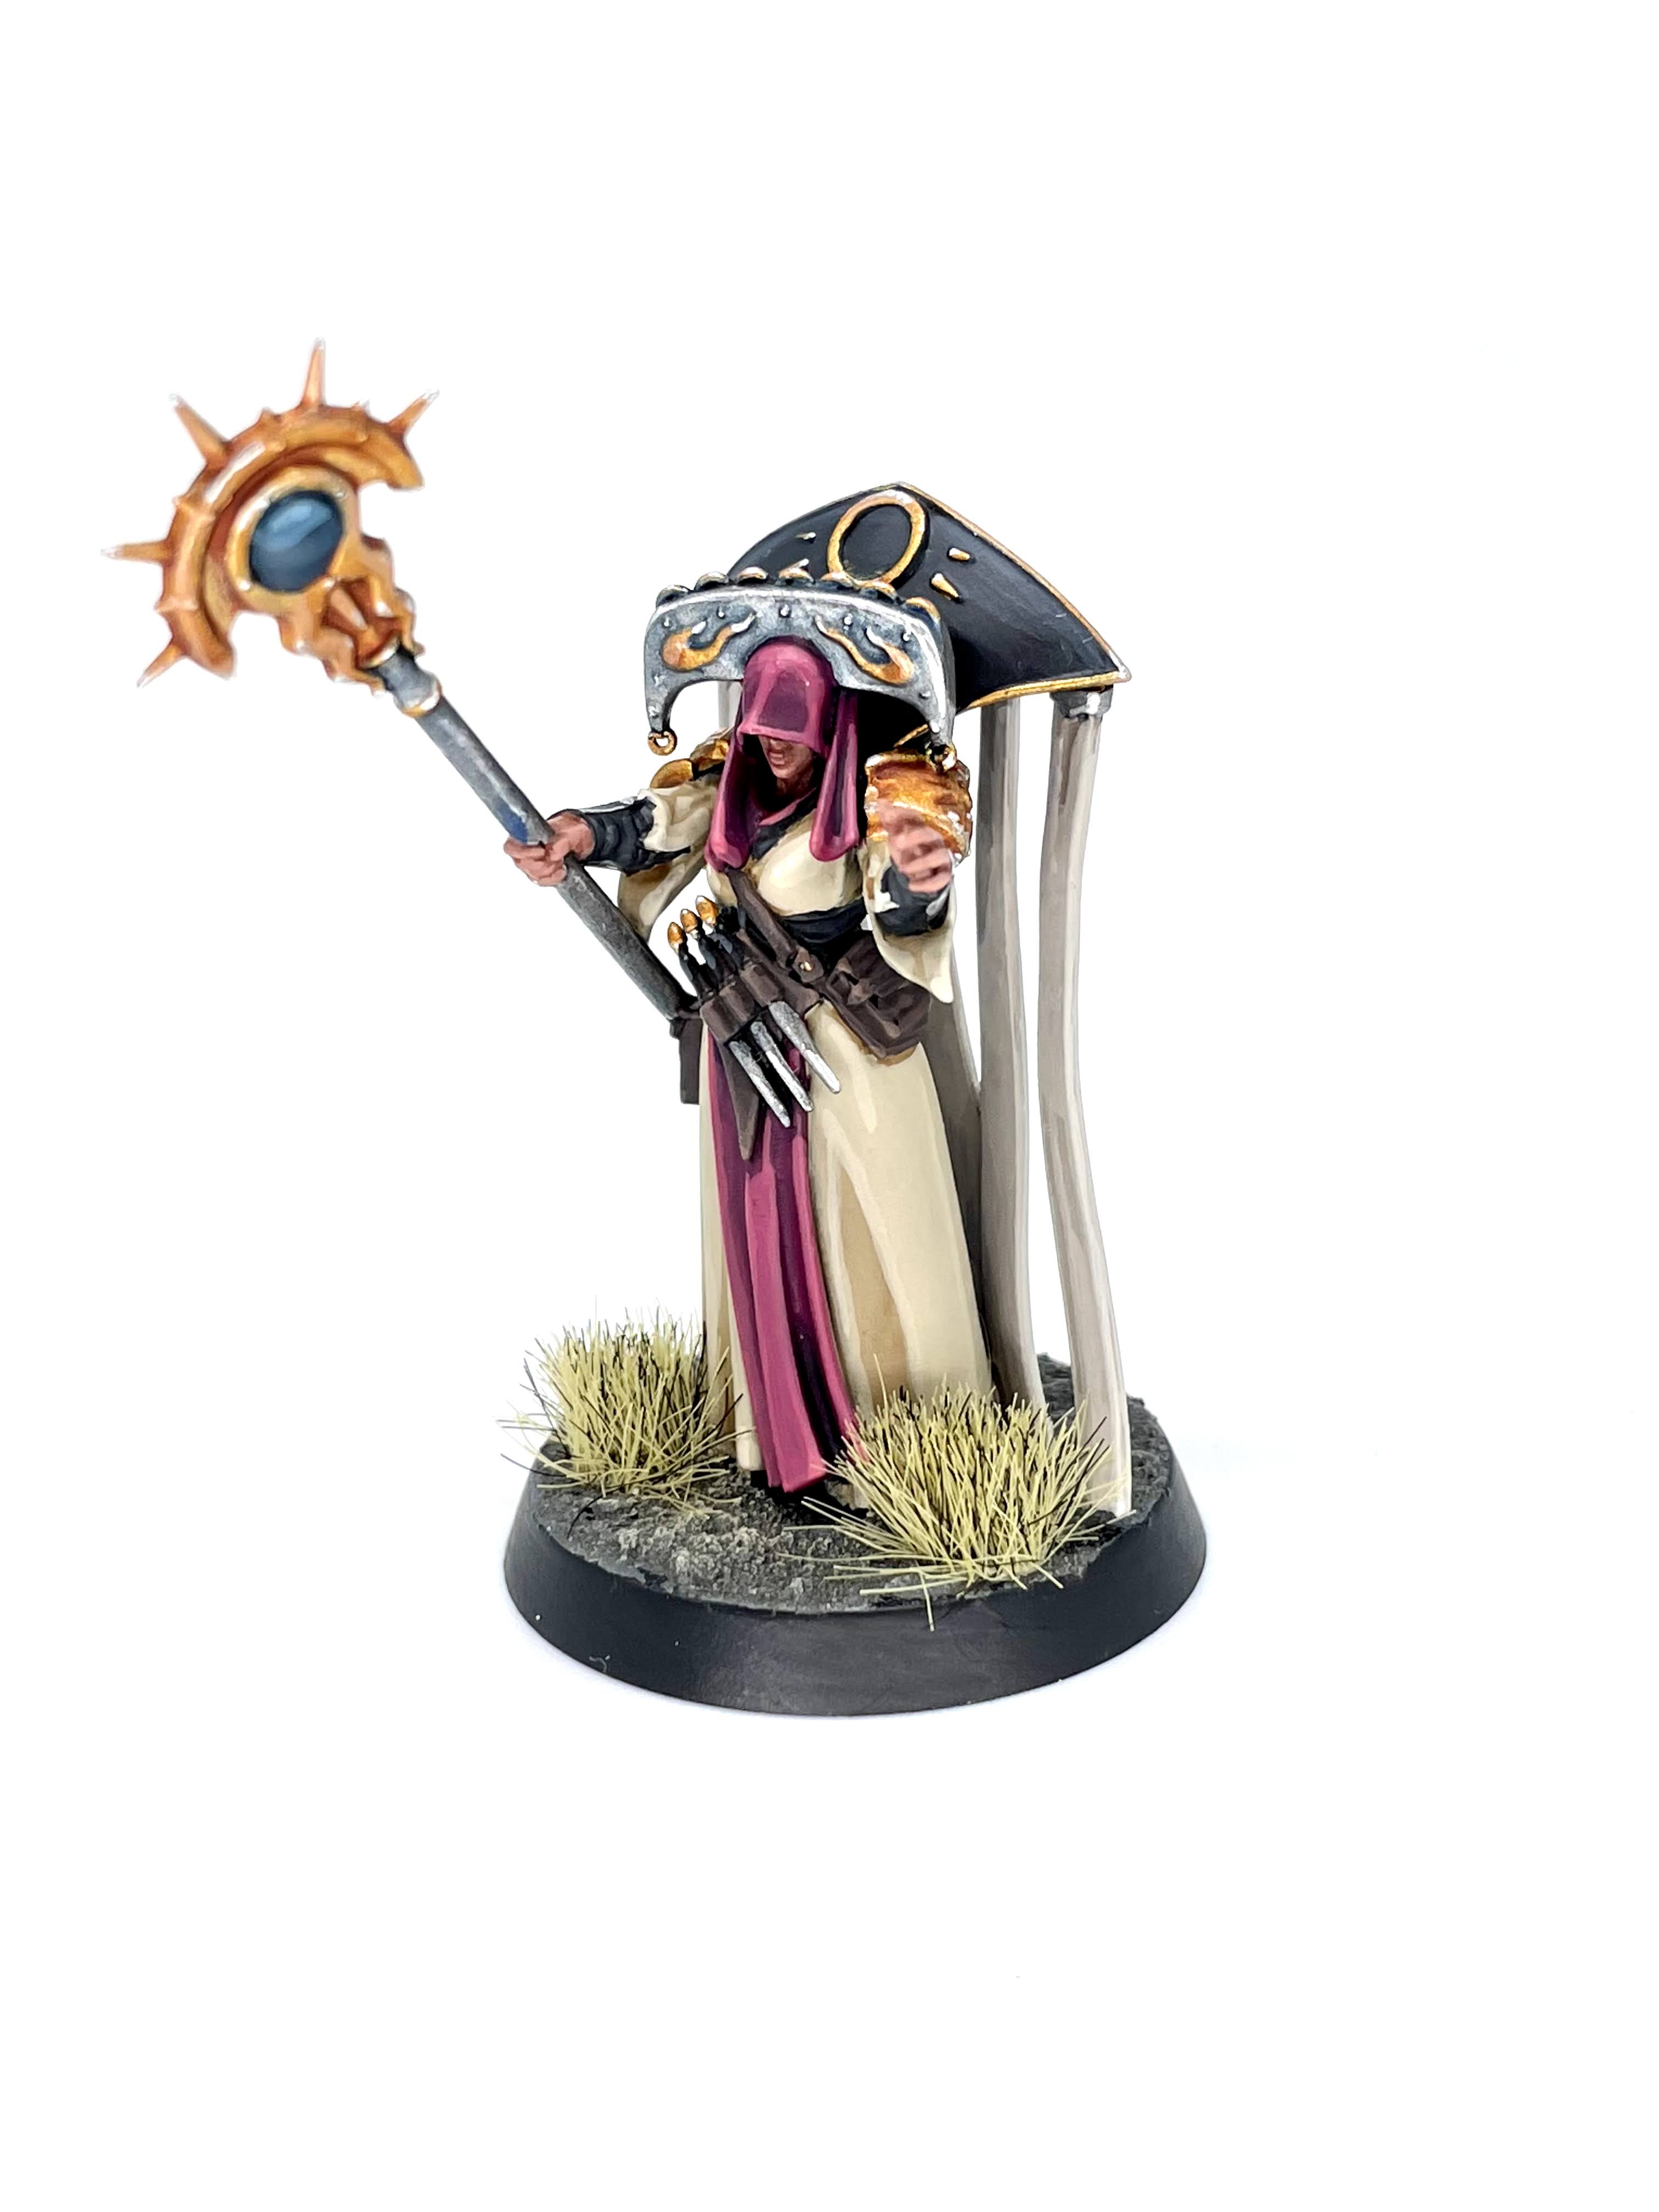
Ol’ Glimscry here was one of my less preferred models in the box, and knocking him out was pretty dang easy. I used the same bone and wood techniques I used on my skellies (more on that later) and the same purple and magenta as my Escher gang, but pushed a little further to pop more. I don’t have a ton more to say about this guy, but I like him alright and he was a quick paintjob.
Cleona Zeitengale is probably the one hero I genuinely didn’t enjoy painting. I did a very similar pink as I did on Glimscry as an accent and wanted to give her a sort of nun’s habit look with the cream robes, but there just isn’t enough detail in the right places for me on this model. The toilet paper hanging on her collar make painting her back a pain in the butt, and there’s just not enough detail in the fabric to make painting it very fun. Pink and cream are always an appealing color combo though, and I liked that simplicity since it meant I got to get working on models I enjoyed more. Speaking of…
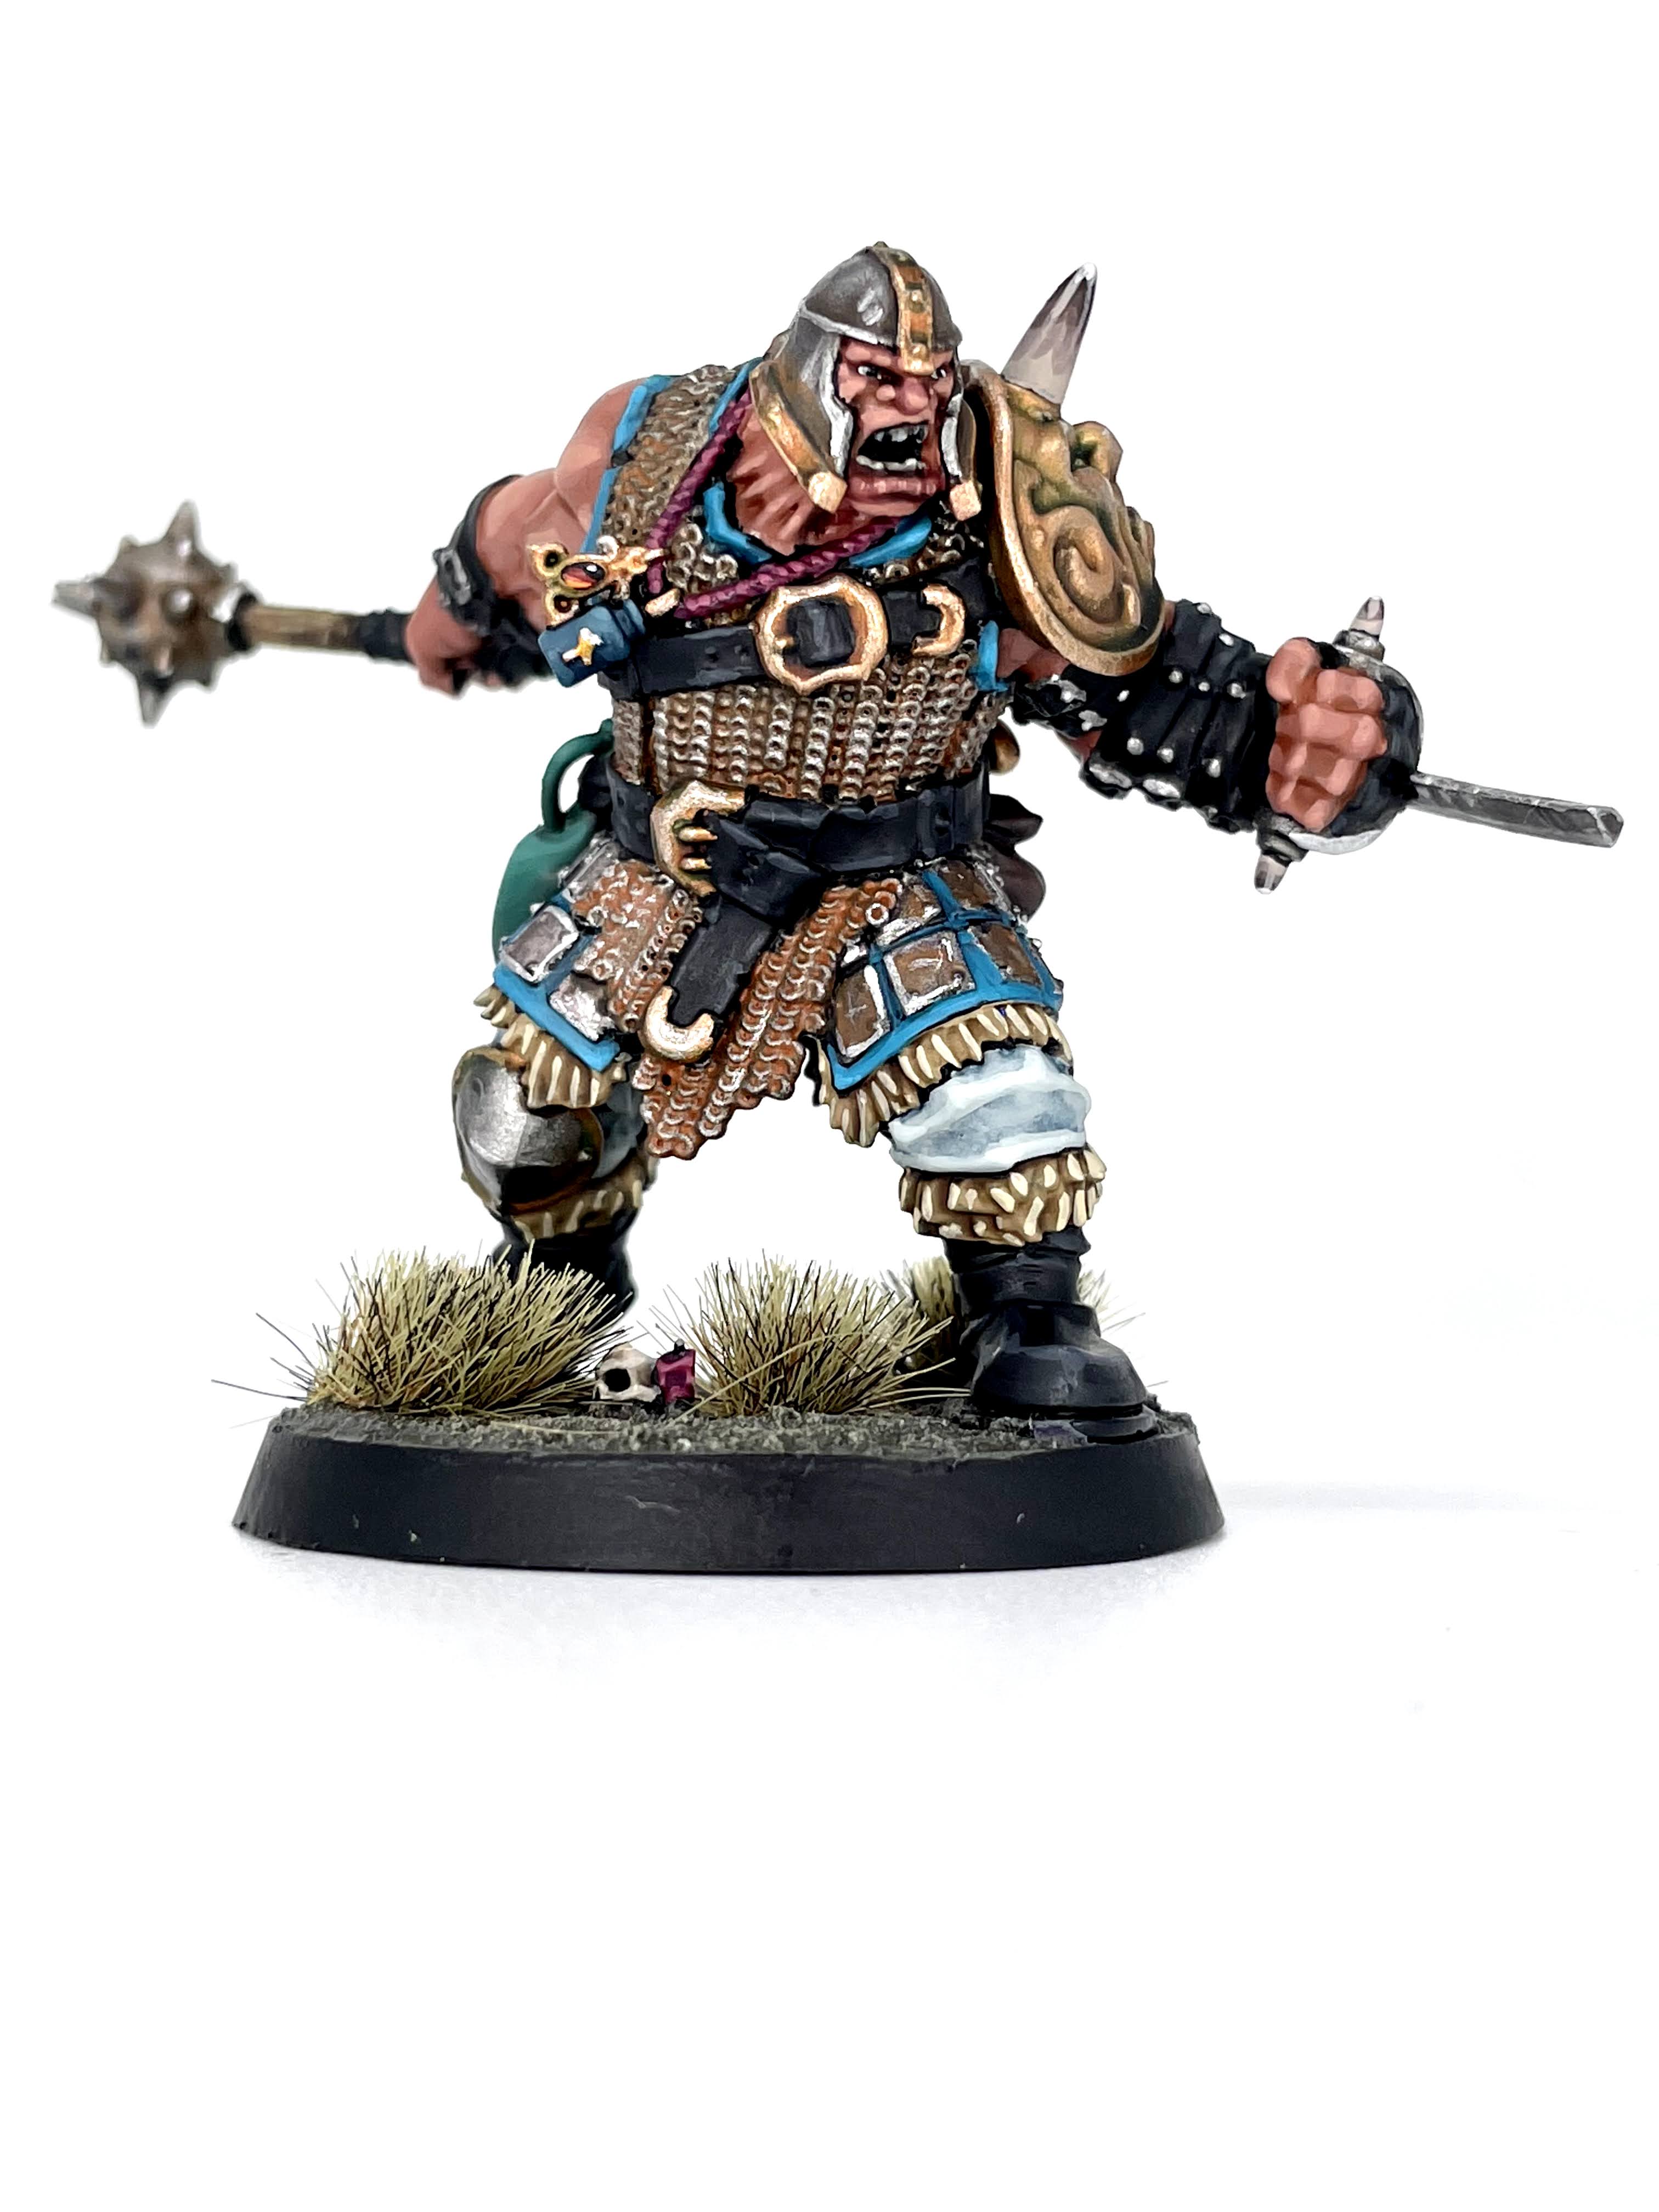
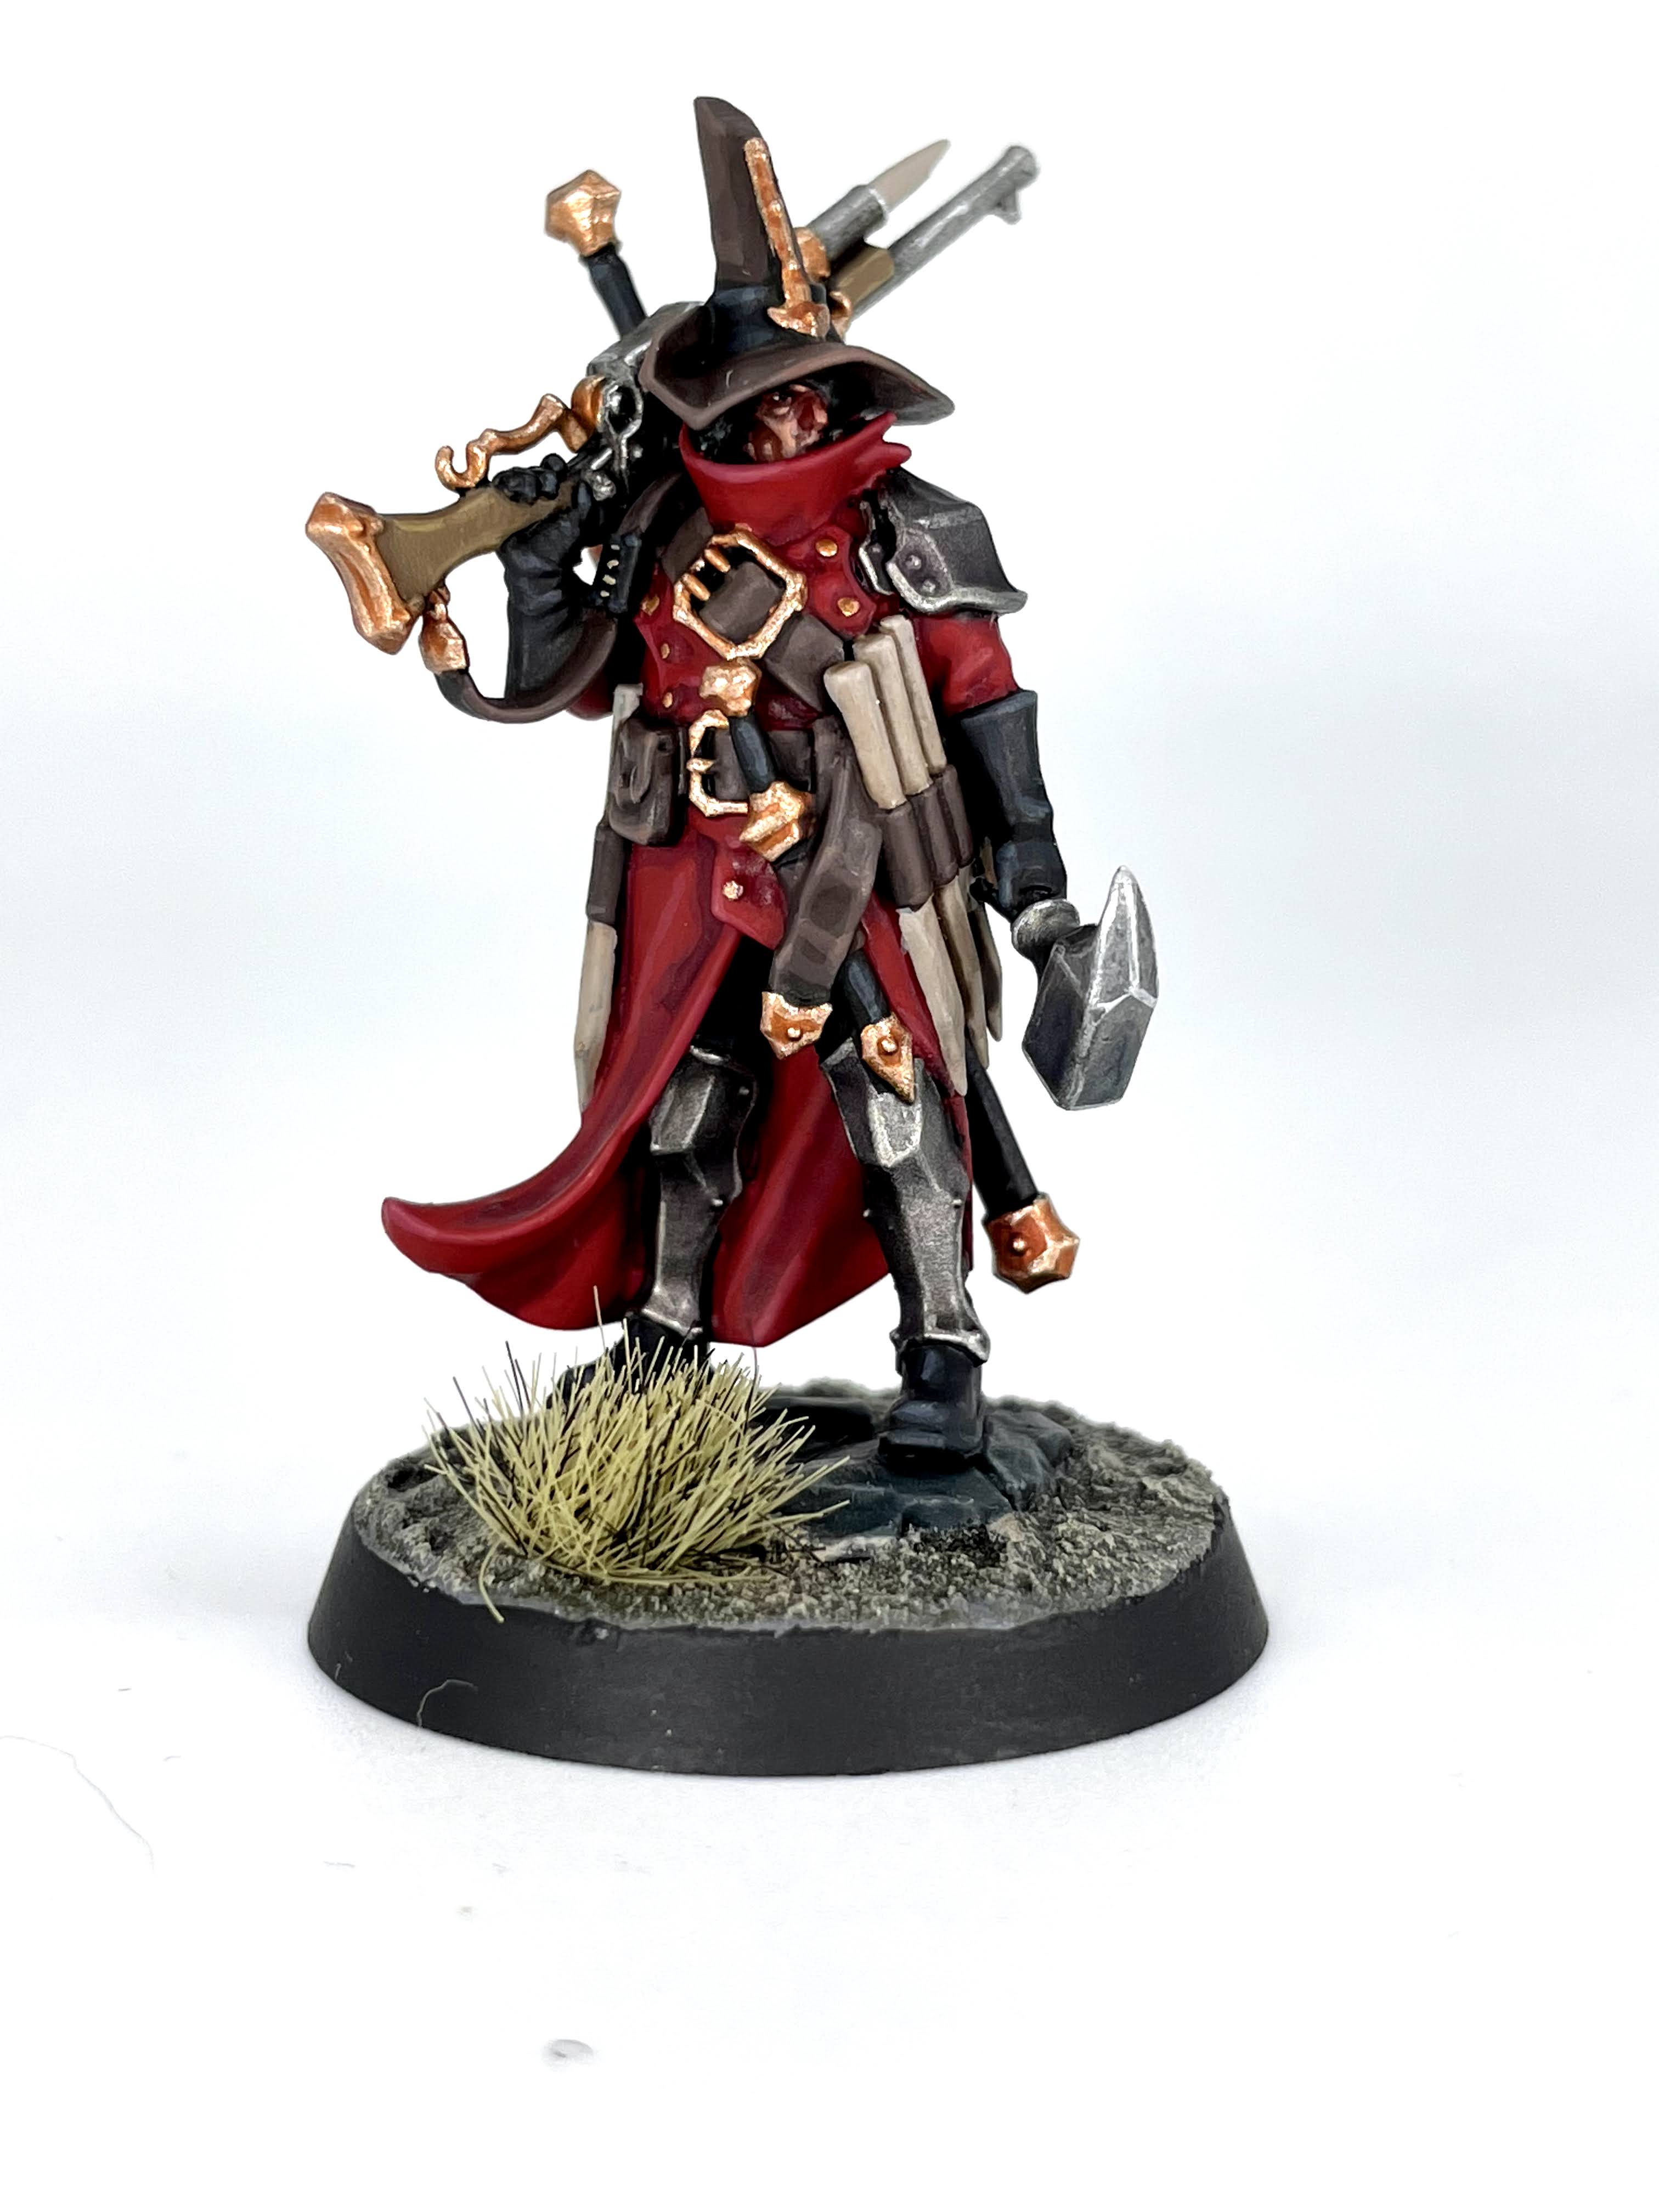
For the third time, I’ve got a favorite model in this set. I wasn’t even that excited to paint this guy, but then the brush hit the model, four hours had passed, and there was a painted Ogor mercenary on my desk. I wanted to give him the feeling of being from somewhere cold, as Ogors often are, but give him a warm, ruddy skintone for contrast. Painting big swathes of skin like on Brutogg’s arms is a lot of fun, and the bigger face really let me let loose with targeted washes for some extra color. I also painted his equipment to be a bit more beat up than the other heroes, as I figure he’s a traveling merc who might not always take the best care of his equipment. I still managed to tie him in with the other heroes with the fur, black leather, and buckles sharing the same colors as the rest. He’s also got this vial on his neck of… something? I thought it looked like the holy water from Castlevania so I painted it like that. Turns out Dagnai Holdenstock has the same stuff on him, and guess what: he’s next!
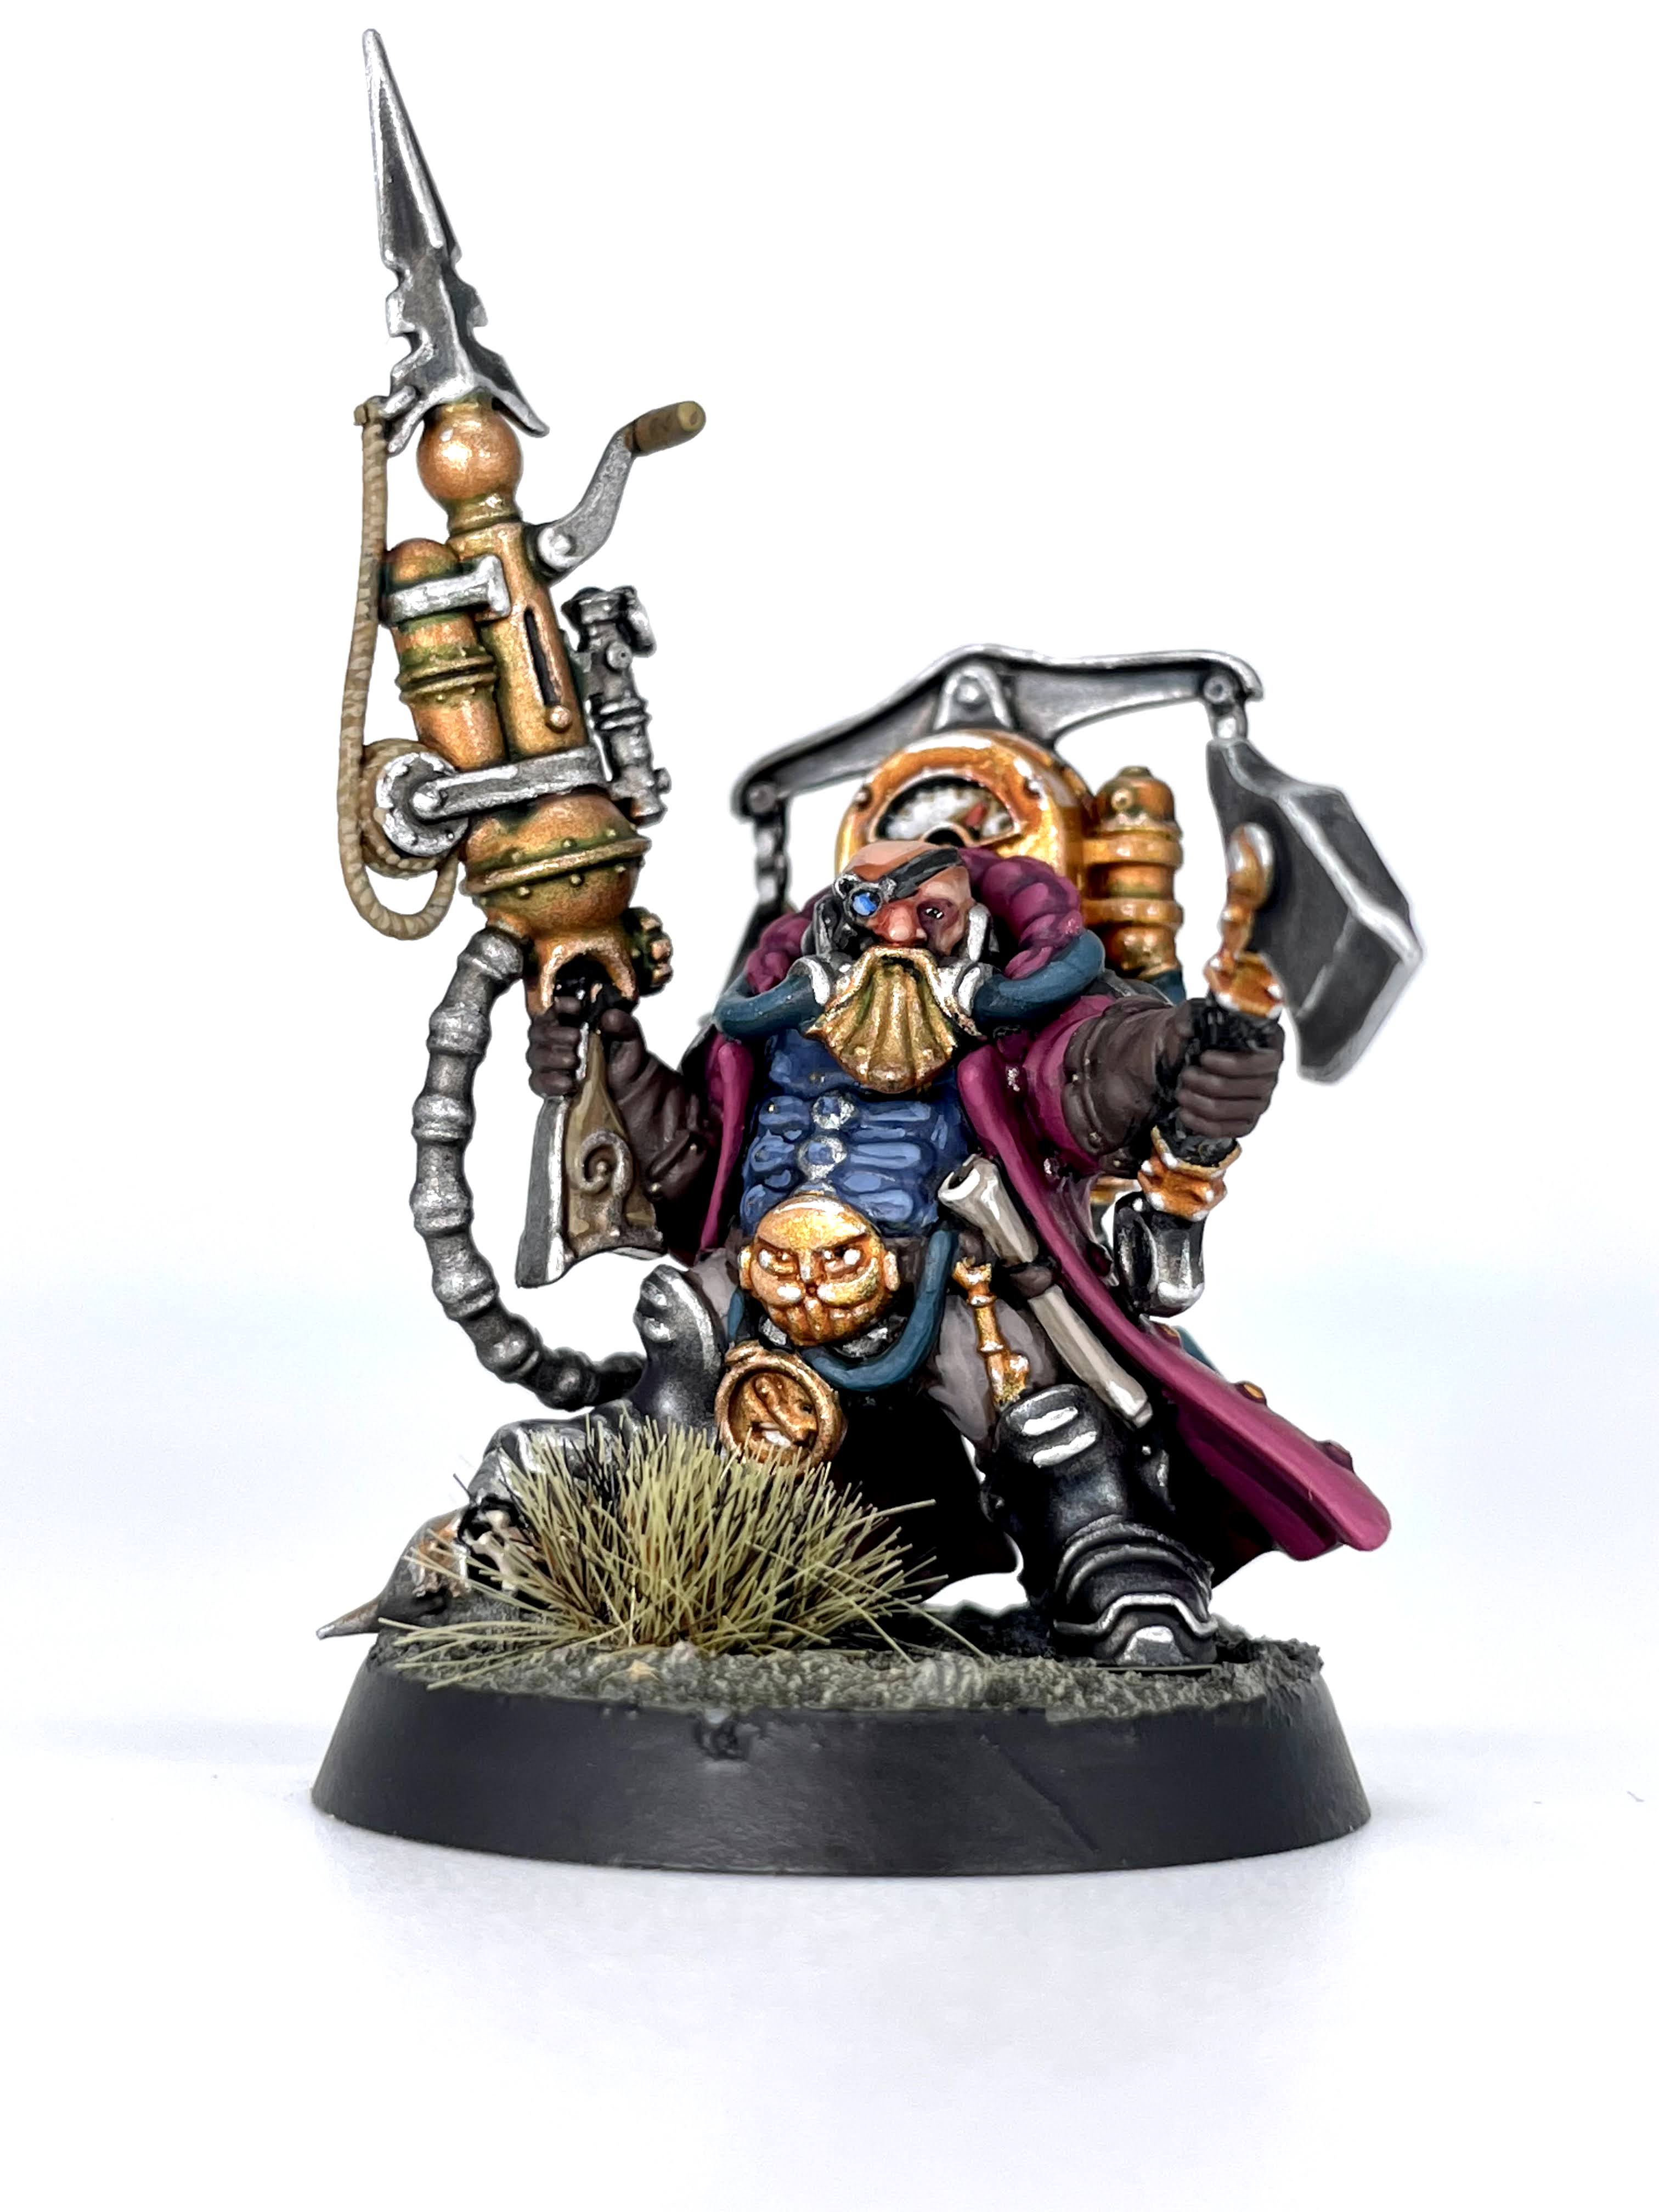
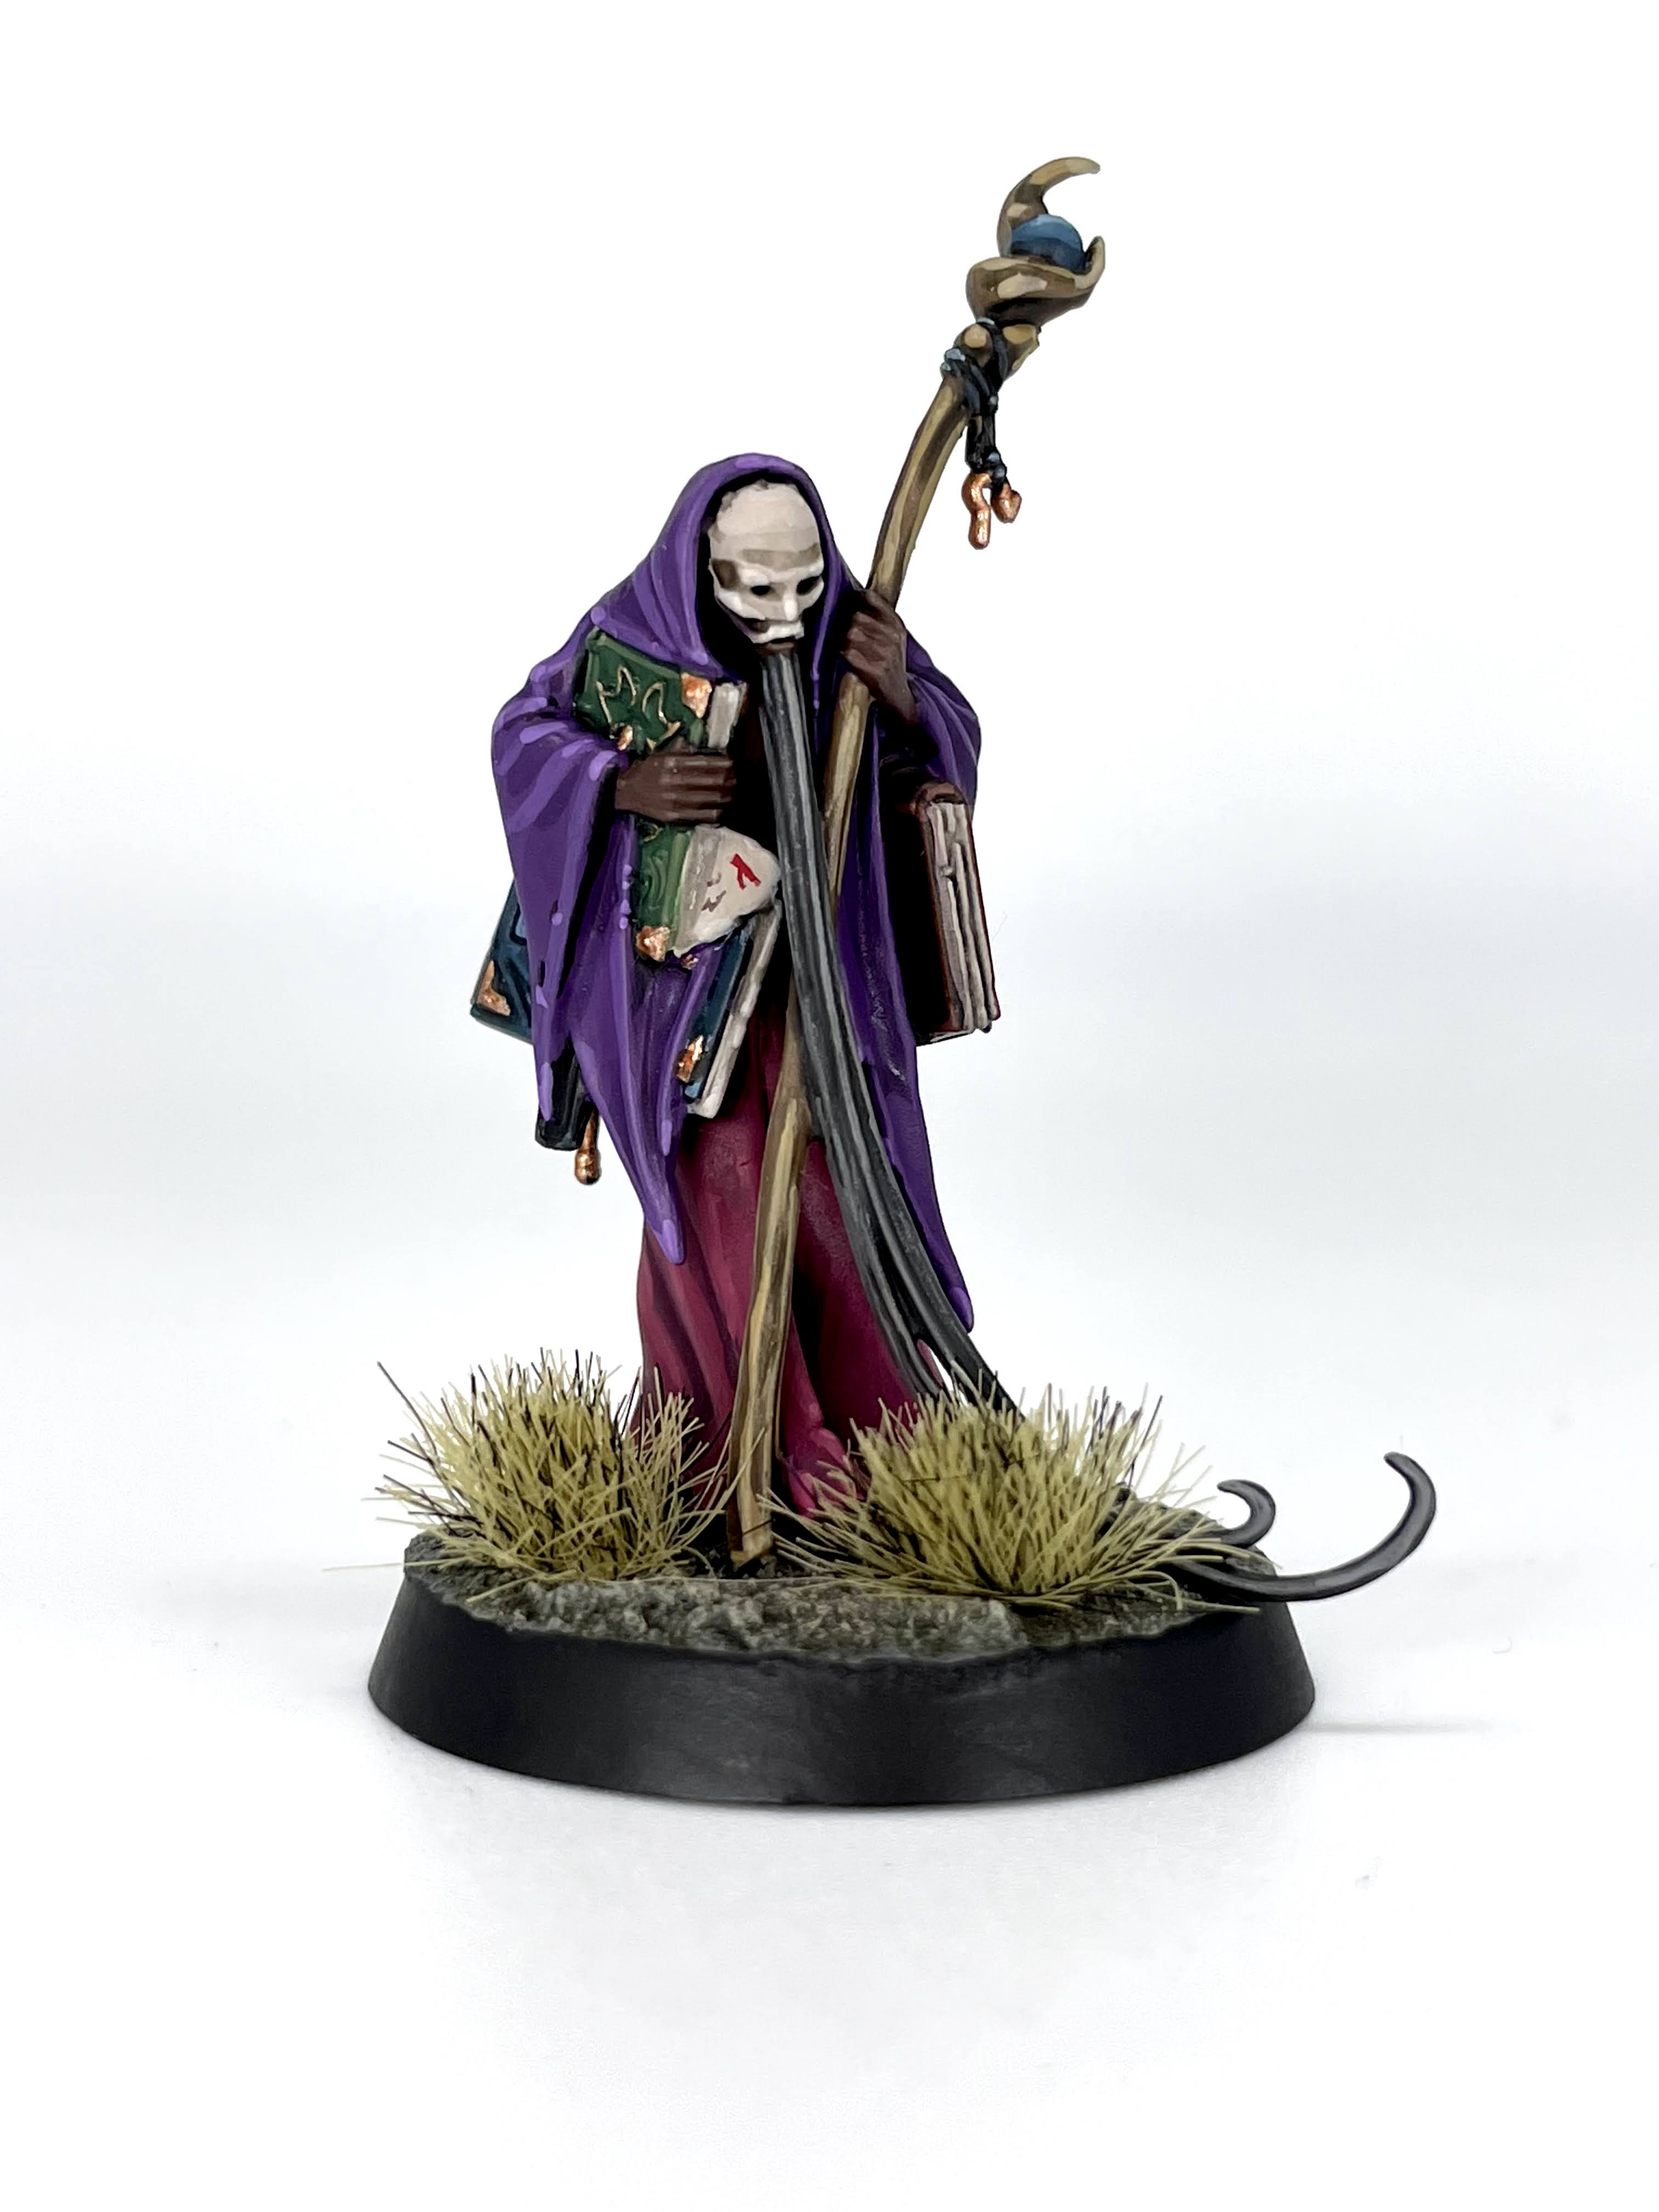
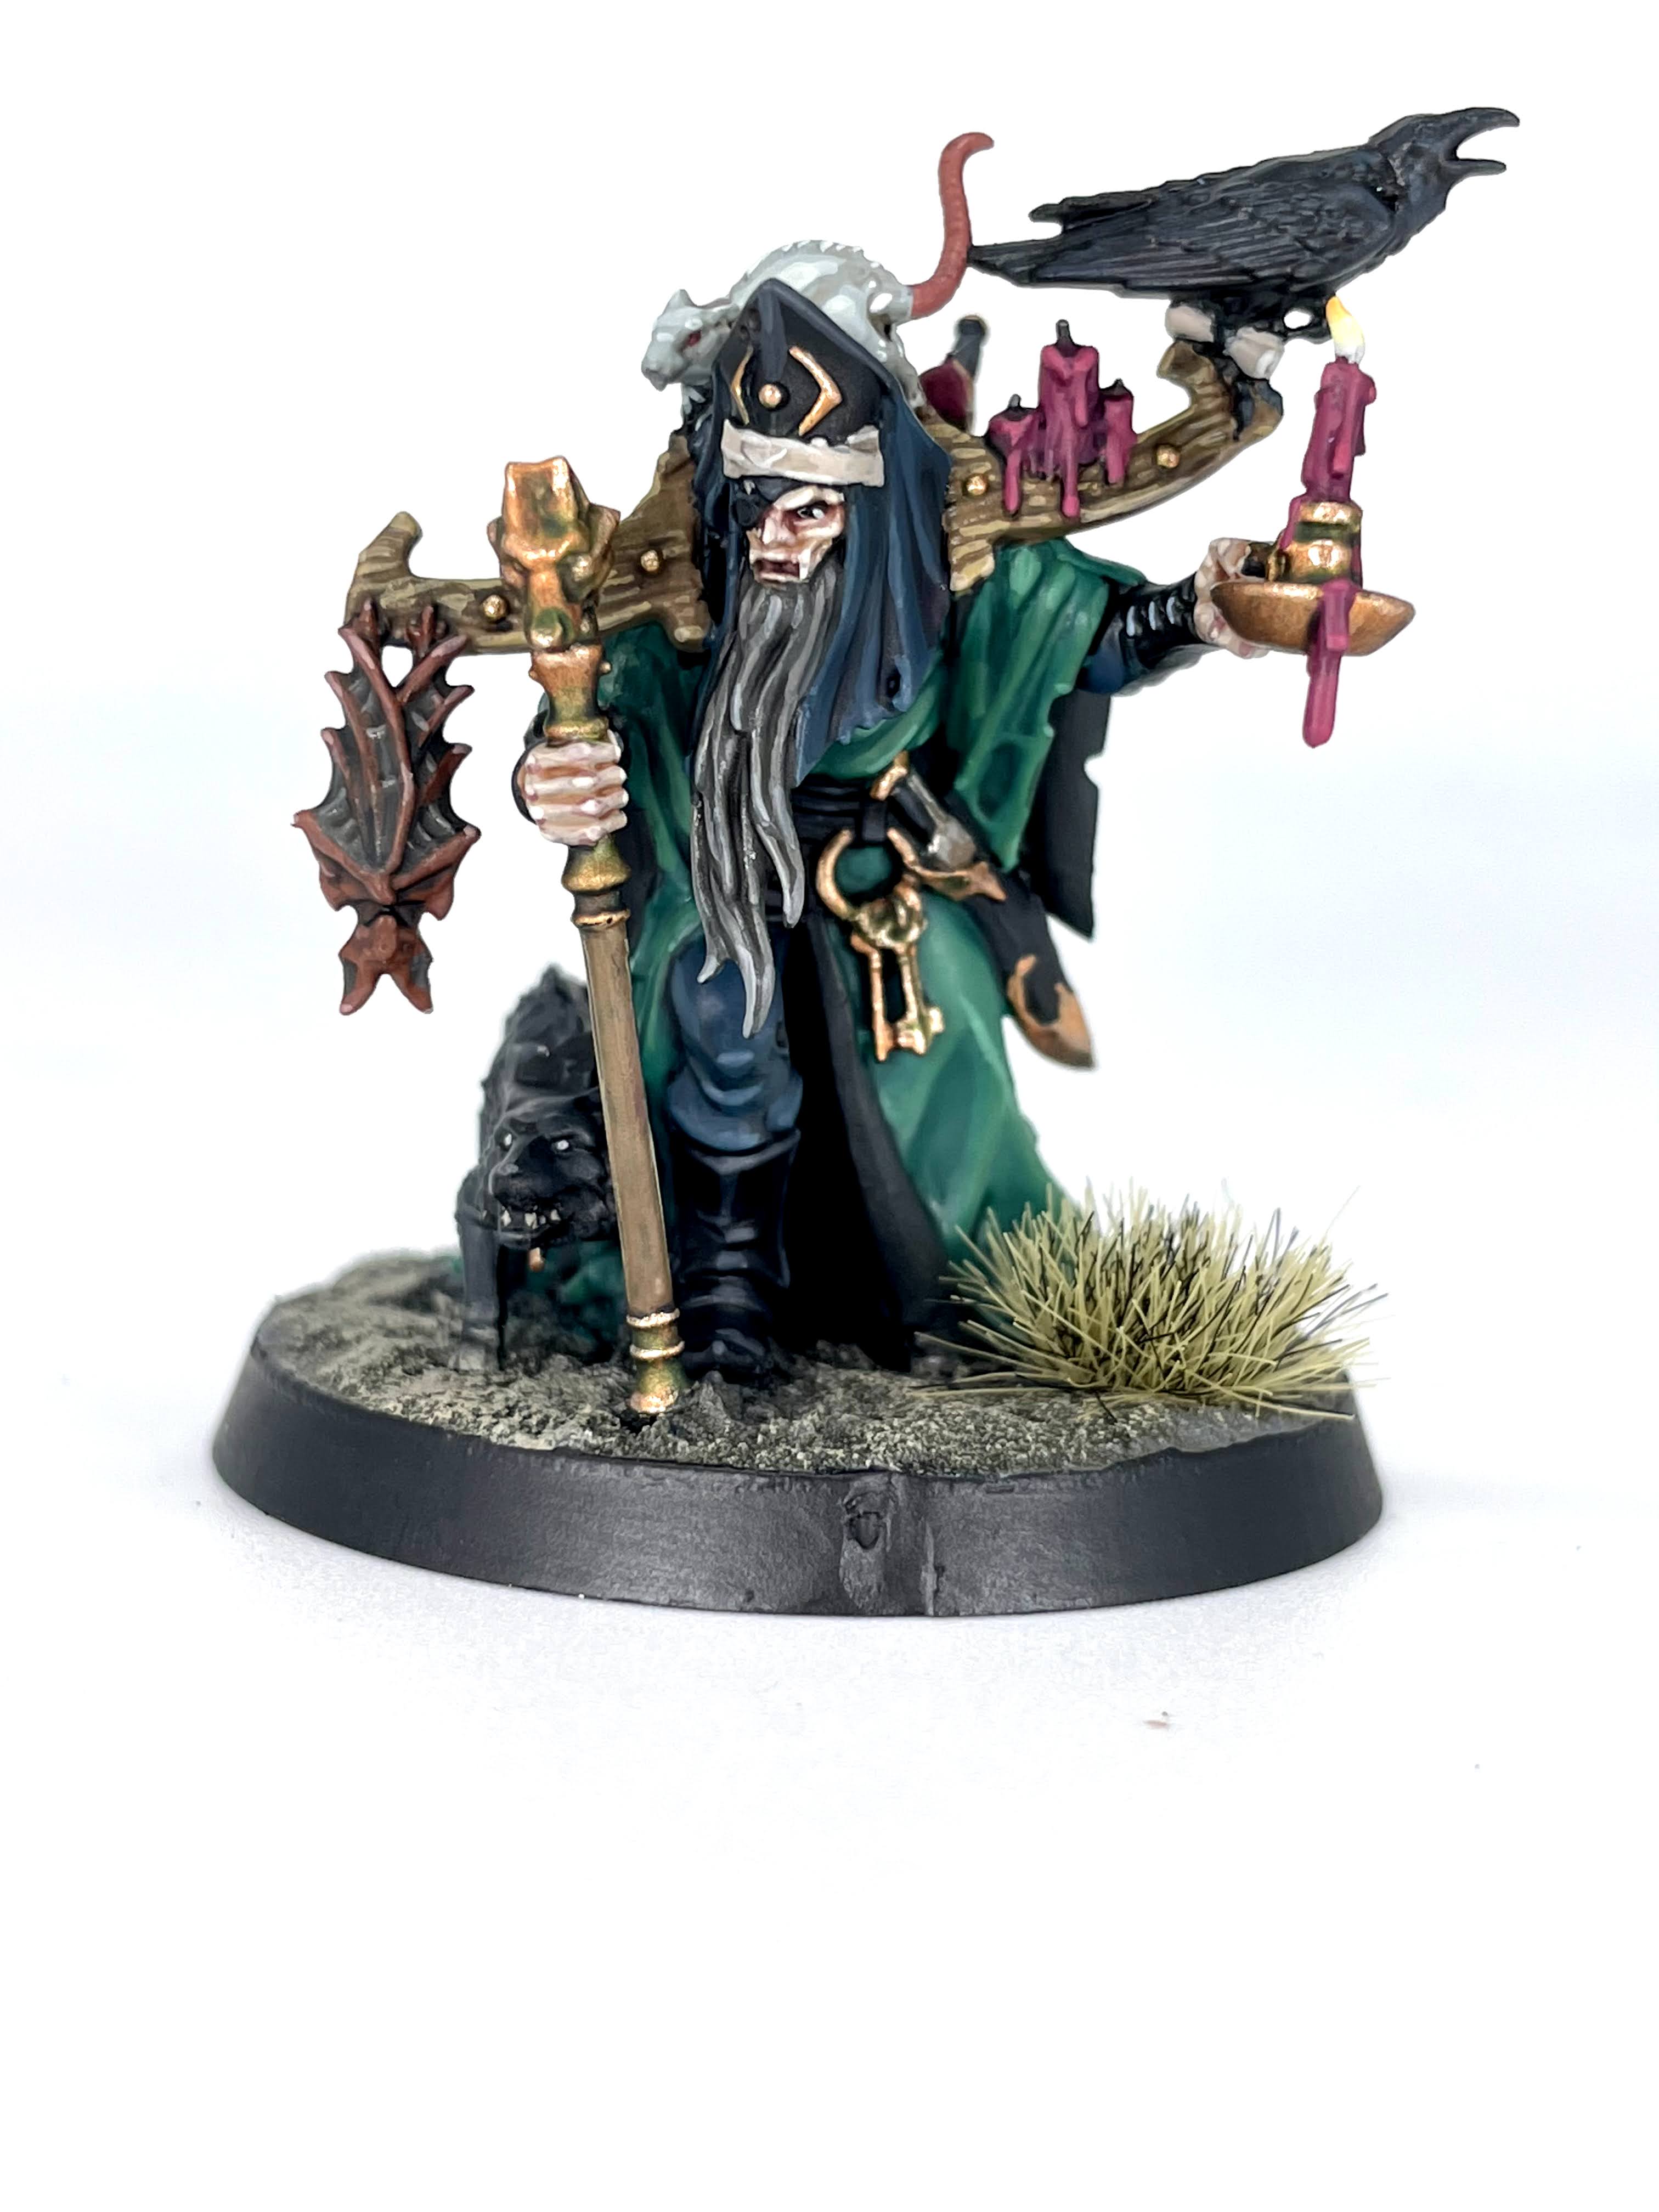
I’ll be honest, I struggled with this little fella for a minute. I’d messed around with some colors for his shirt and the inside of his jacket and for a while the needle shifted from “colorful” to “garish” in a way that even my 90s ‘Eavy Metal-loving ass wasn’t down with. After spitballing with my buddy and occasional Goonhammer contributor Dylan, I was able to work out a scheme I liked a load more. Balancing the different metallics – namely the gold vs. copper – was a challenge, but since he’s got the vibes of the guy who balances the books, I wanted him to have some gold on him. The two can look extremely similar, but some targeted green washes for verdigris make enough of a difference. Once I had my colors figured out I enjoyed the hell out of his fella, even if he’s got an awful lot going on. With that, we’ve got one last hero!
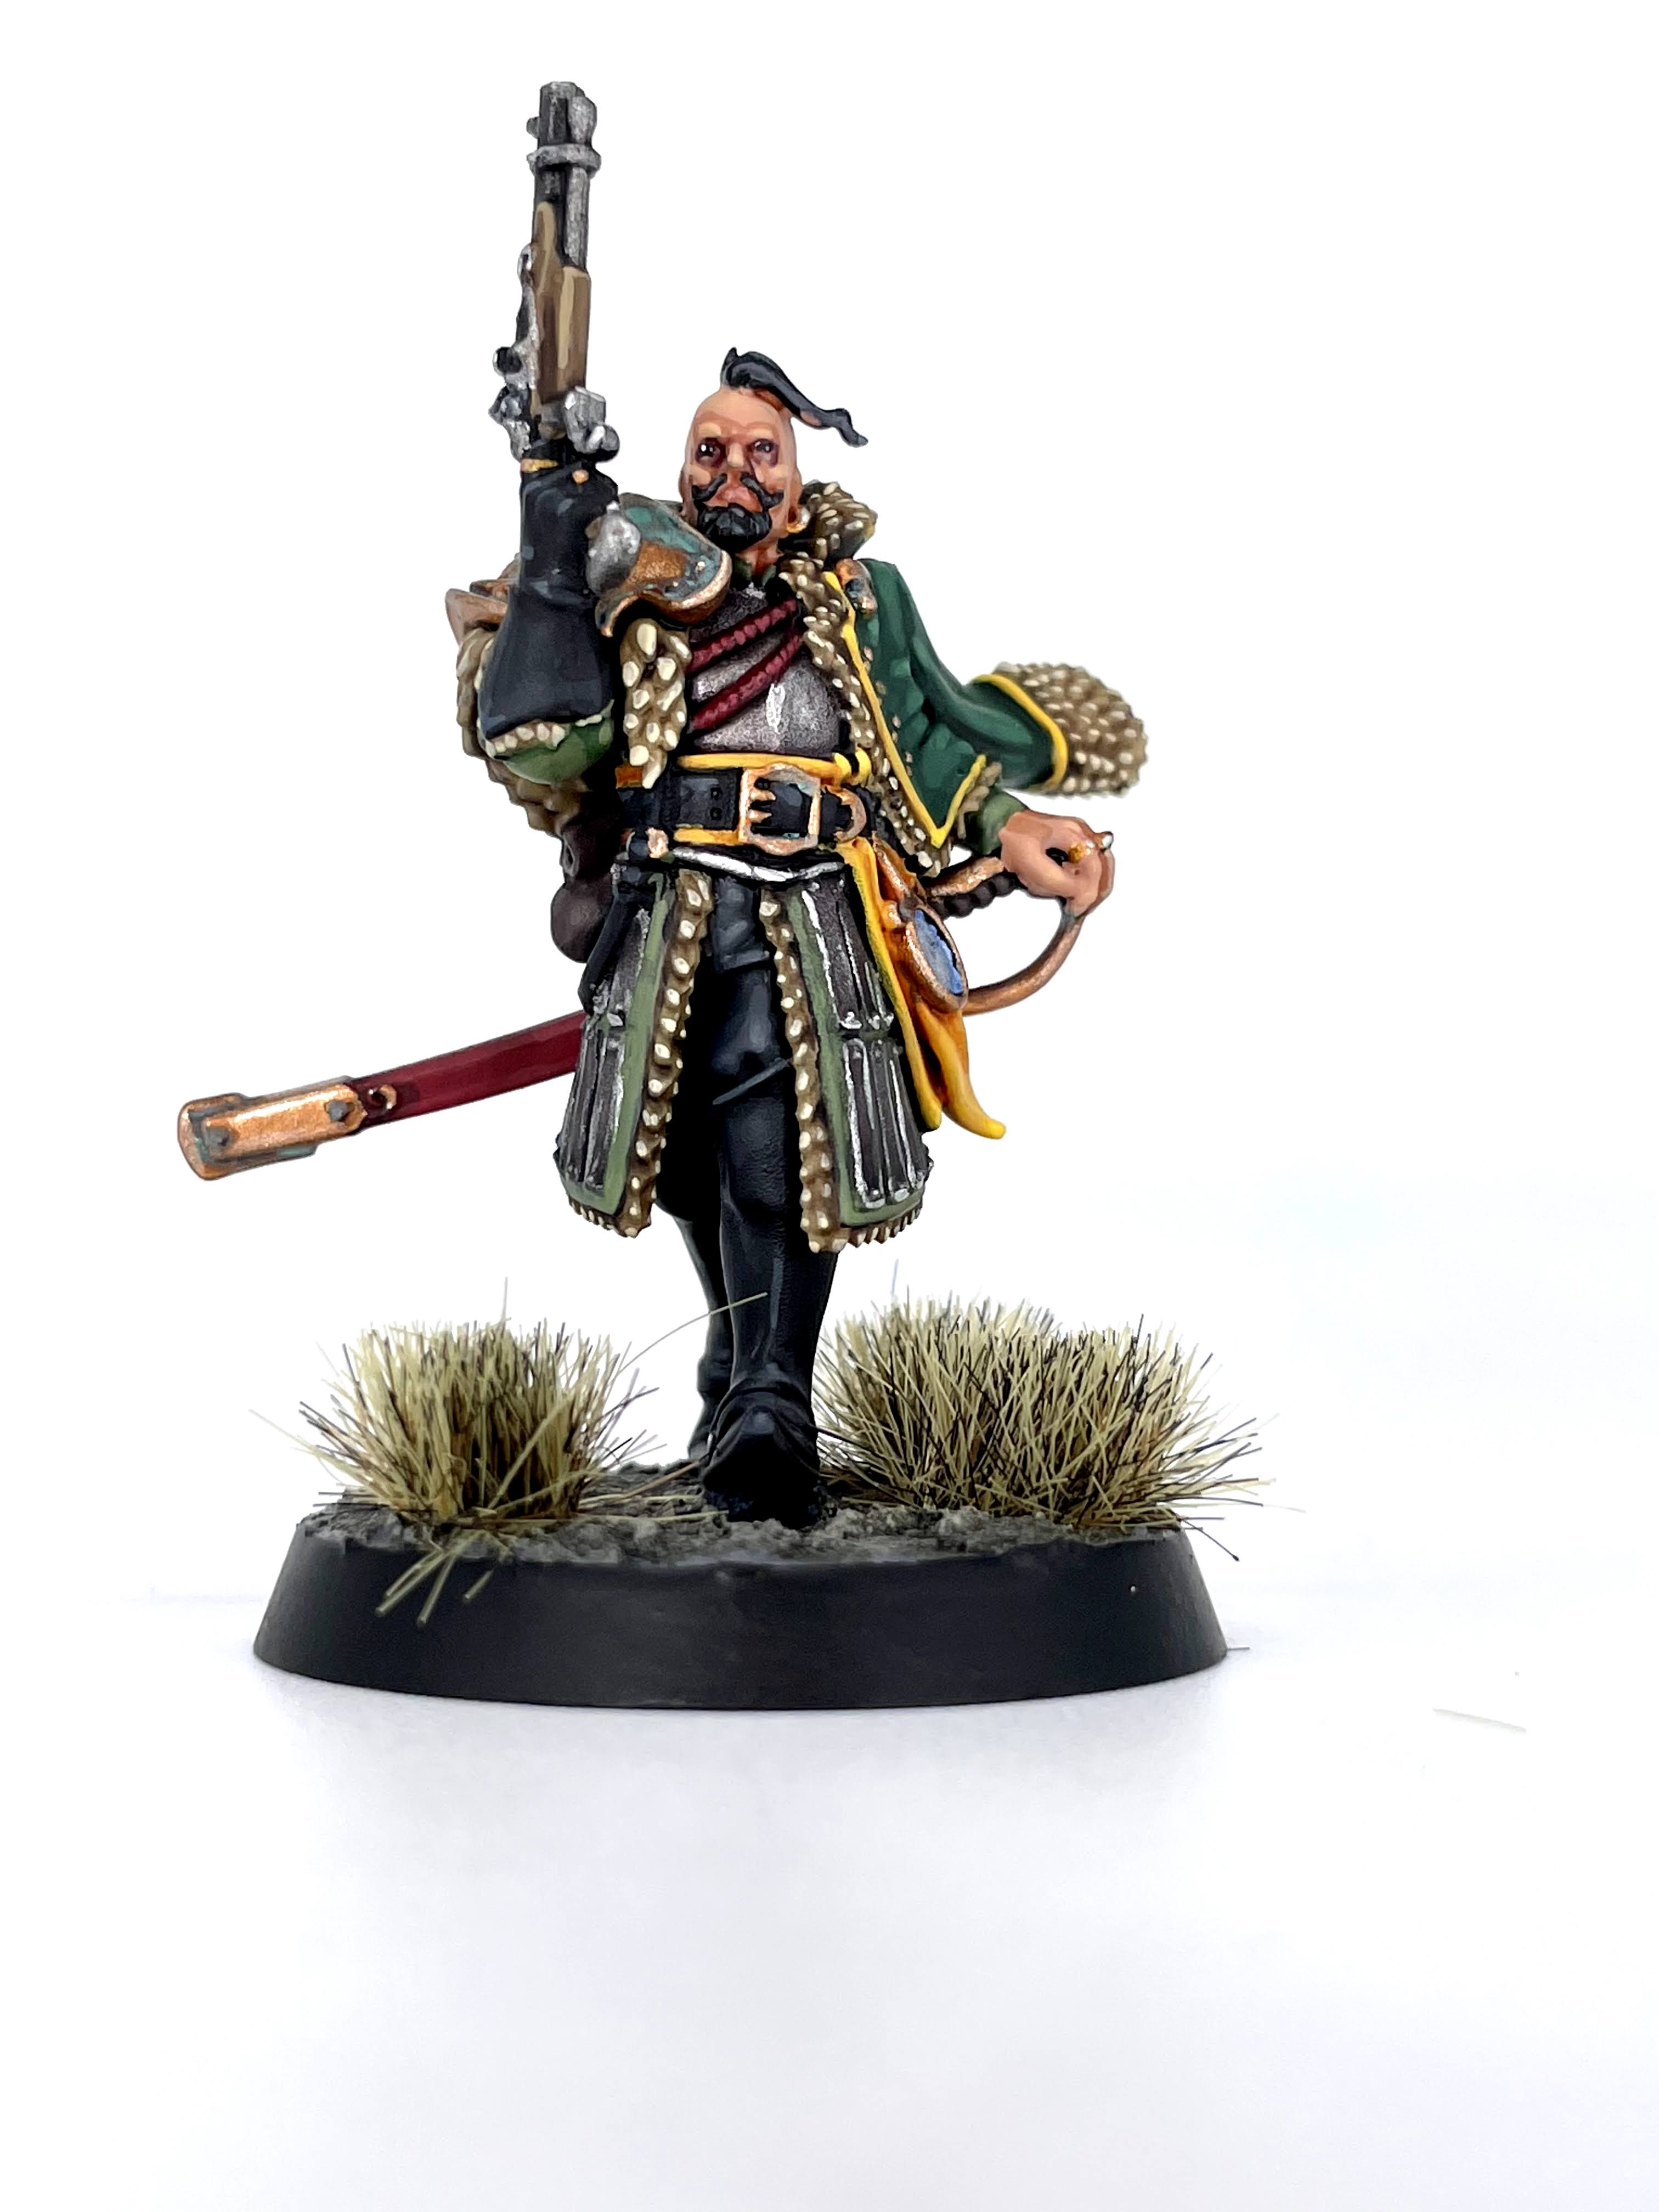
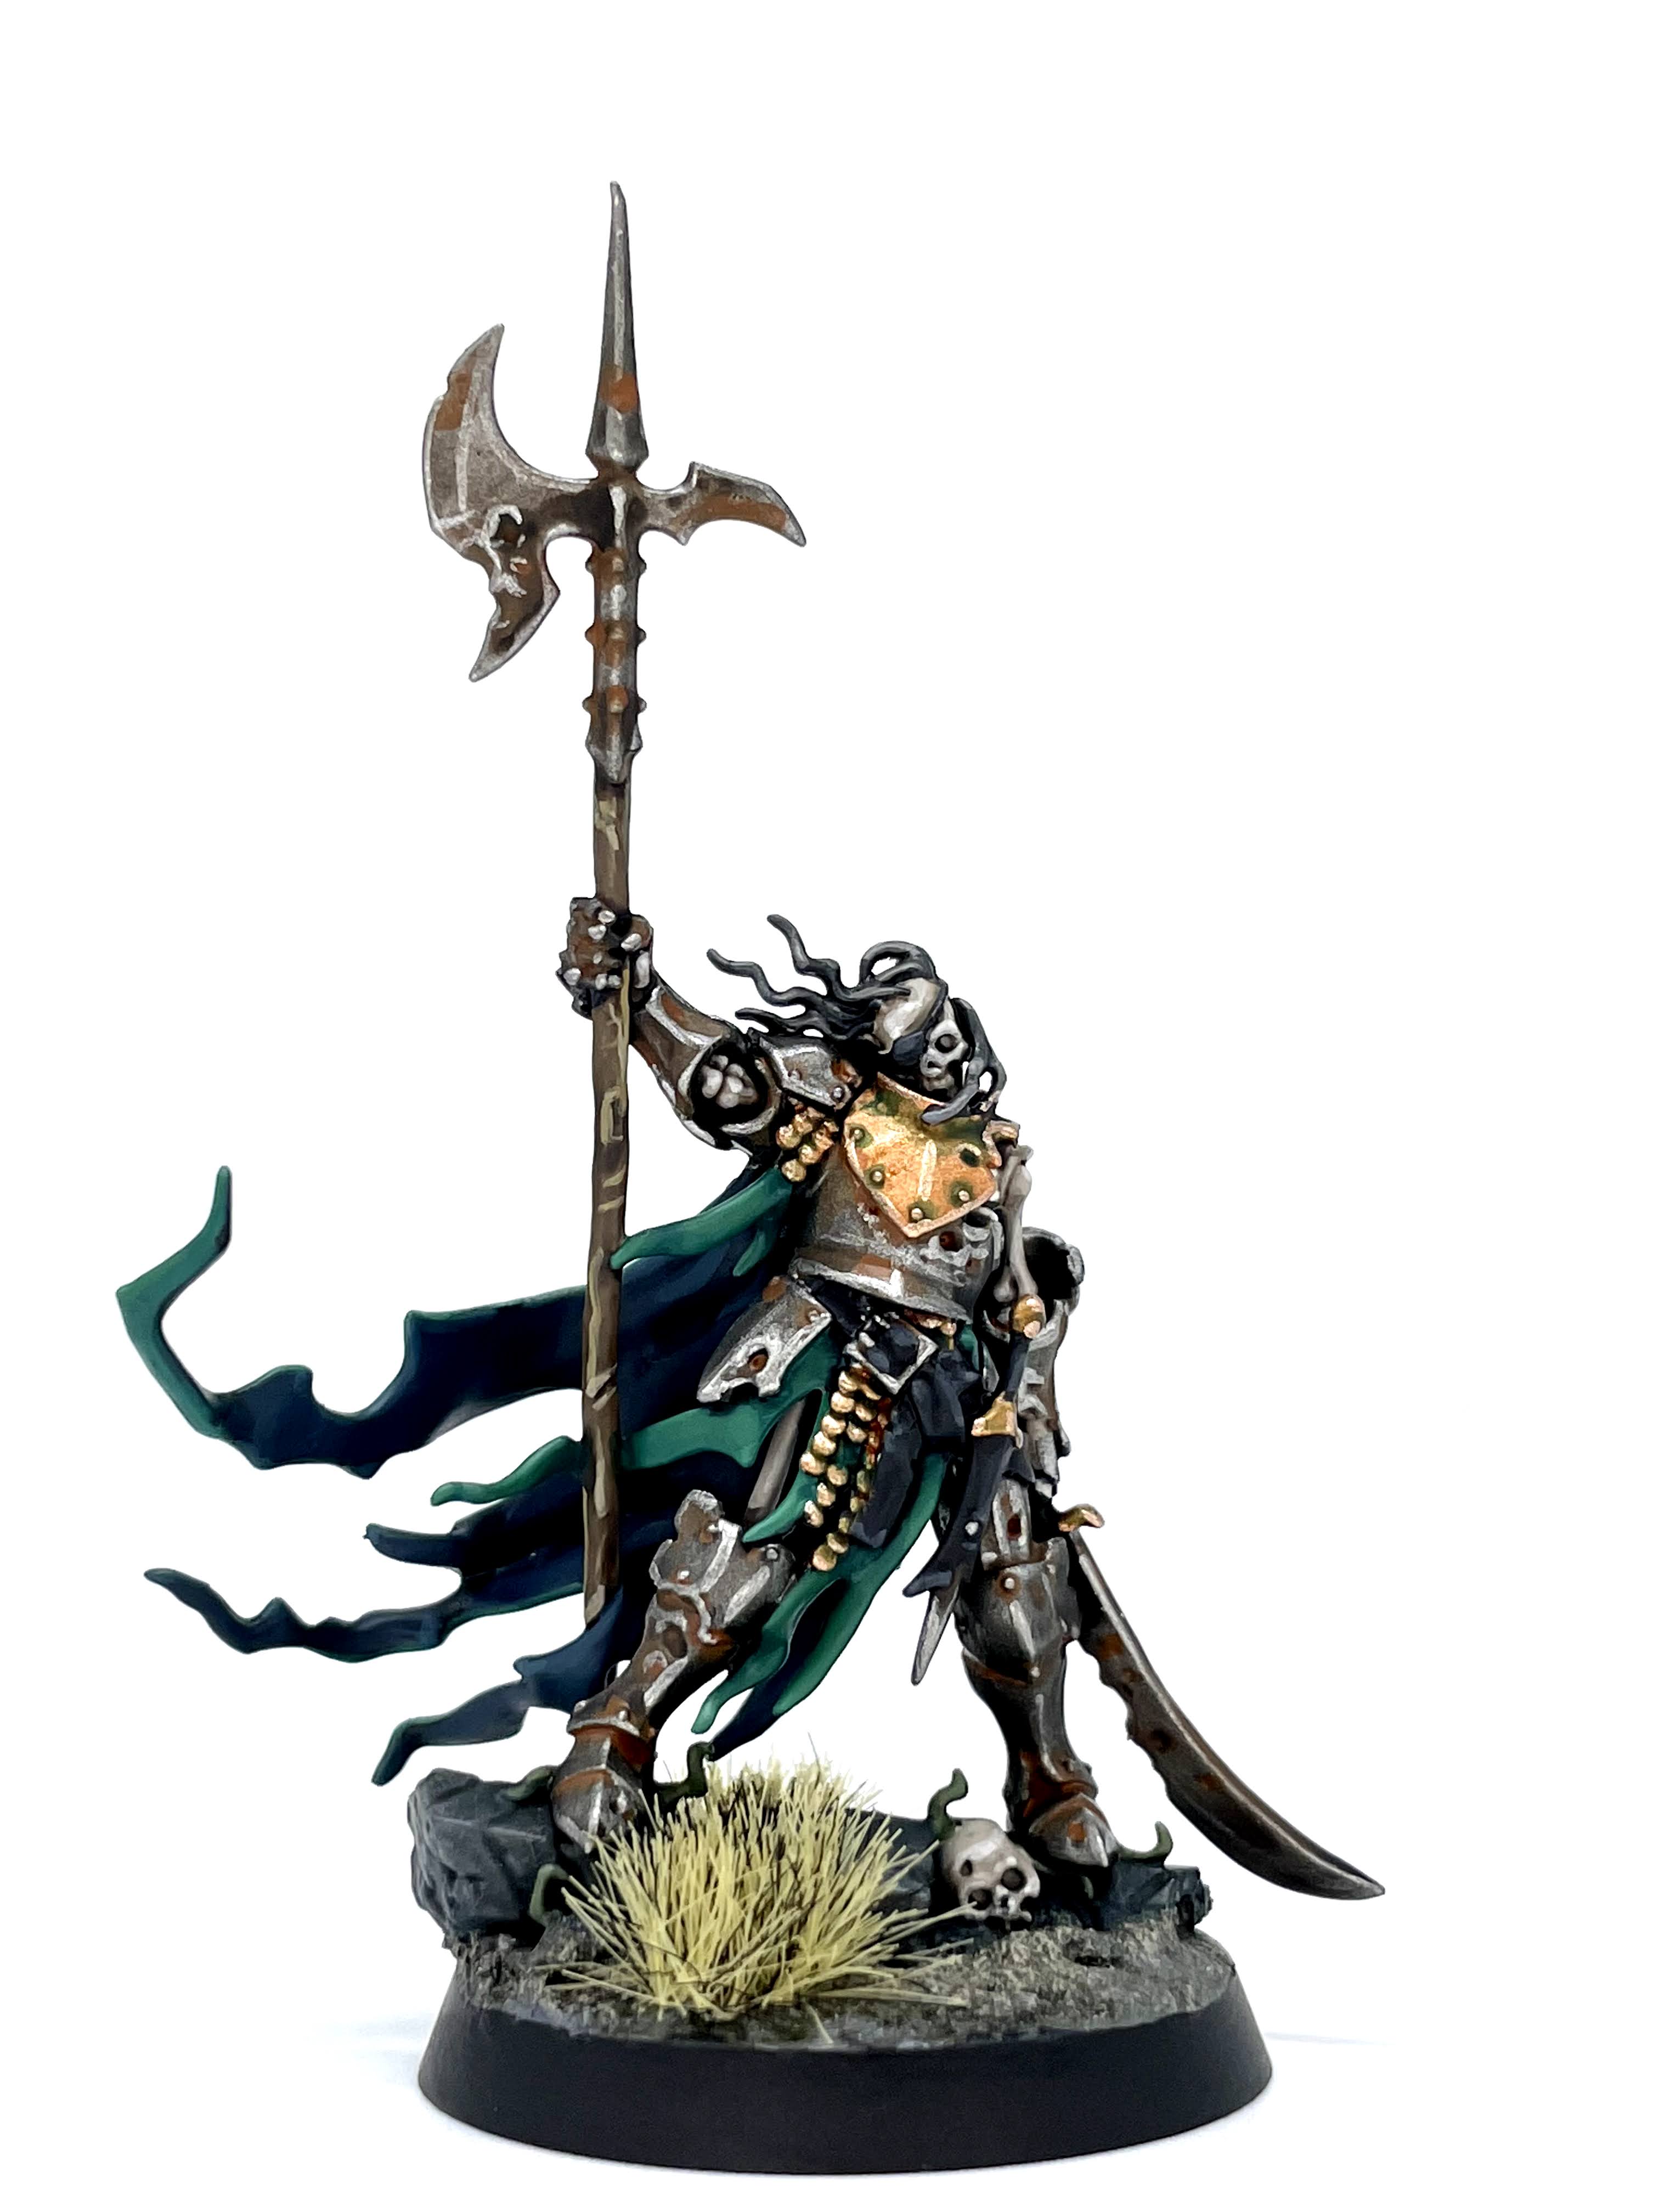
I saved this extremely Oregonian-looking duelist for last, and I’m glad I did. He was my second favorite model when GW unveiled the heroes, and I’d been dreaming up this rich green and yellow combo for him for a long time. I based him on my memory of the old ‘Eavy Metal paintjob of the 7th edition Empire duelist, and I figured he’d be a great victory lap for the box. I tried a different bronze technique and I’m not 100% sure it worked but one-offs like this are a great place to experiment. I got the notion he’s a fallen noble, so I figured his equipment would still be beautiful but maybe not in the best shape. He was a hell of a model to close out the whole box set on, and after painting a unit I really couldn’t stand (foreshadowing!) he was exactly the reward I was looking for.
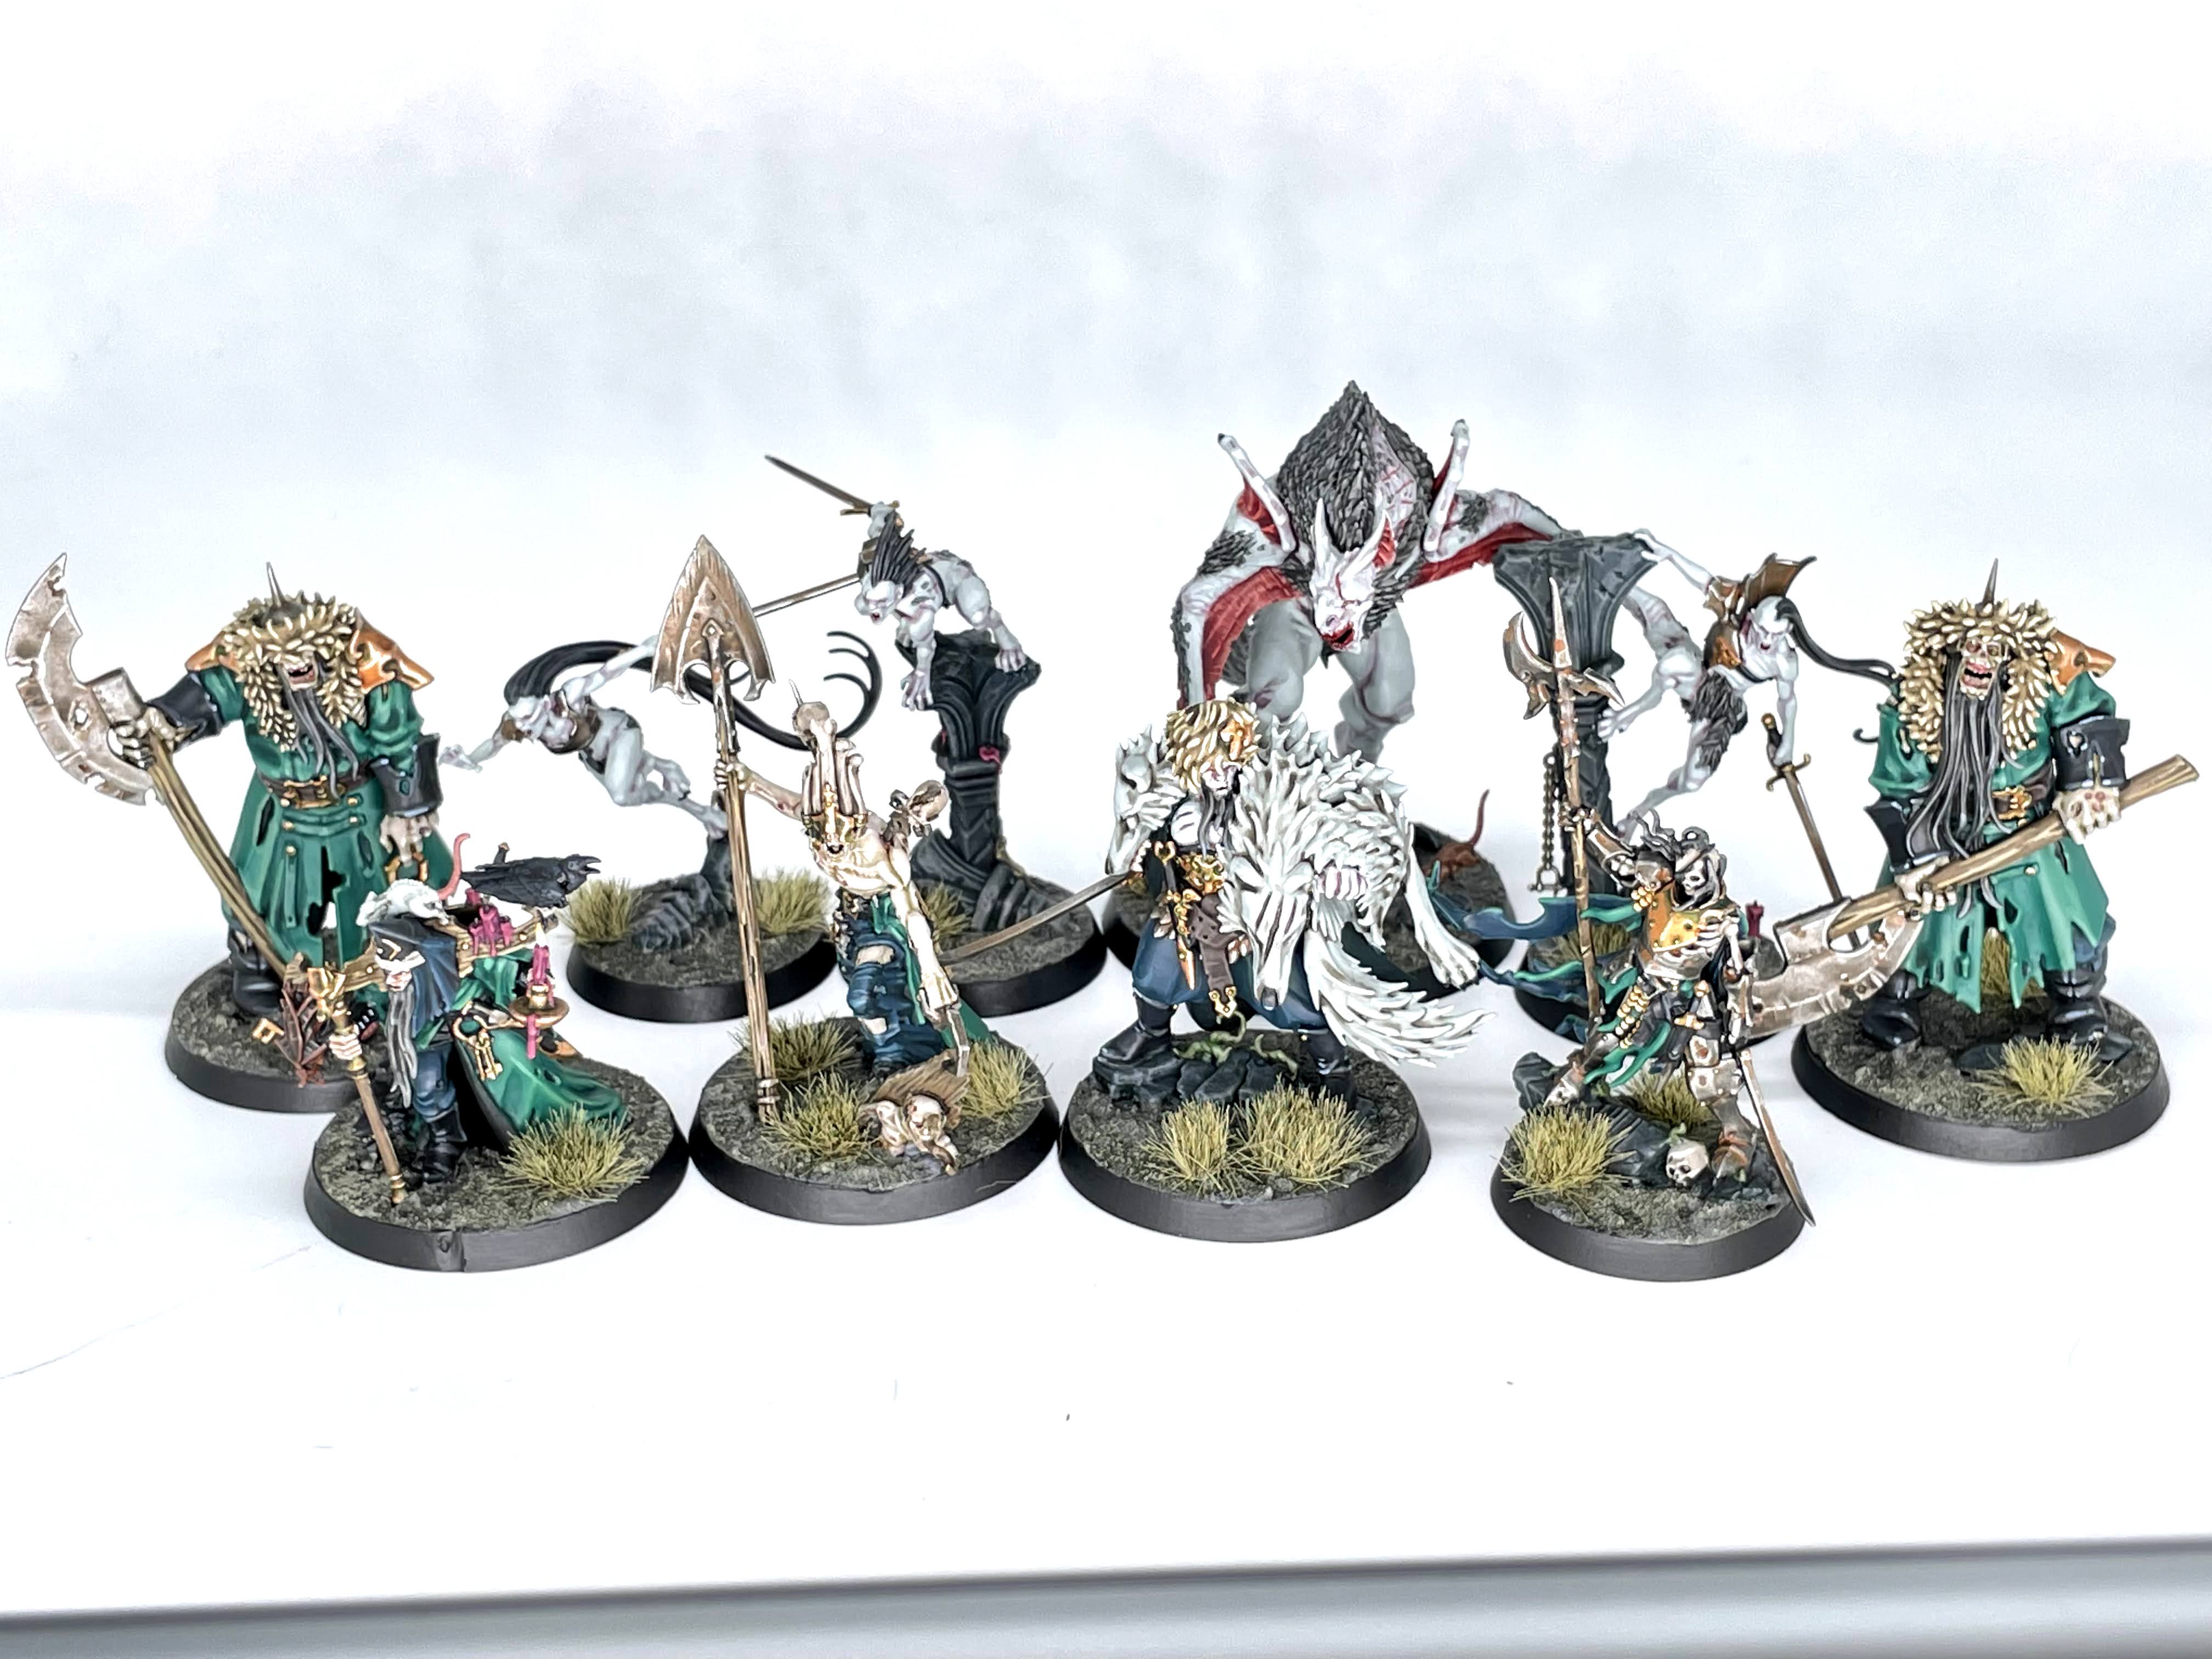
That’s it for the heroes, which means it’s time for the big bads – Radukar’s Court!

I started with the Kosargi Nightguard, as I wasn’t really that excited about them. I figured they’d be a decent place to test out the ghastly green I had in mind for the bad guys, as well as work out some of the textures to come – namely the rotting skin, rotting wood, and tarnished, rusty metal that would be unifying elements of the undead. Despite my initial misgivings, I had a load of fun with them! It was like painting a couple of 54mm models – these guys are legit huge. There was enough open space to experiment with the green blends and enough detail to hold my interest. These were the third and fourth models I’d painted in the set, and proof that plenty of surprises were still to come.

I’m not extremely wild about this dude, but he was a great way to figure out what I wanted to do for vampire skin and figure out a sickly, pallid, creepy color for it. You can’t see it from the front, but his coat is the same green as the Kosargi, which would go on to unite pretty much all the baddies in the set. His pants were a challenge to solve since I needed a second cloth color, and I didn’t want something that would clash or get lost with my “bad guy” green. I settled for a suitably cold color starting at Incubi Darkness and blending up to The Fang.
I have a confession to make: I’ve never played an undead army, but I fucking love skeletons. They’re macabre without being gross, and they always look like they’re having a grand old time. Halgrim was my opportunity to take what I’d figured out and map it onto the skeletons still to come. I blitzed through this dude, happily weathering away and using everything I’d learned up to this point. There’s not much more to say about this dude, but among all the skeletons in this kit, he’s the one who slaps the hardest.
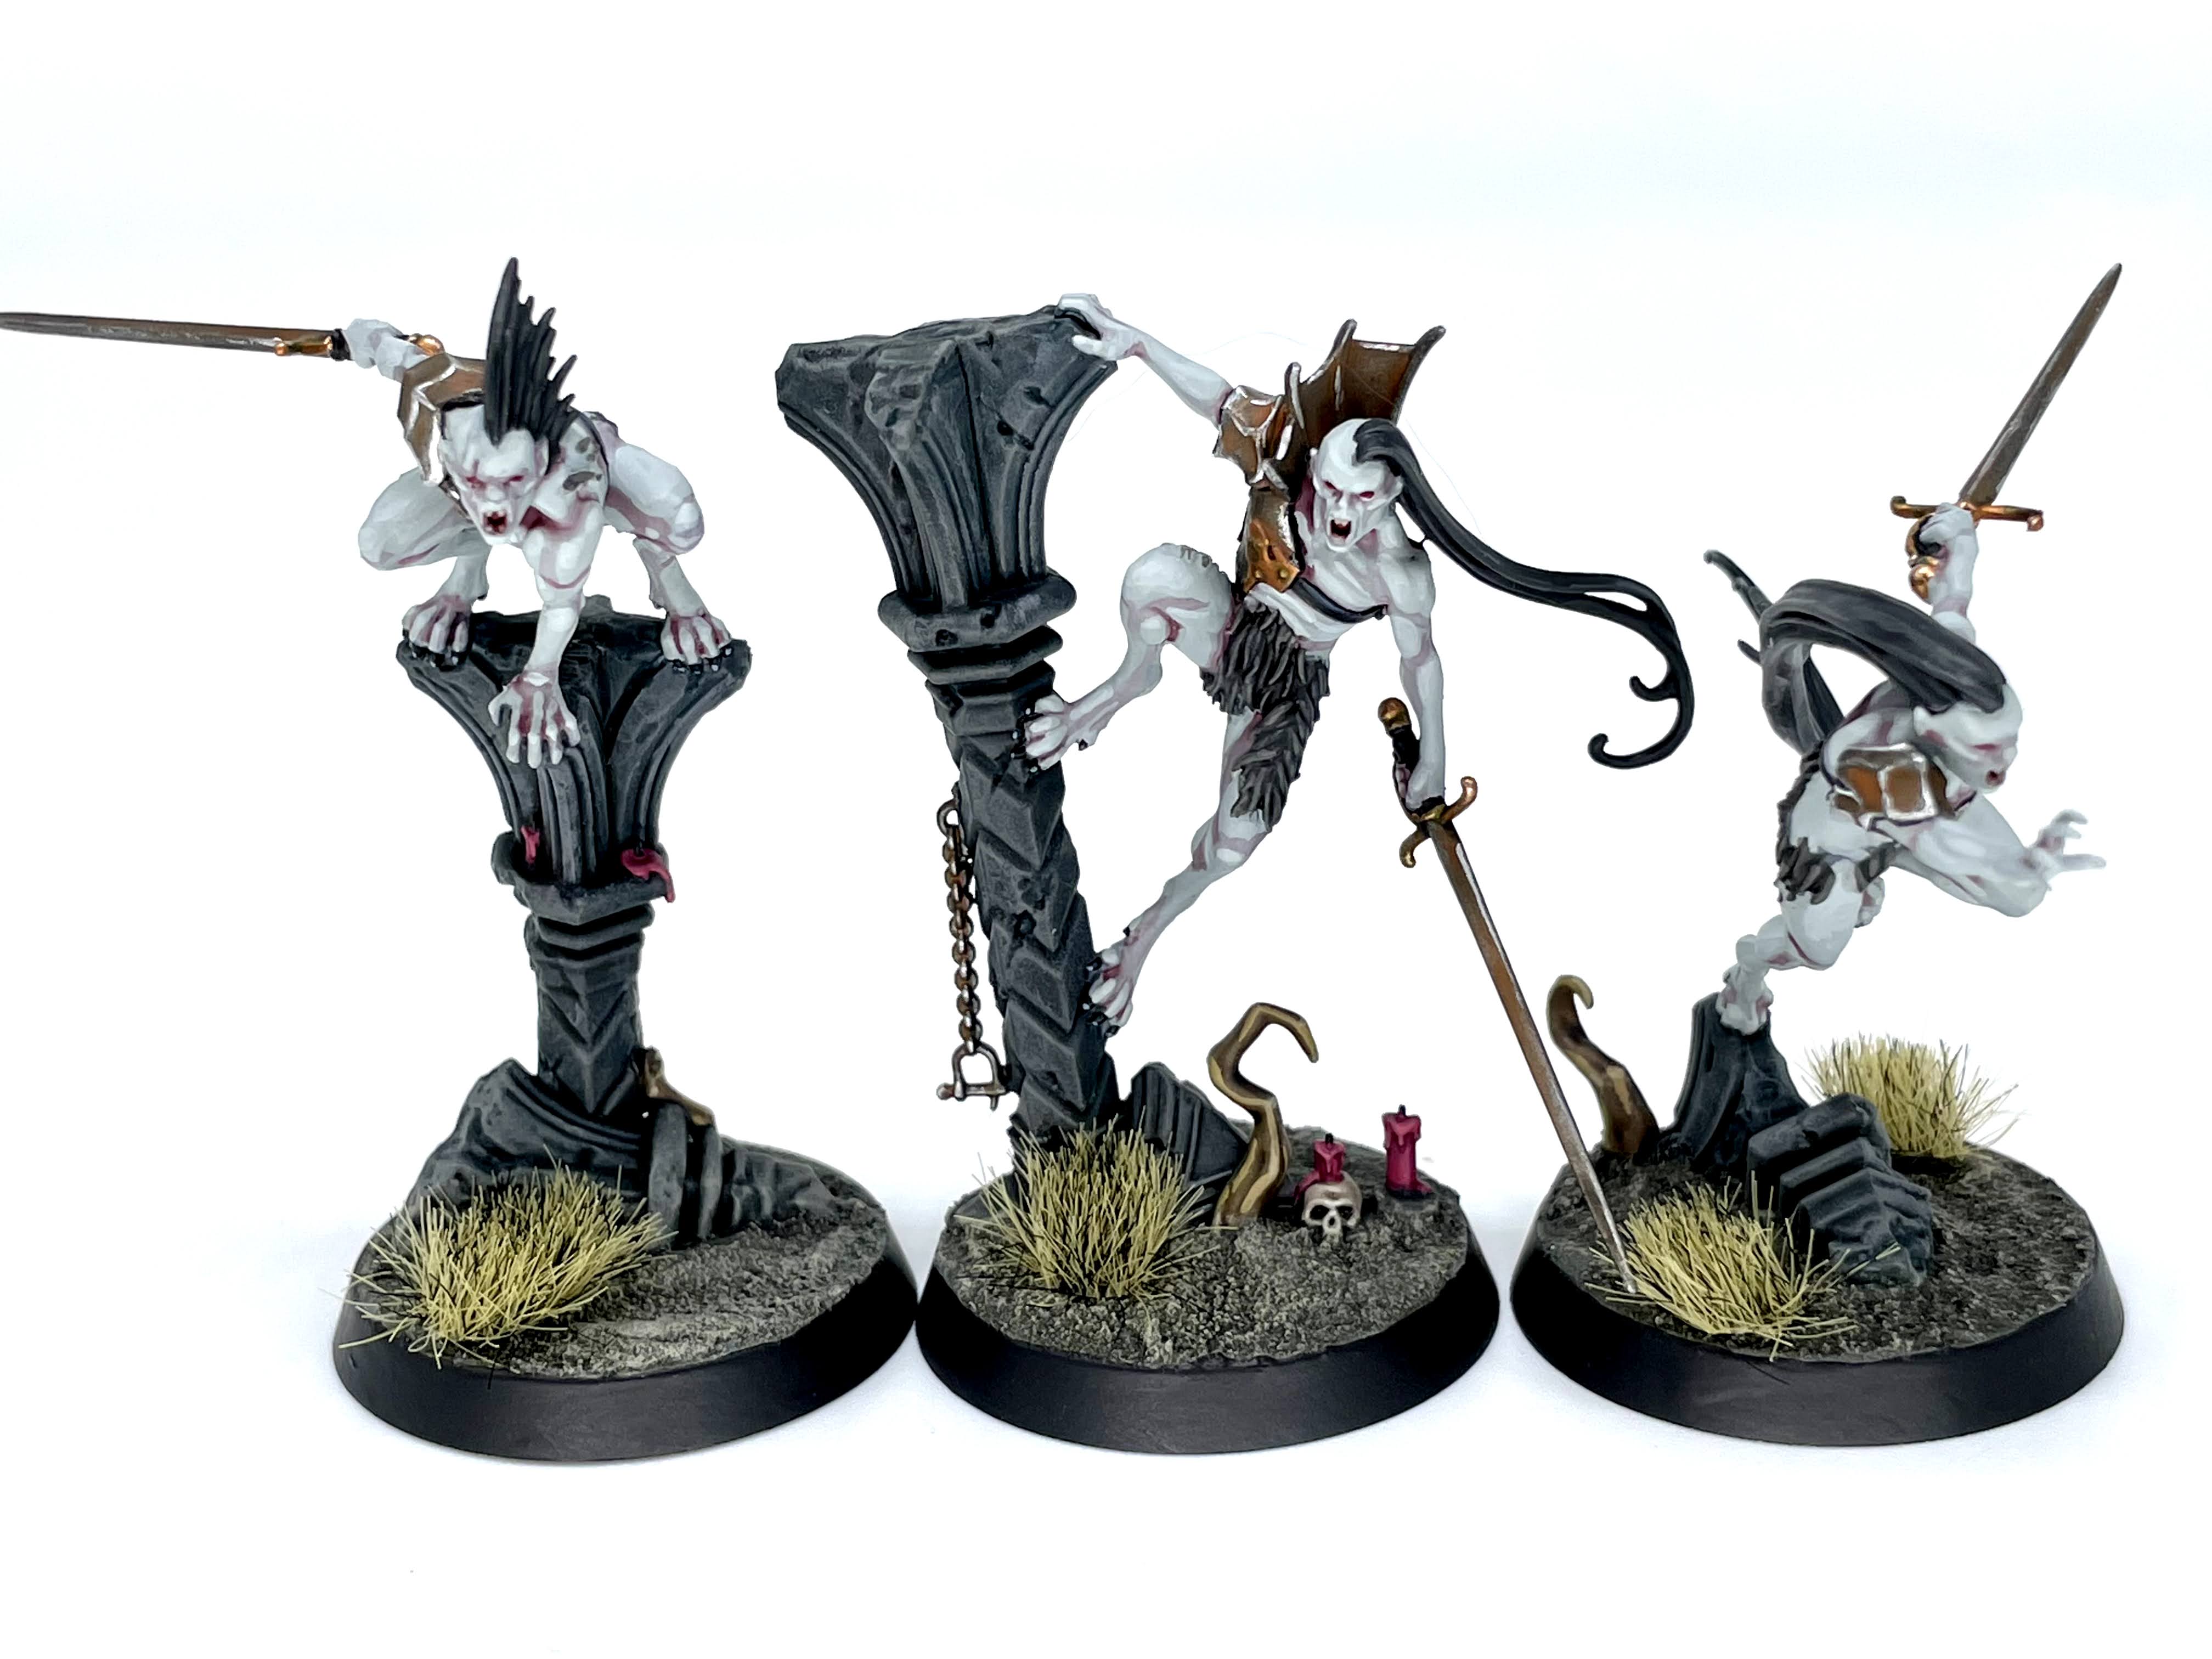
I was looking forward to these three ever since I figured out my vampire skin with Radukar. Painting big areas of skin is one of my favorite things to do, and this trio manages that along with some killer poses. I wanted their elegant swords to look rusty and weathered, as these are bestial, corrupt vampires and not the hot kind. Well, maybe they are to someone, I’m not gonna yuck anyone’s yums.
I actually batch painted this dude along with the Blood-Born above, as I wanted him to be tonally consistent with them. When you’re mixing colors willy-nilly and want models to match, it can be tricky to keep things consistent if you paint them at different times. His skin, fur, claws, and beady red eyes all echo the Blood-Born, and those eyes, wounds, and weird ribbing stuff were great places to use some Contrast paints. I highlighted after the fact, but it got a raw, gnarly look that sells how creepy this big jerk is. I’d use a lot more Contrast down the line for wounds and the like, as it’s subtler than something like Blood for the Blood God but easy to drop into pickmarks, cuts, and other holes where they shouldn’t be.
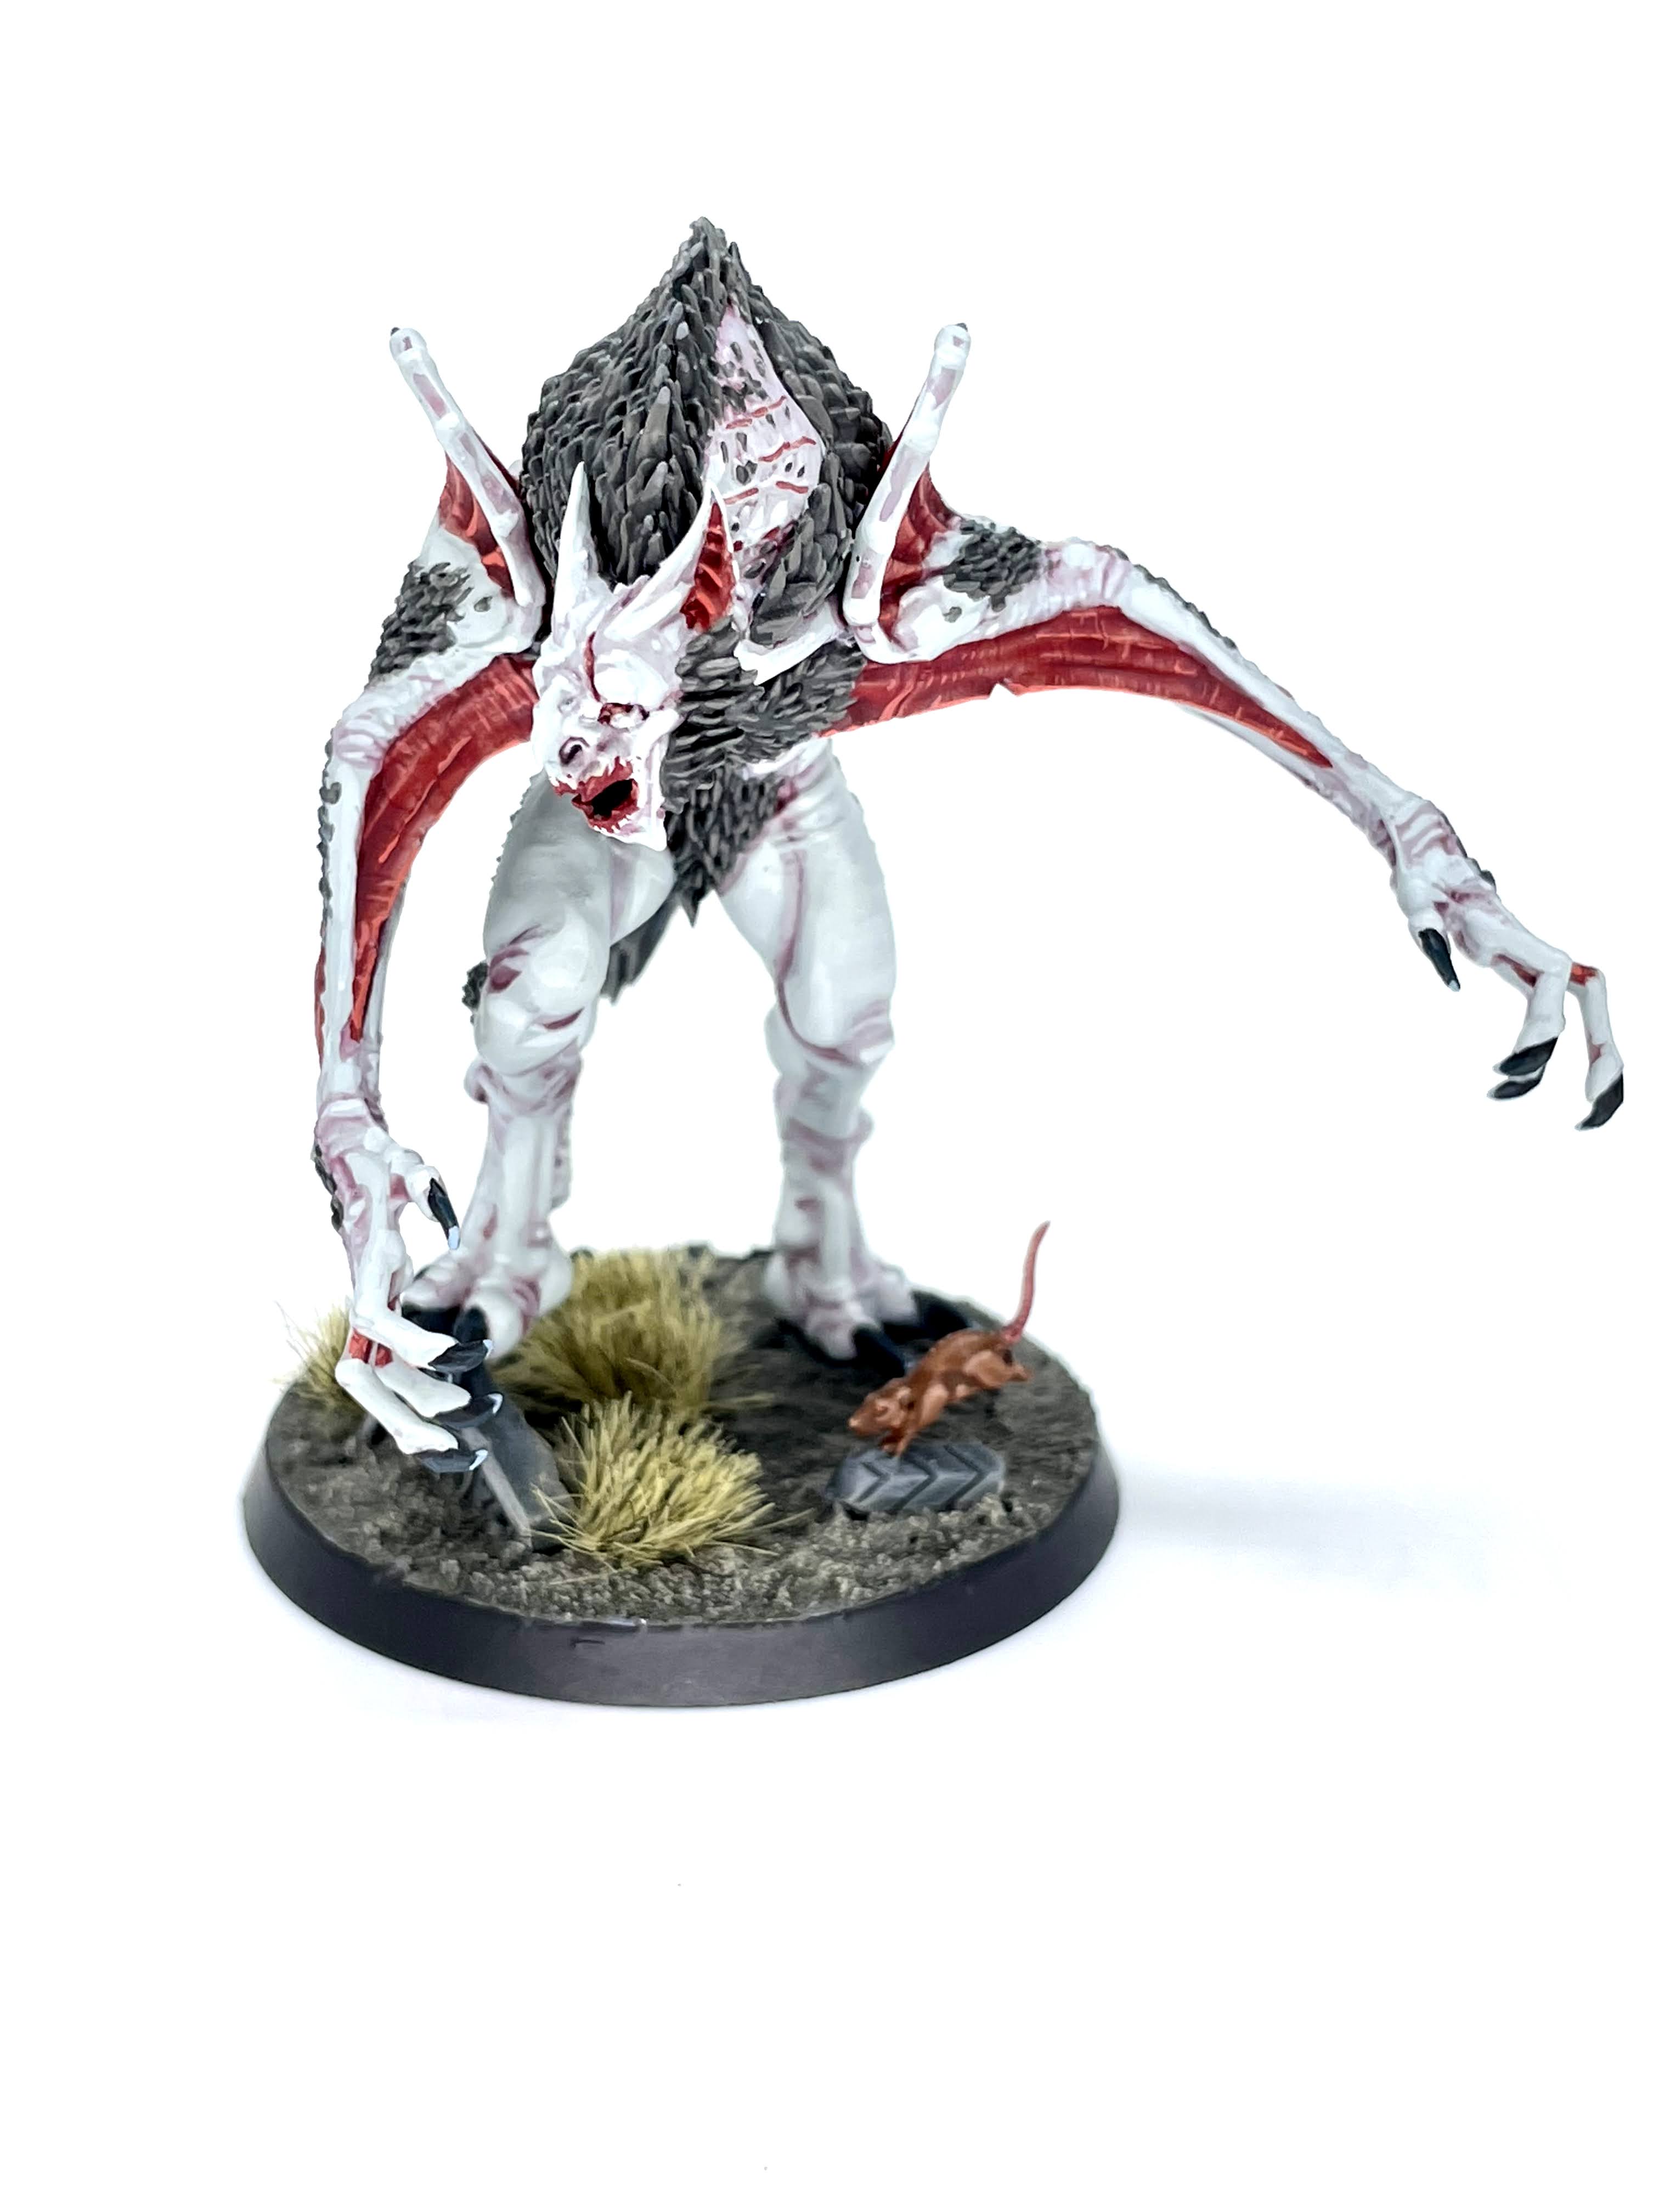
This Bloodborne-looking gross boi was the villain that I was most excited for, and he gave me a canvas to really figure out my zombie skin recipe. Intermittently using Athonian Camoshade and Carroburg Crimson over Rakarth Flesh really works if you want a starting point for putrid skin! Aside from some frustration breaking the fencepost things off his back, he came together extremely quickly and is probably my favorite non-skeleton among the bad guys. He was pretty automatic as by now I’d figured out what all the sundry badguy bits should look like.
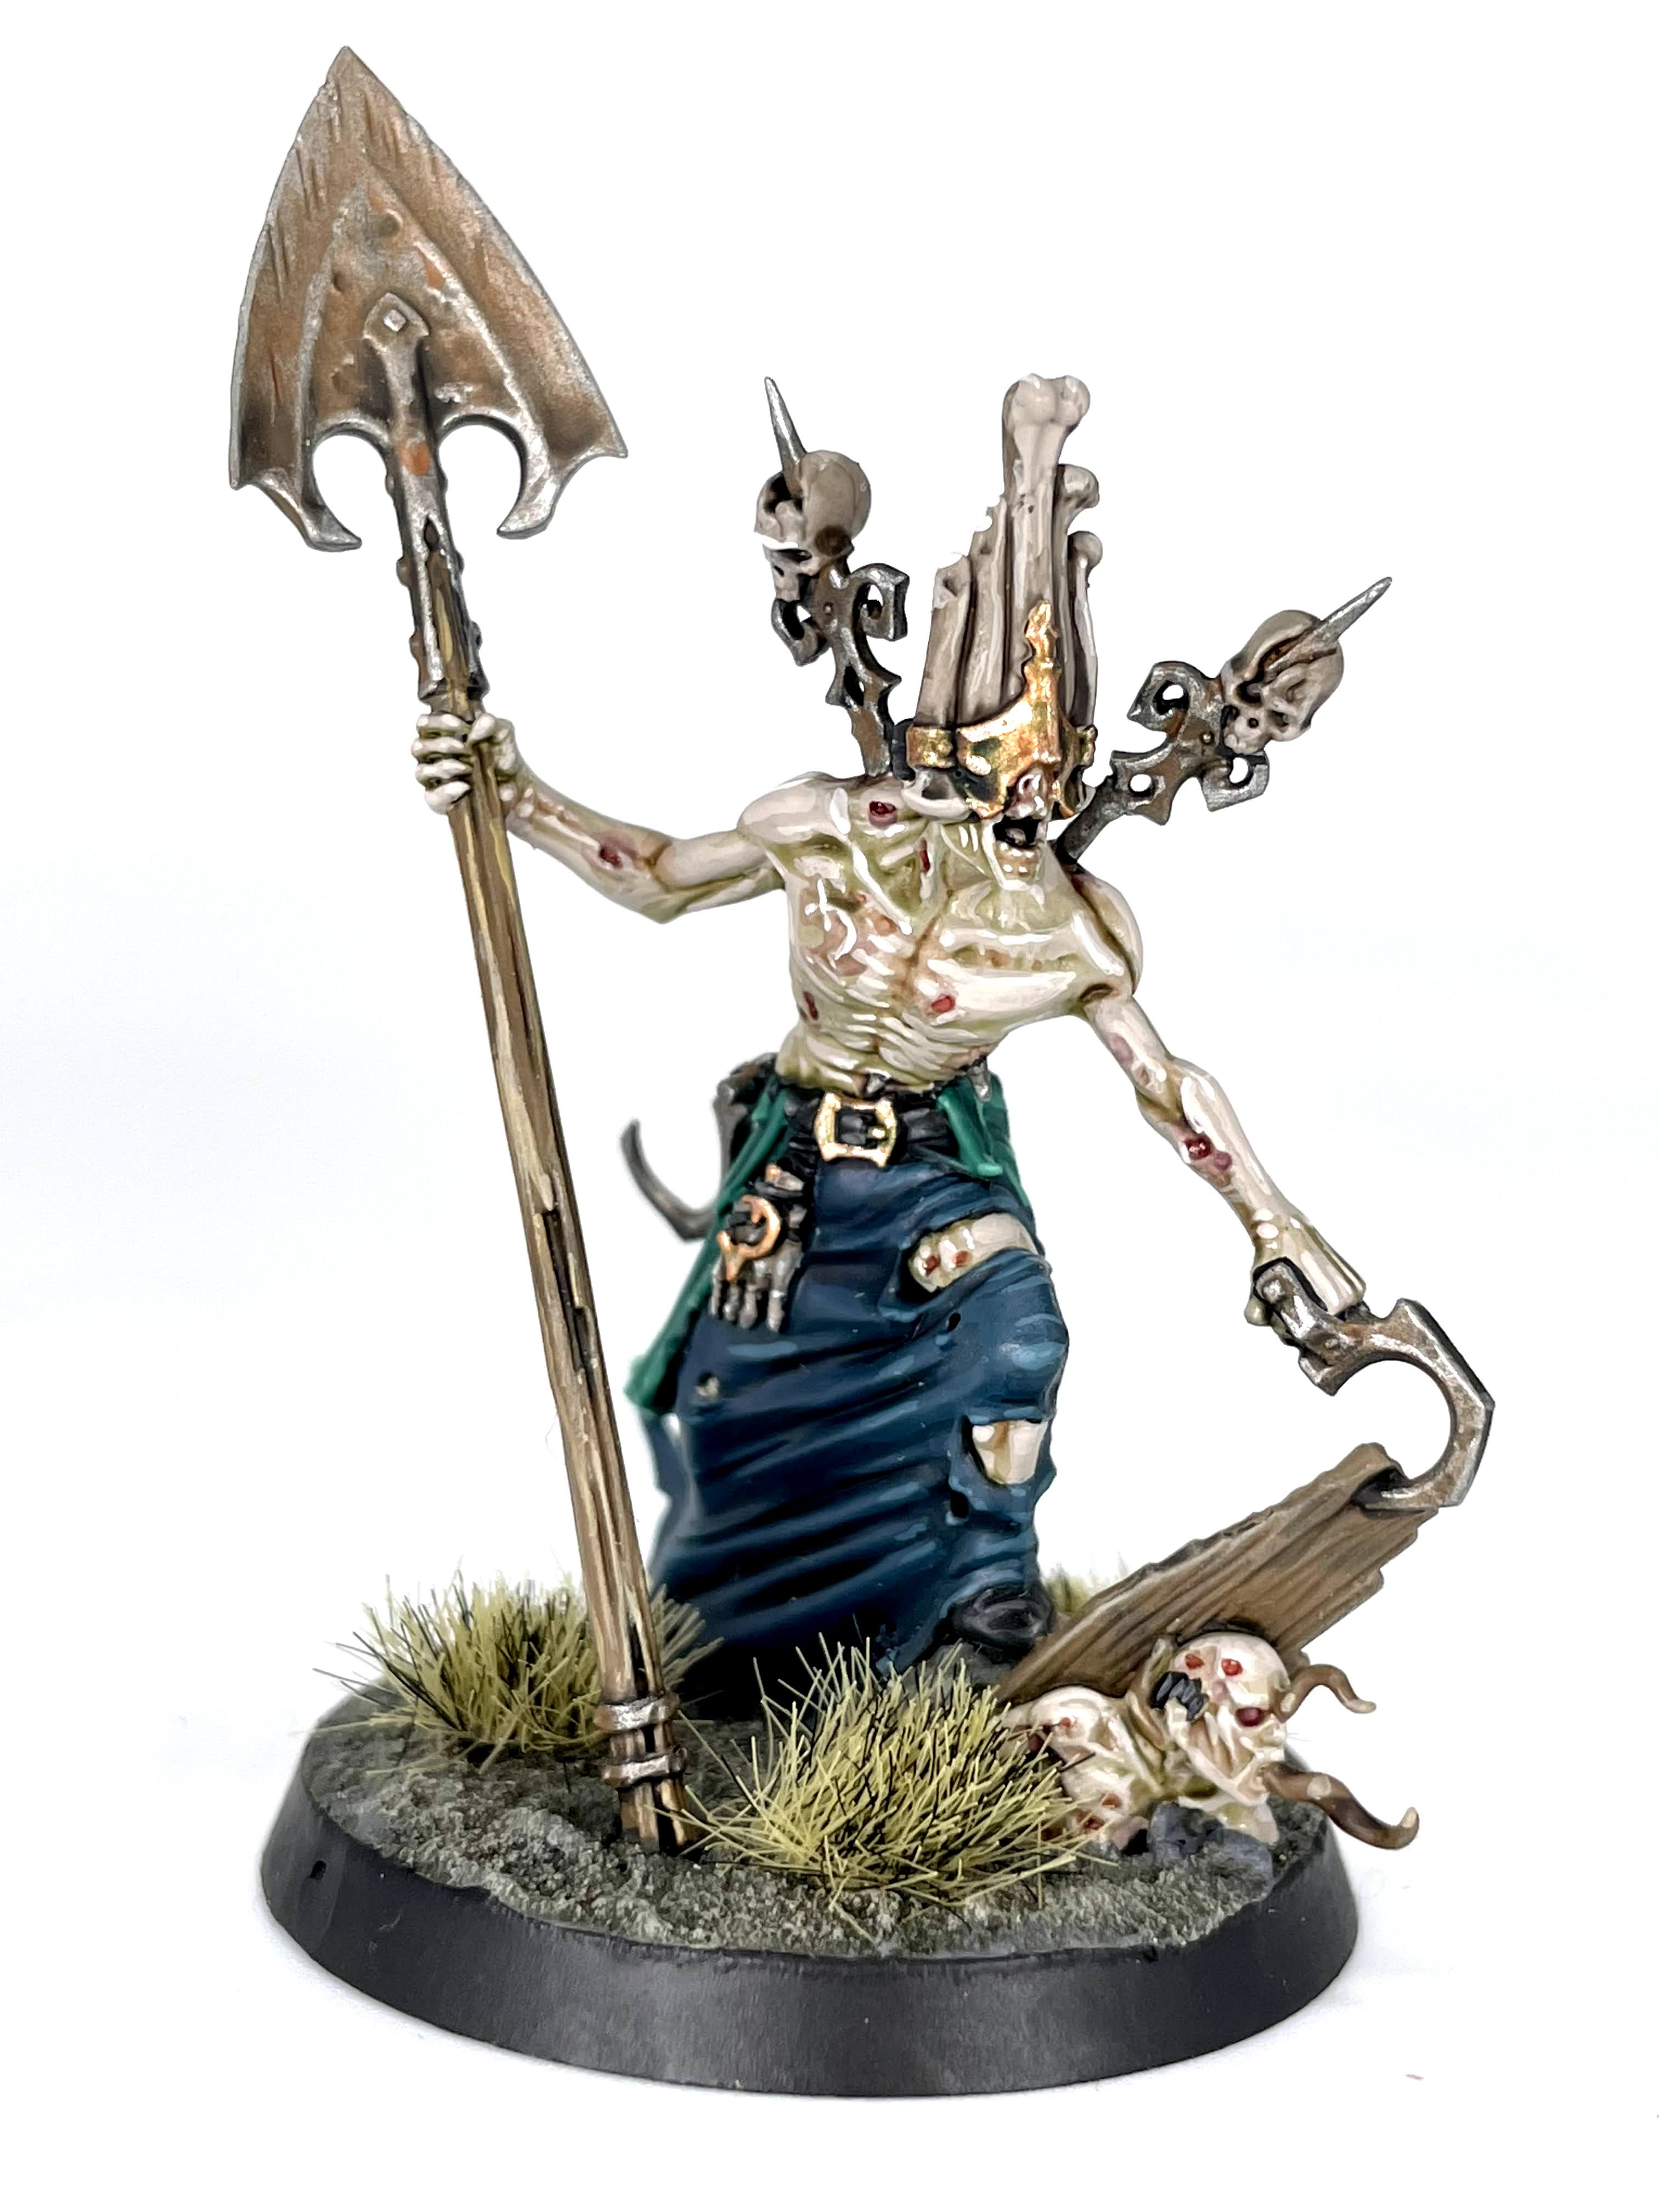
The crazy cat lady of the bunch, this dude was tricky. There are so many different materials and textures overlapping on him that I needed a plan going in. I was trying to figure out how I’d be painting all the sundry critters here, as I’d rather figure them out when I’m not trying to paint a whole mess on a base. Resultantly they look a little different but hey, that’s nature, baby! The dude himself was pretty simple, but figuring out the right balance on the animals to make them look altogether cohesive without blending into the model was tricky. Enjoy my one albino rat, I guess.
Onto the shambling hordes! Get ready for a land of lower-case C contrasts here.
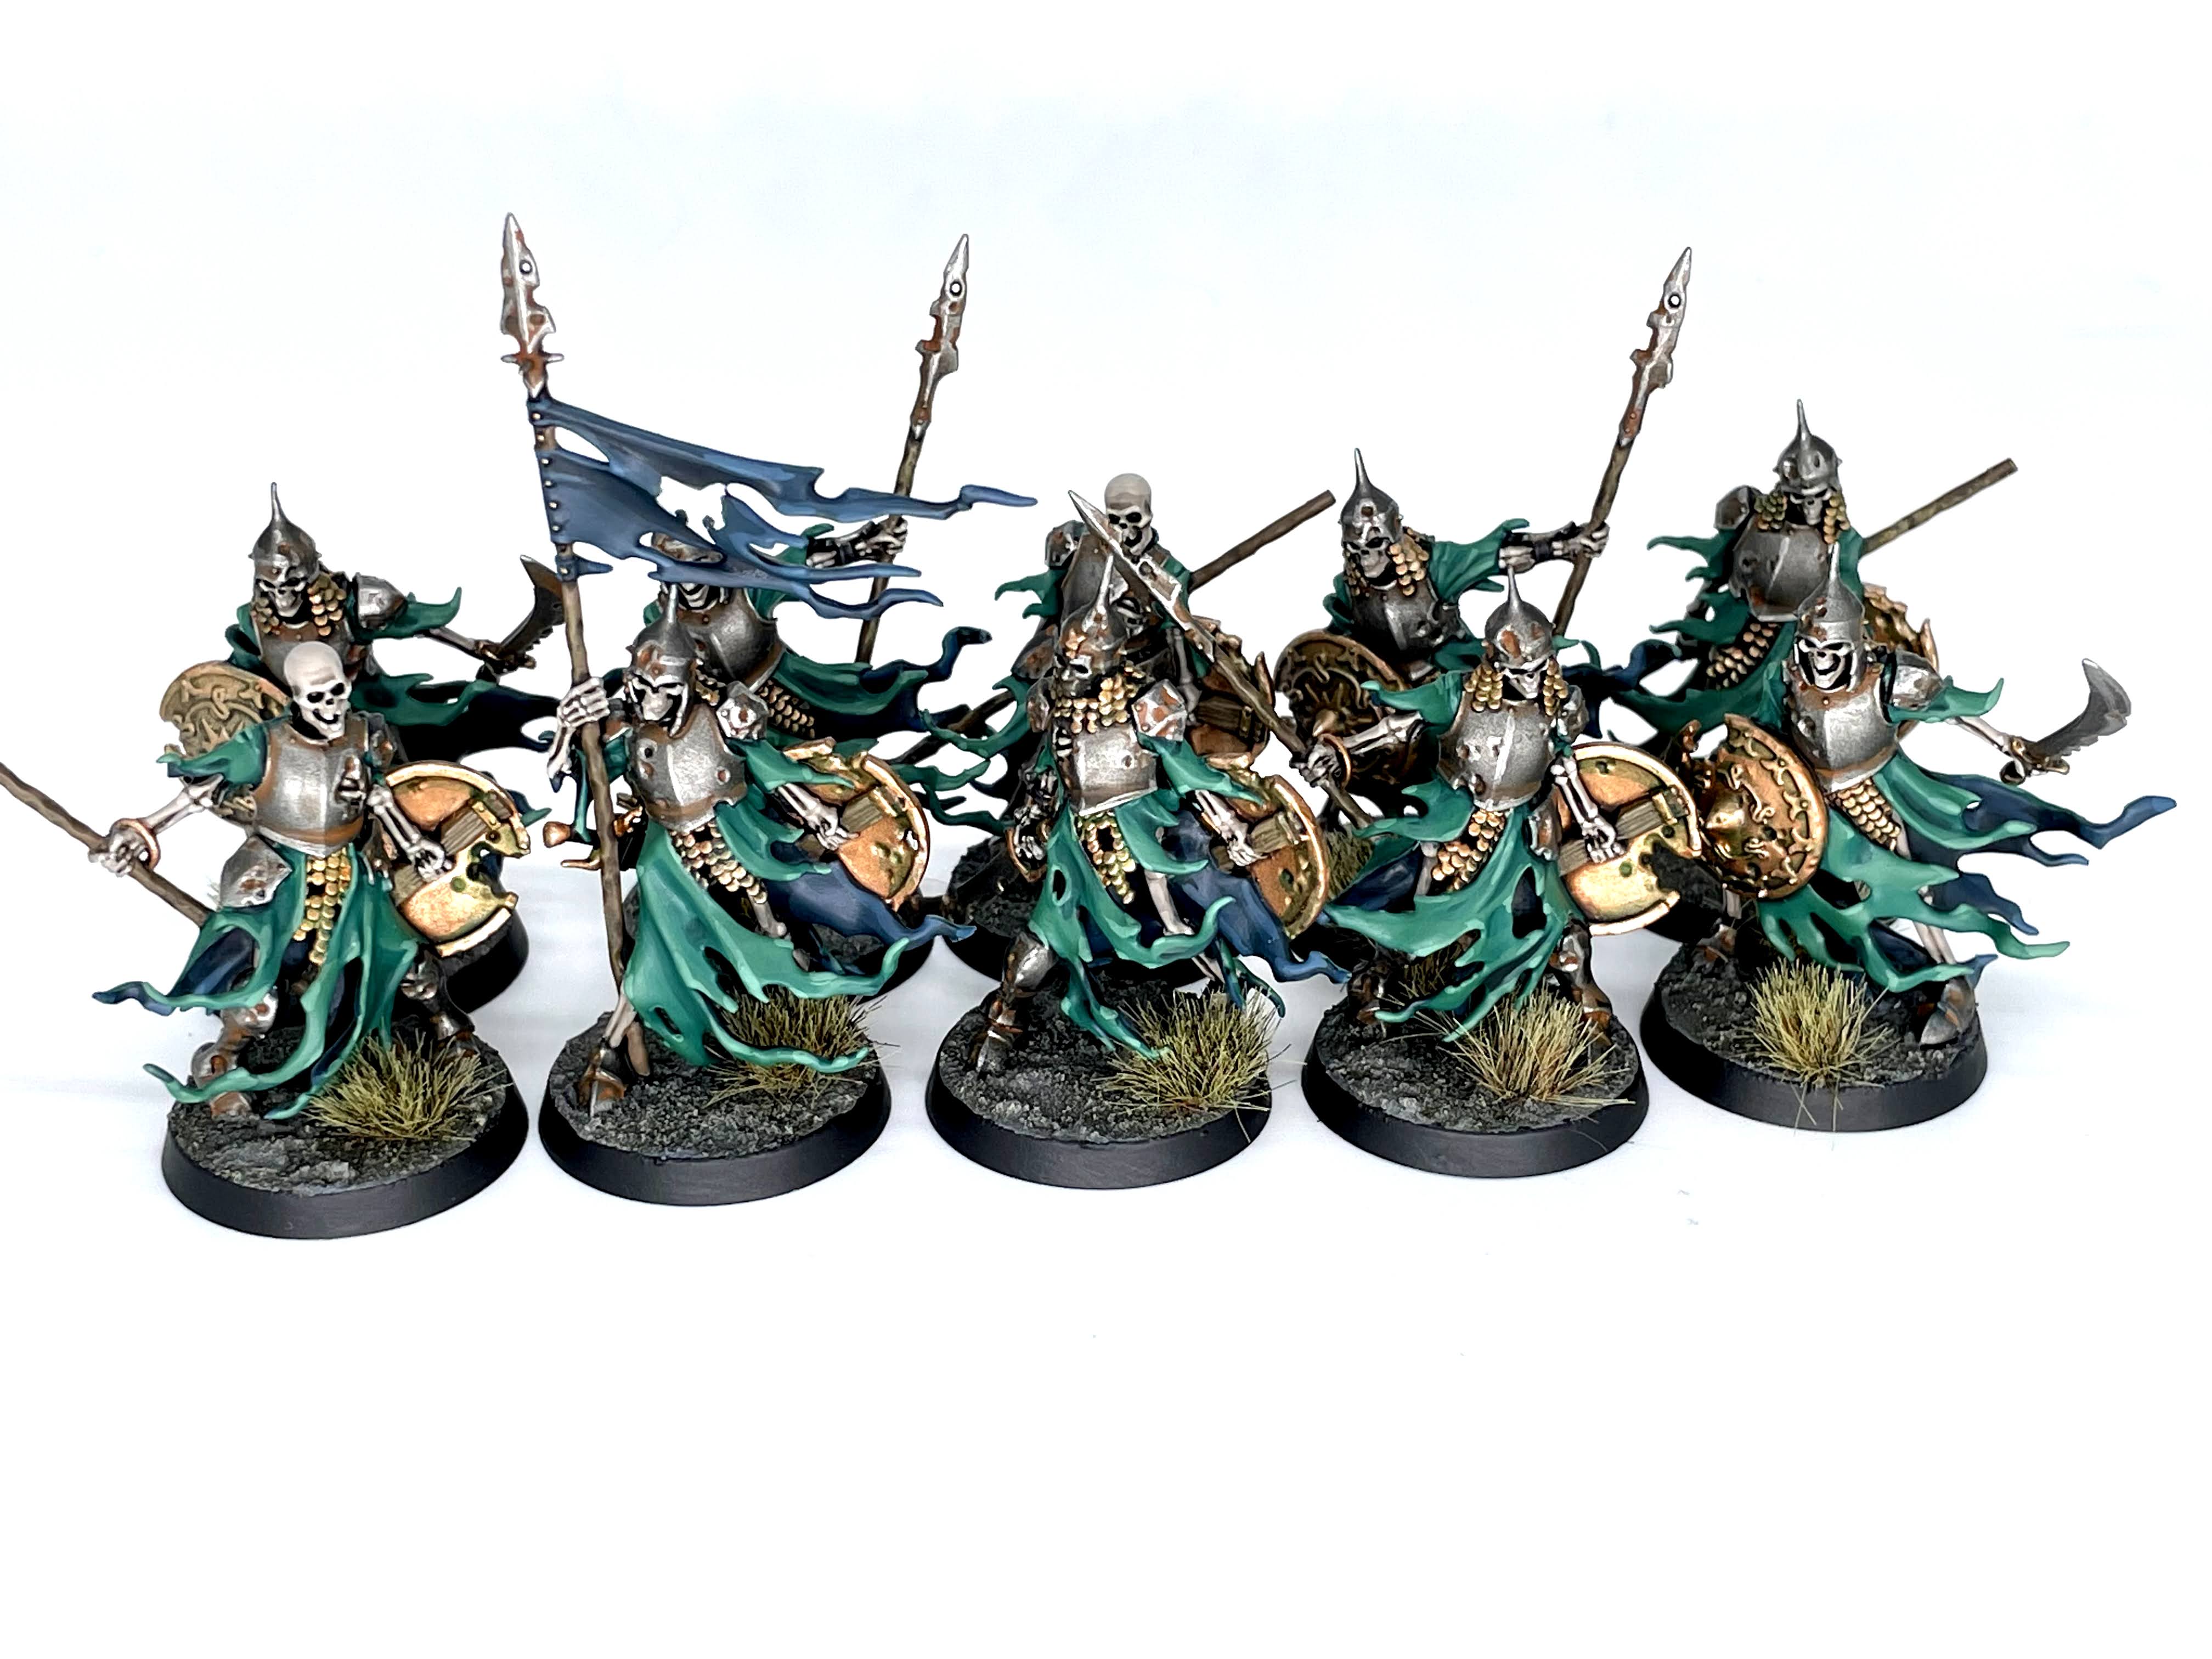
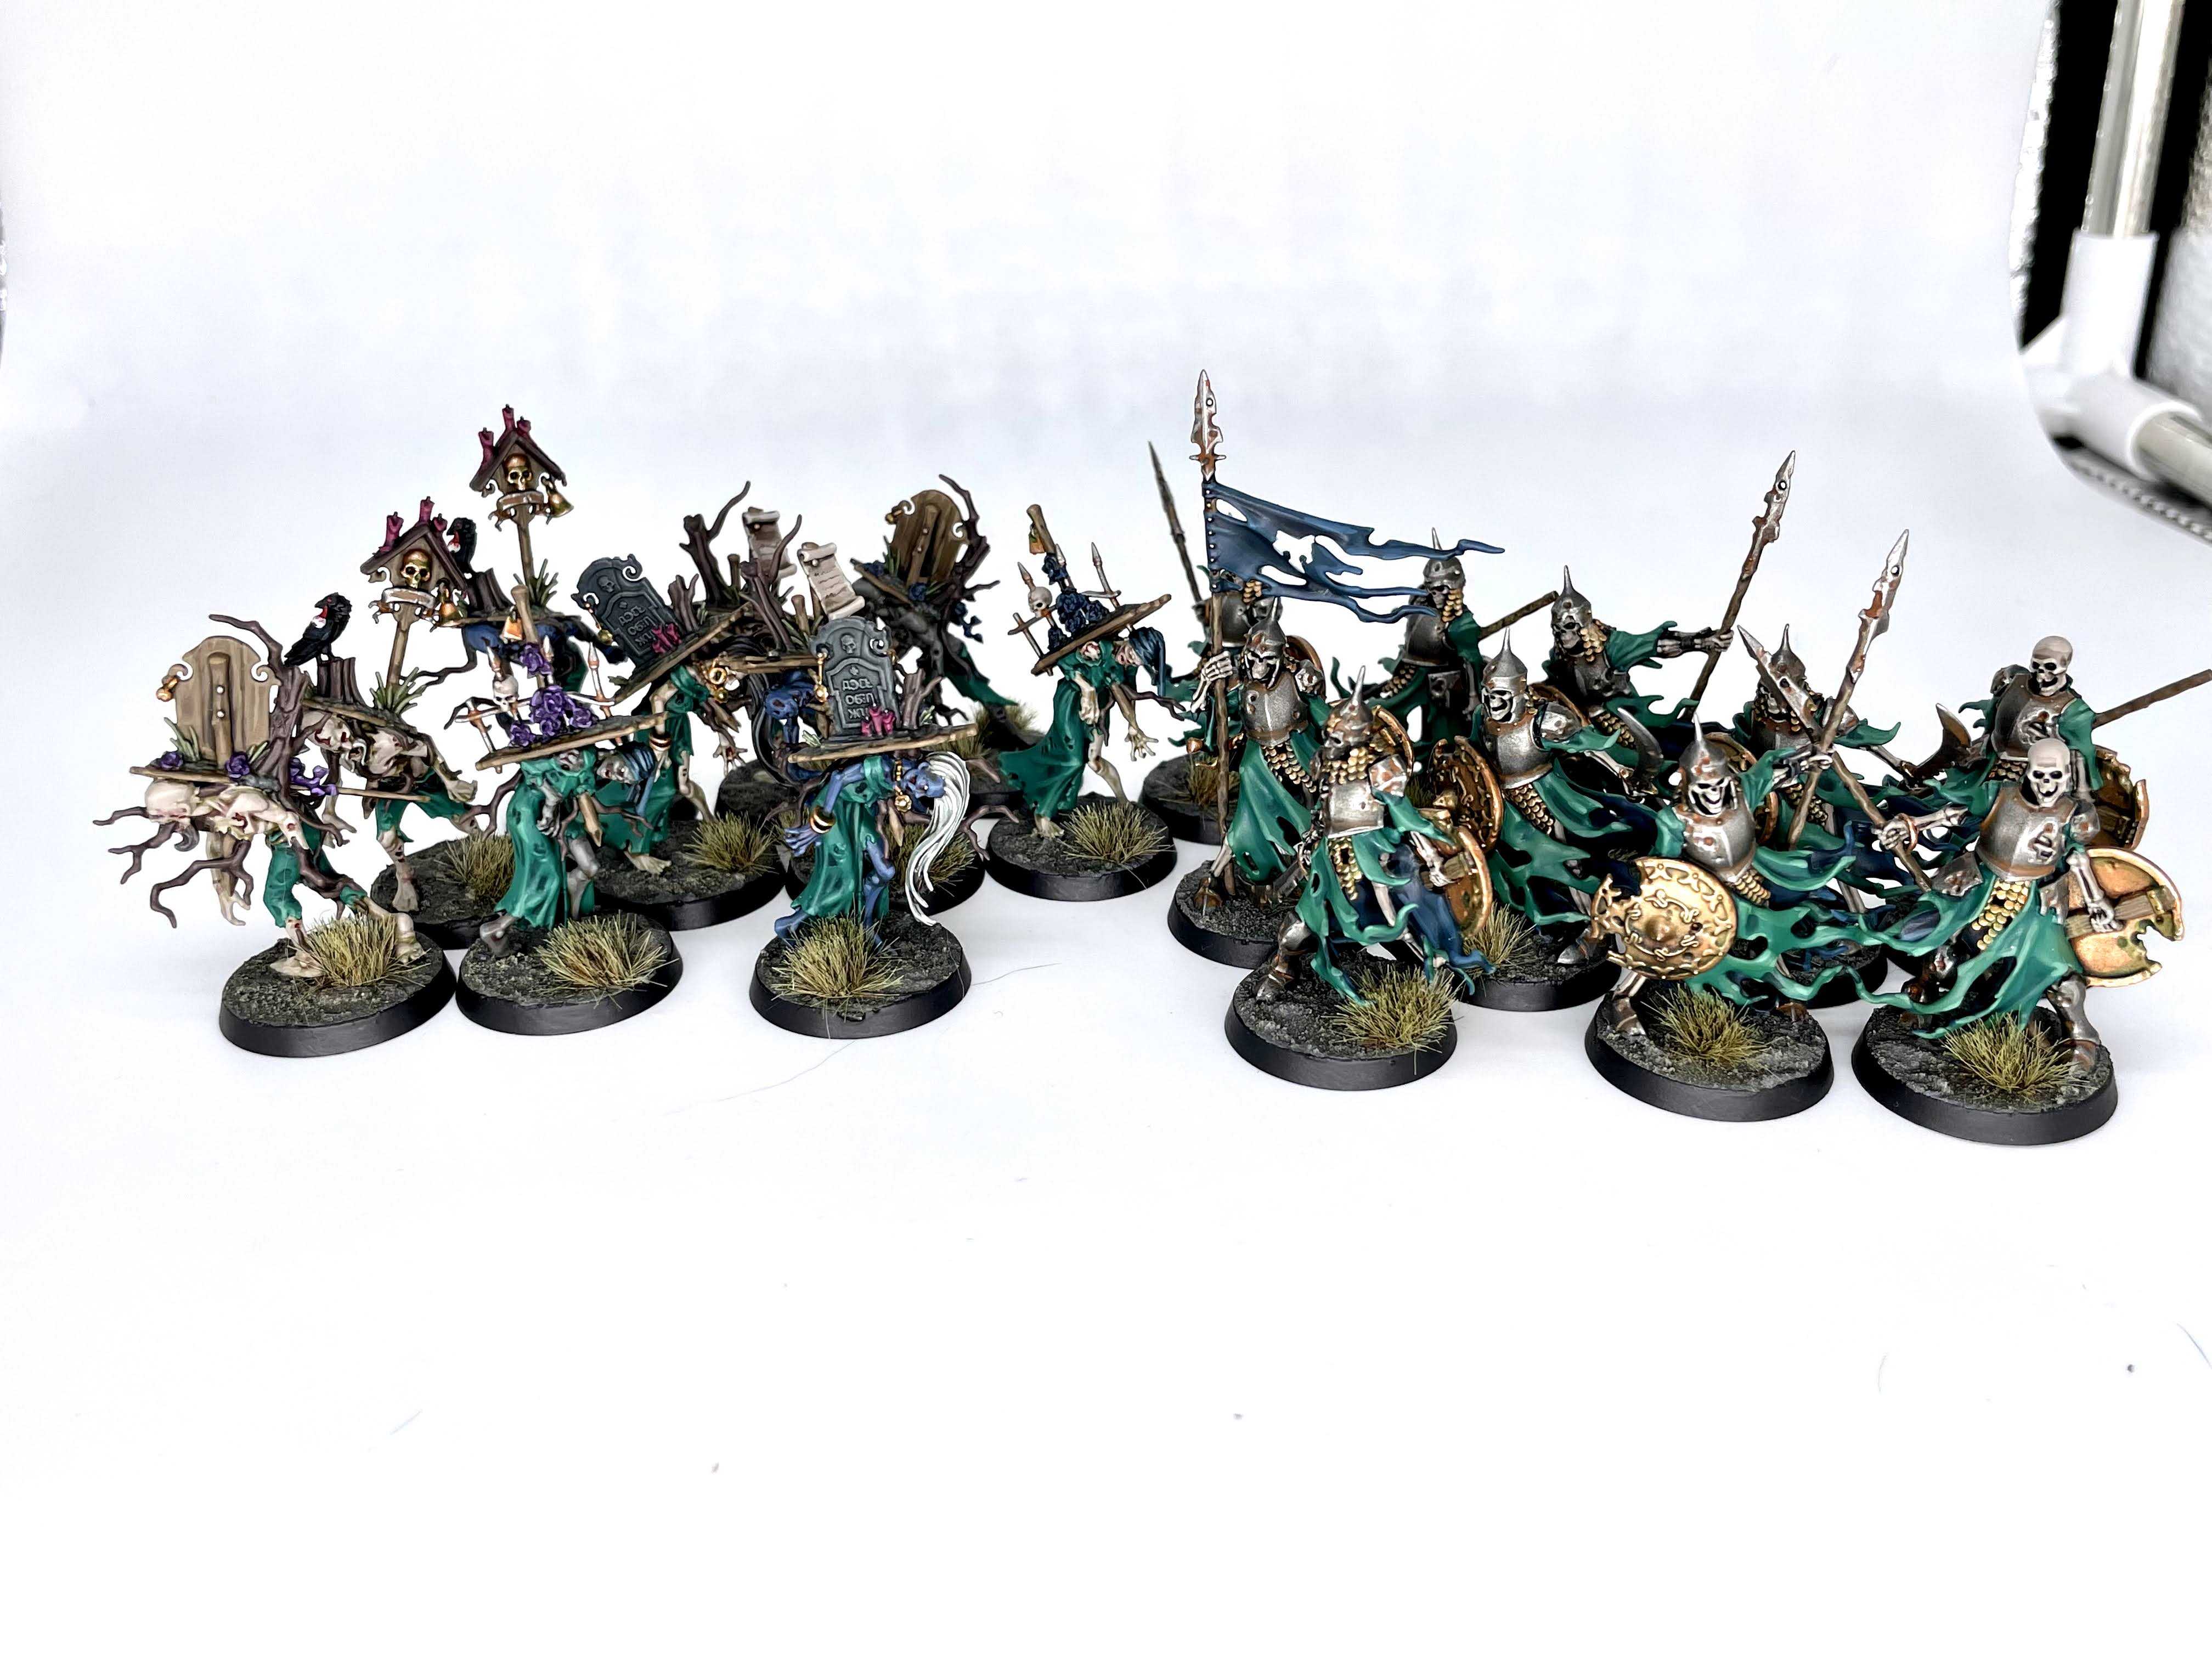
First up, these guys fuckin slap. They whip. They quite literally own bones. The only way they could be better would be if there was a skeleton musician playing a wind instrument. Painting these dudes was just like painting Watch Captain Halgrim, but I did it 10 times and it was therefore 10 times as fun. I’m thrilled they carried this aesthetic over to the new multipart box. The only real flair I think I put on these guys was painting a wolf head on the banner, but it ended up being kind of soft and cute so it looks like they’re panda fans or something. Whatever, I loved painting these guys and they’re the best use of Kabalite Green I’ve ever had.

On the other side of things, I’ve got these fucking jamokes. I hated painting them so goddamn much. Just looking at the dude on the far right, he’s got:
- skin
- cloth
- leather
- wood/roots
- wood/boards/stakes
- candles
- brass
- silver
- hair
- gore
- eyeball (detached)
- bird
That’s a dozen different textures right there, and they all need colors. You could simplify this process a bit (I did by just dressing all the zombies in matching Bad Guy Green) but there’s still a lot of overlapping detail on what are, at the end of the day, chaff to be murdered by our heroes. It doesn’t help that they’ve all got the same bad posture so they manage to look busy and samey at the same time. I took longer on these than anything else in the entire set, and didn’t enjoy the process very much at all. I’m relieved that the multipart kit only has like, a single guy with this bad posing, but it was immensely frustrating and I always found myself missing another little detail. There’s some cool ones – two zombies have rats nibbling at their ankles – but the combination of monotony, detail, and the gross-out factor here had me saving them for next to last. I knew I’d burn out if I started them too early, and by keeping the final model to be painted, Glaurio Van Alten III nearby, I had a light at the end of the tunnel.
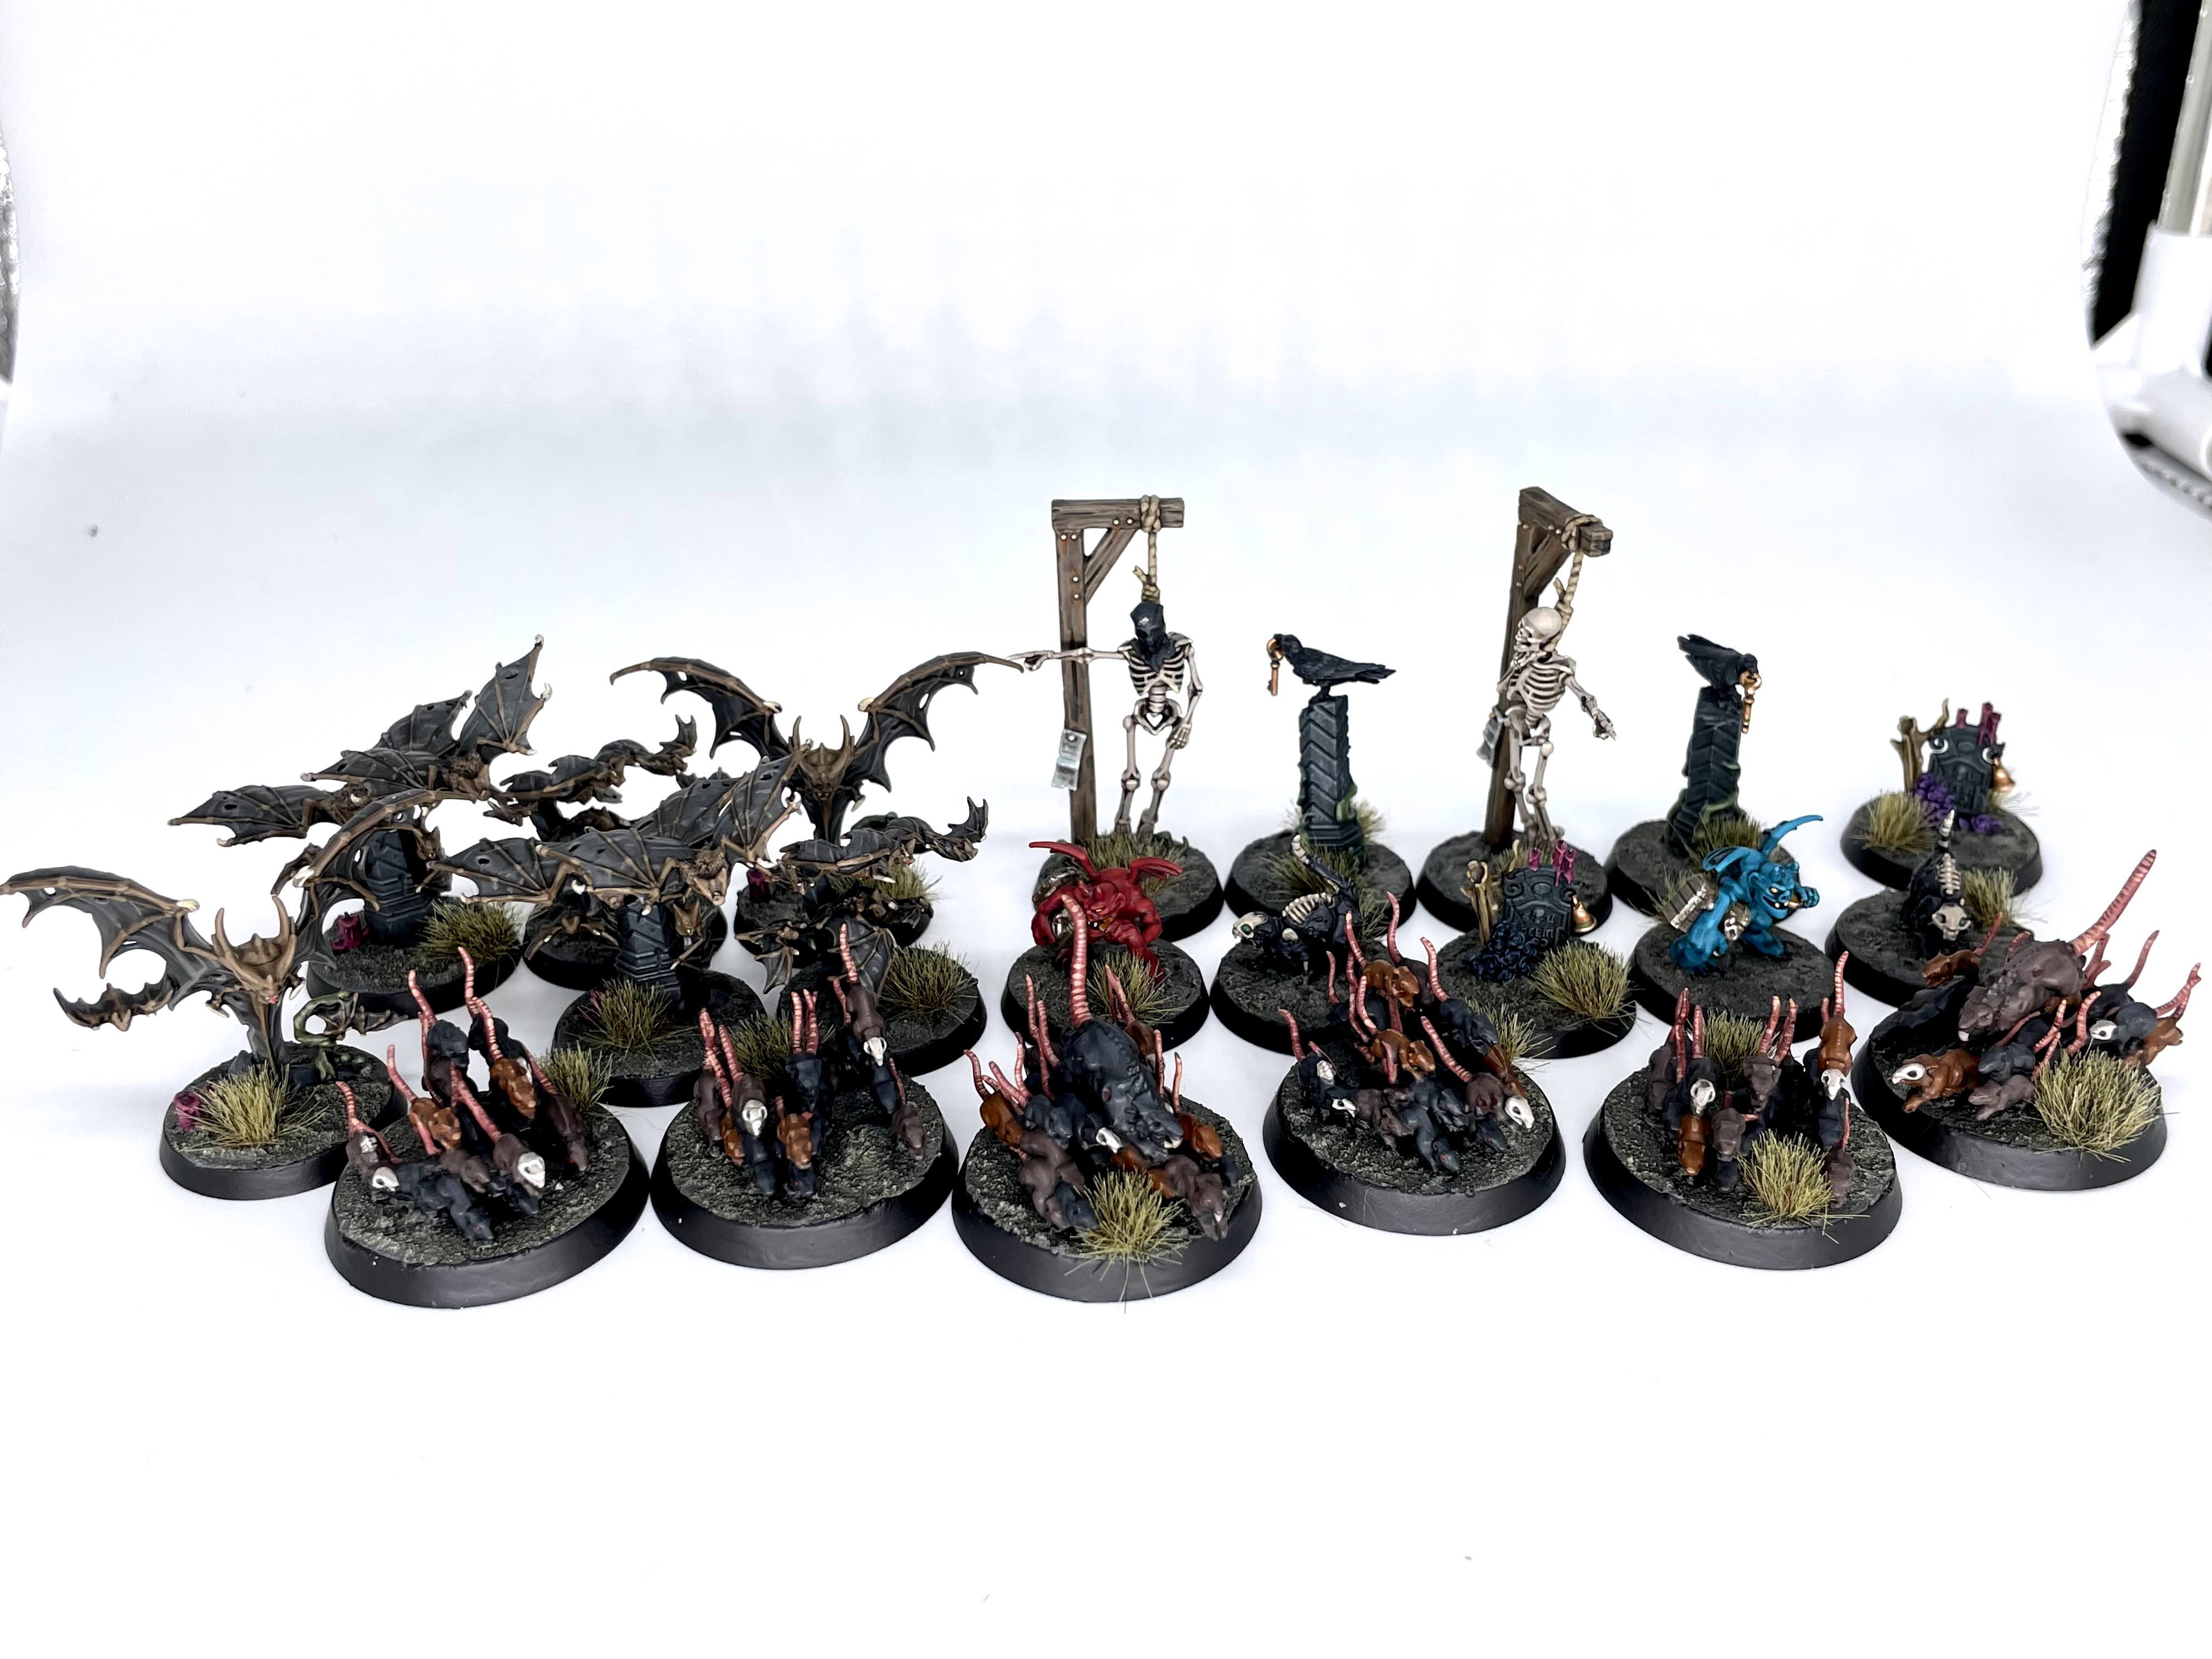
Lastly, here’s all the other stuff – the objective markers, bats, and rats. I had a feeling I’d burn out before getting to these so I peppered them into the process, one group at a time.
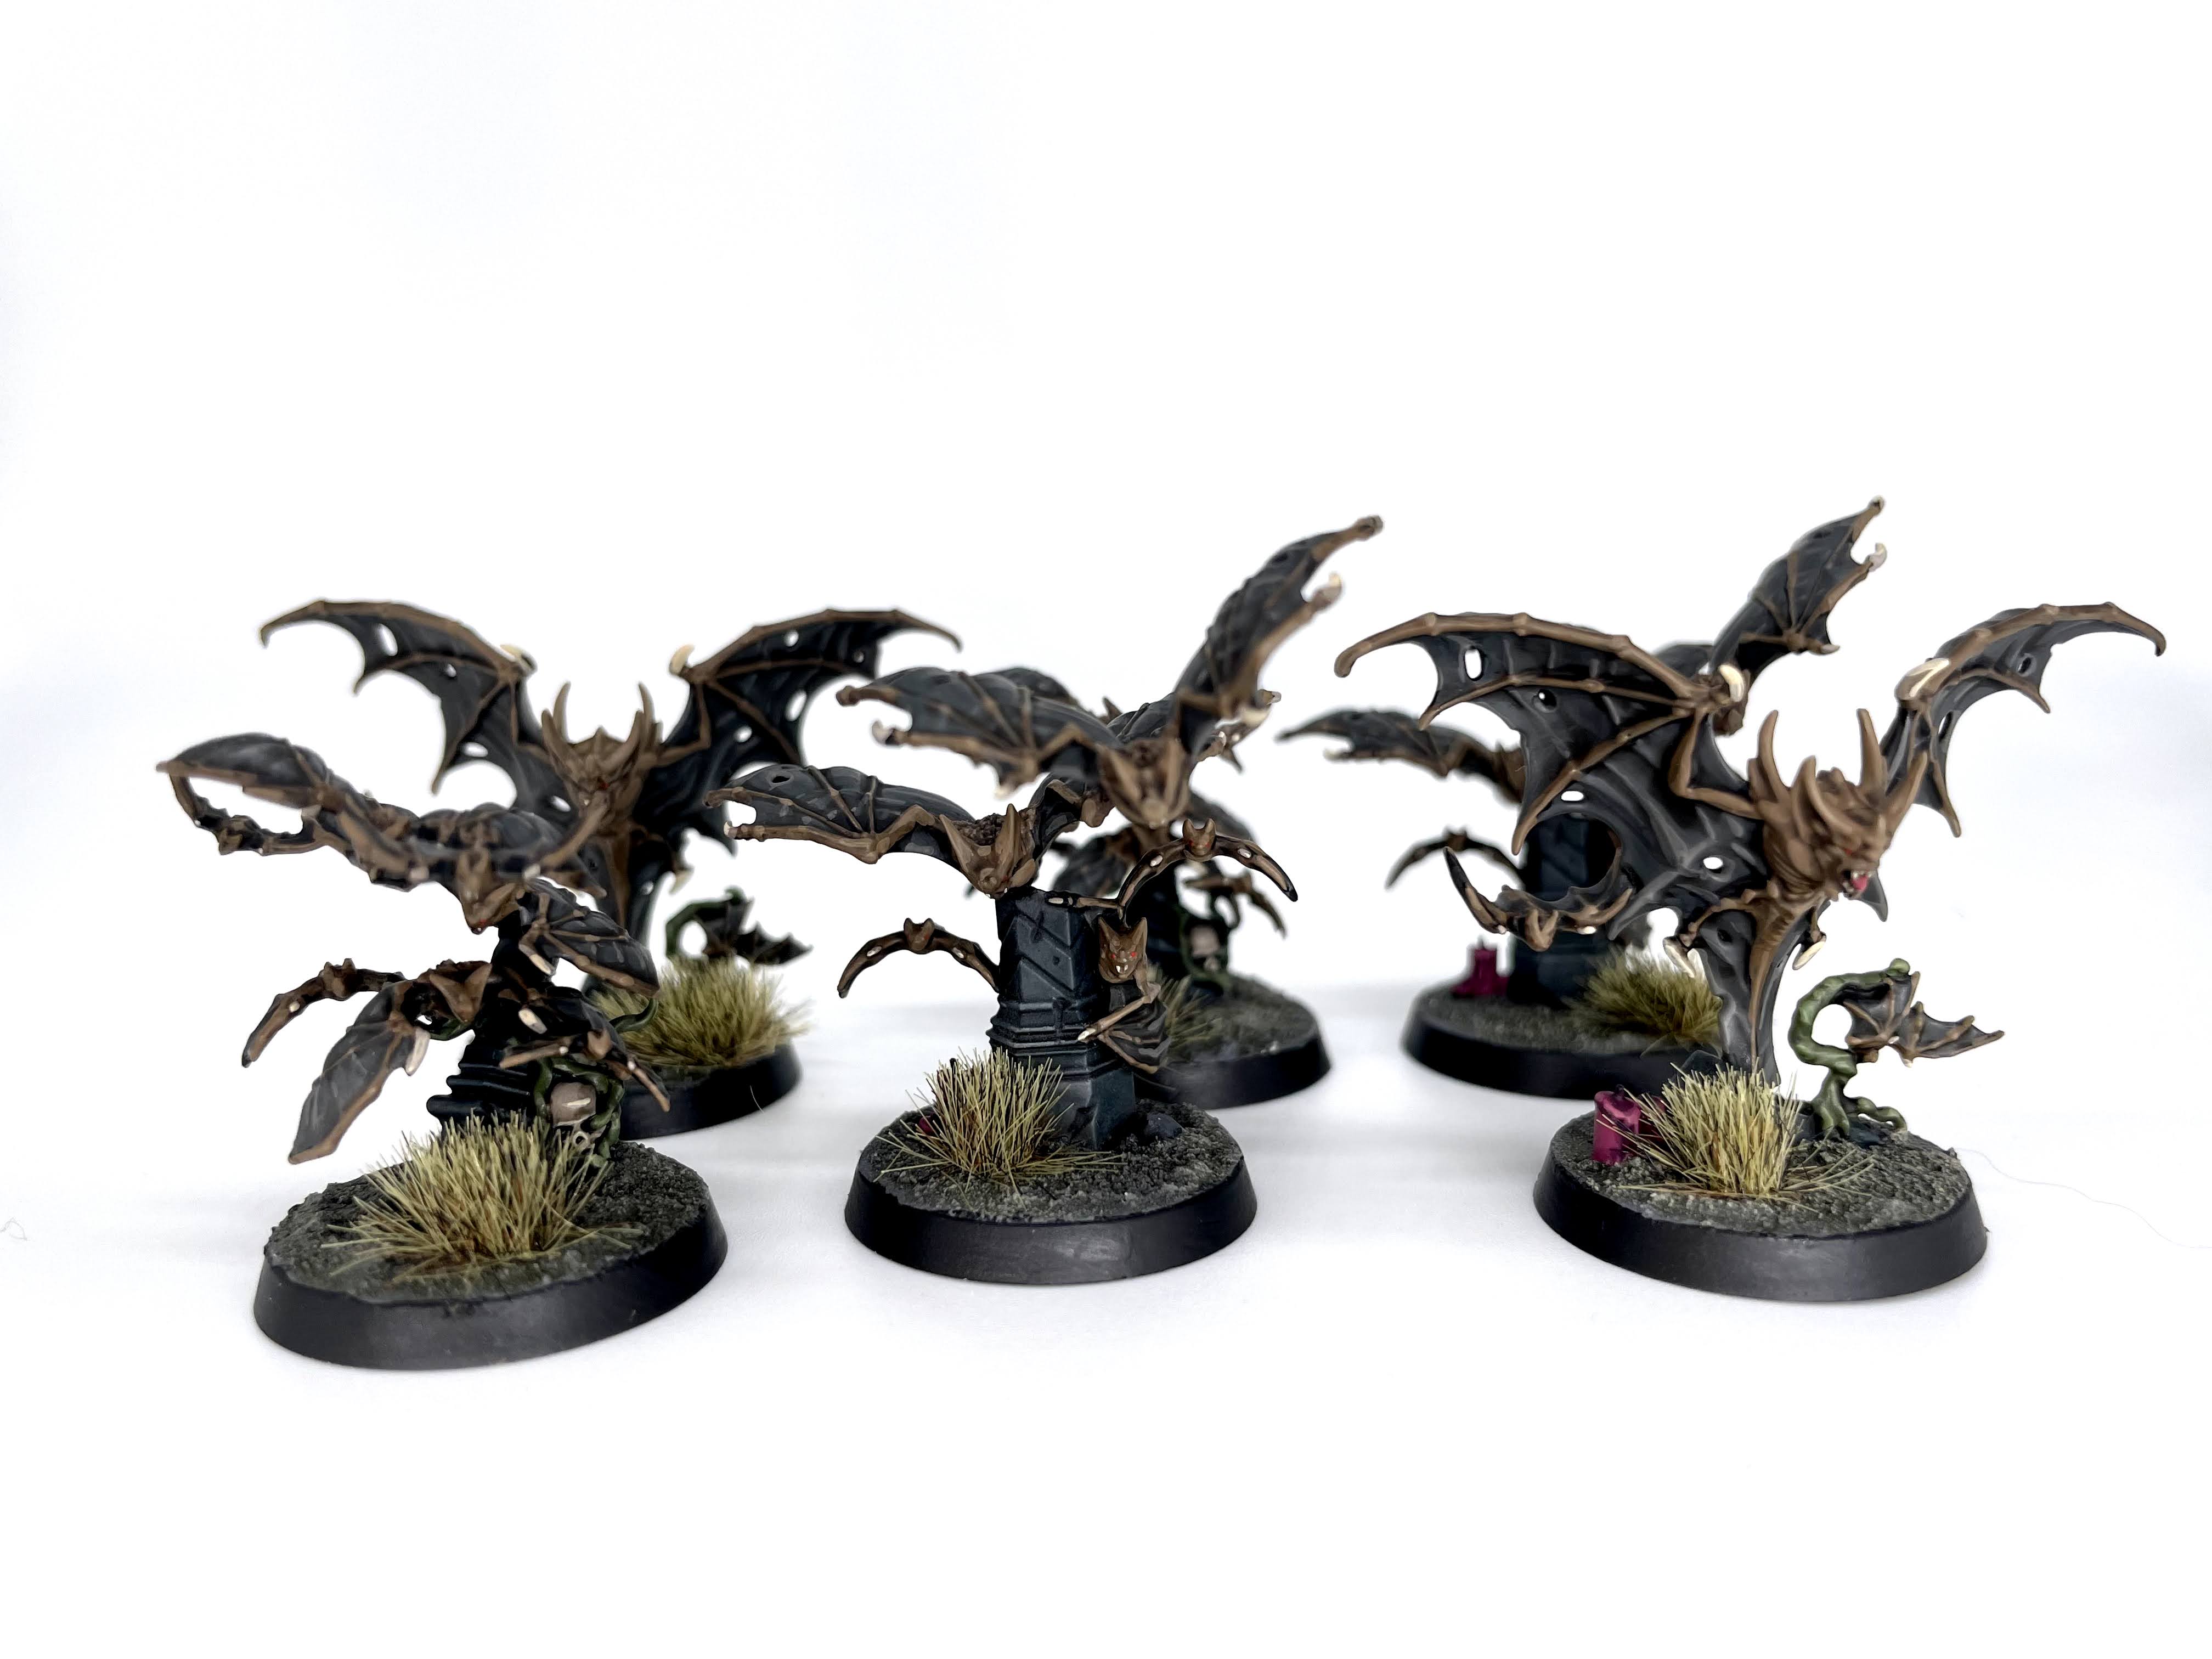
First up are these bats. I hate to have two negative takes in a row, but I think a lot of this came down to my painting process. I really should have just done Contrast with these instead of a more traditional layer, shade, highlight, highlight situation. They’re nice and dynamic models but I had no idea how hard it would be to reach into all the nooks and crannies on them. There’s a lot of bats in the way of bats, and I had to do some serious brush angling to get under all those wings. I can’t say I really enjoyed these, but the yoked bat with its six pack remains extremely funny to me.
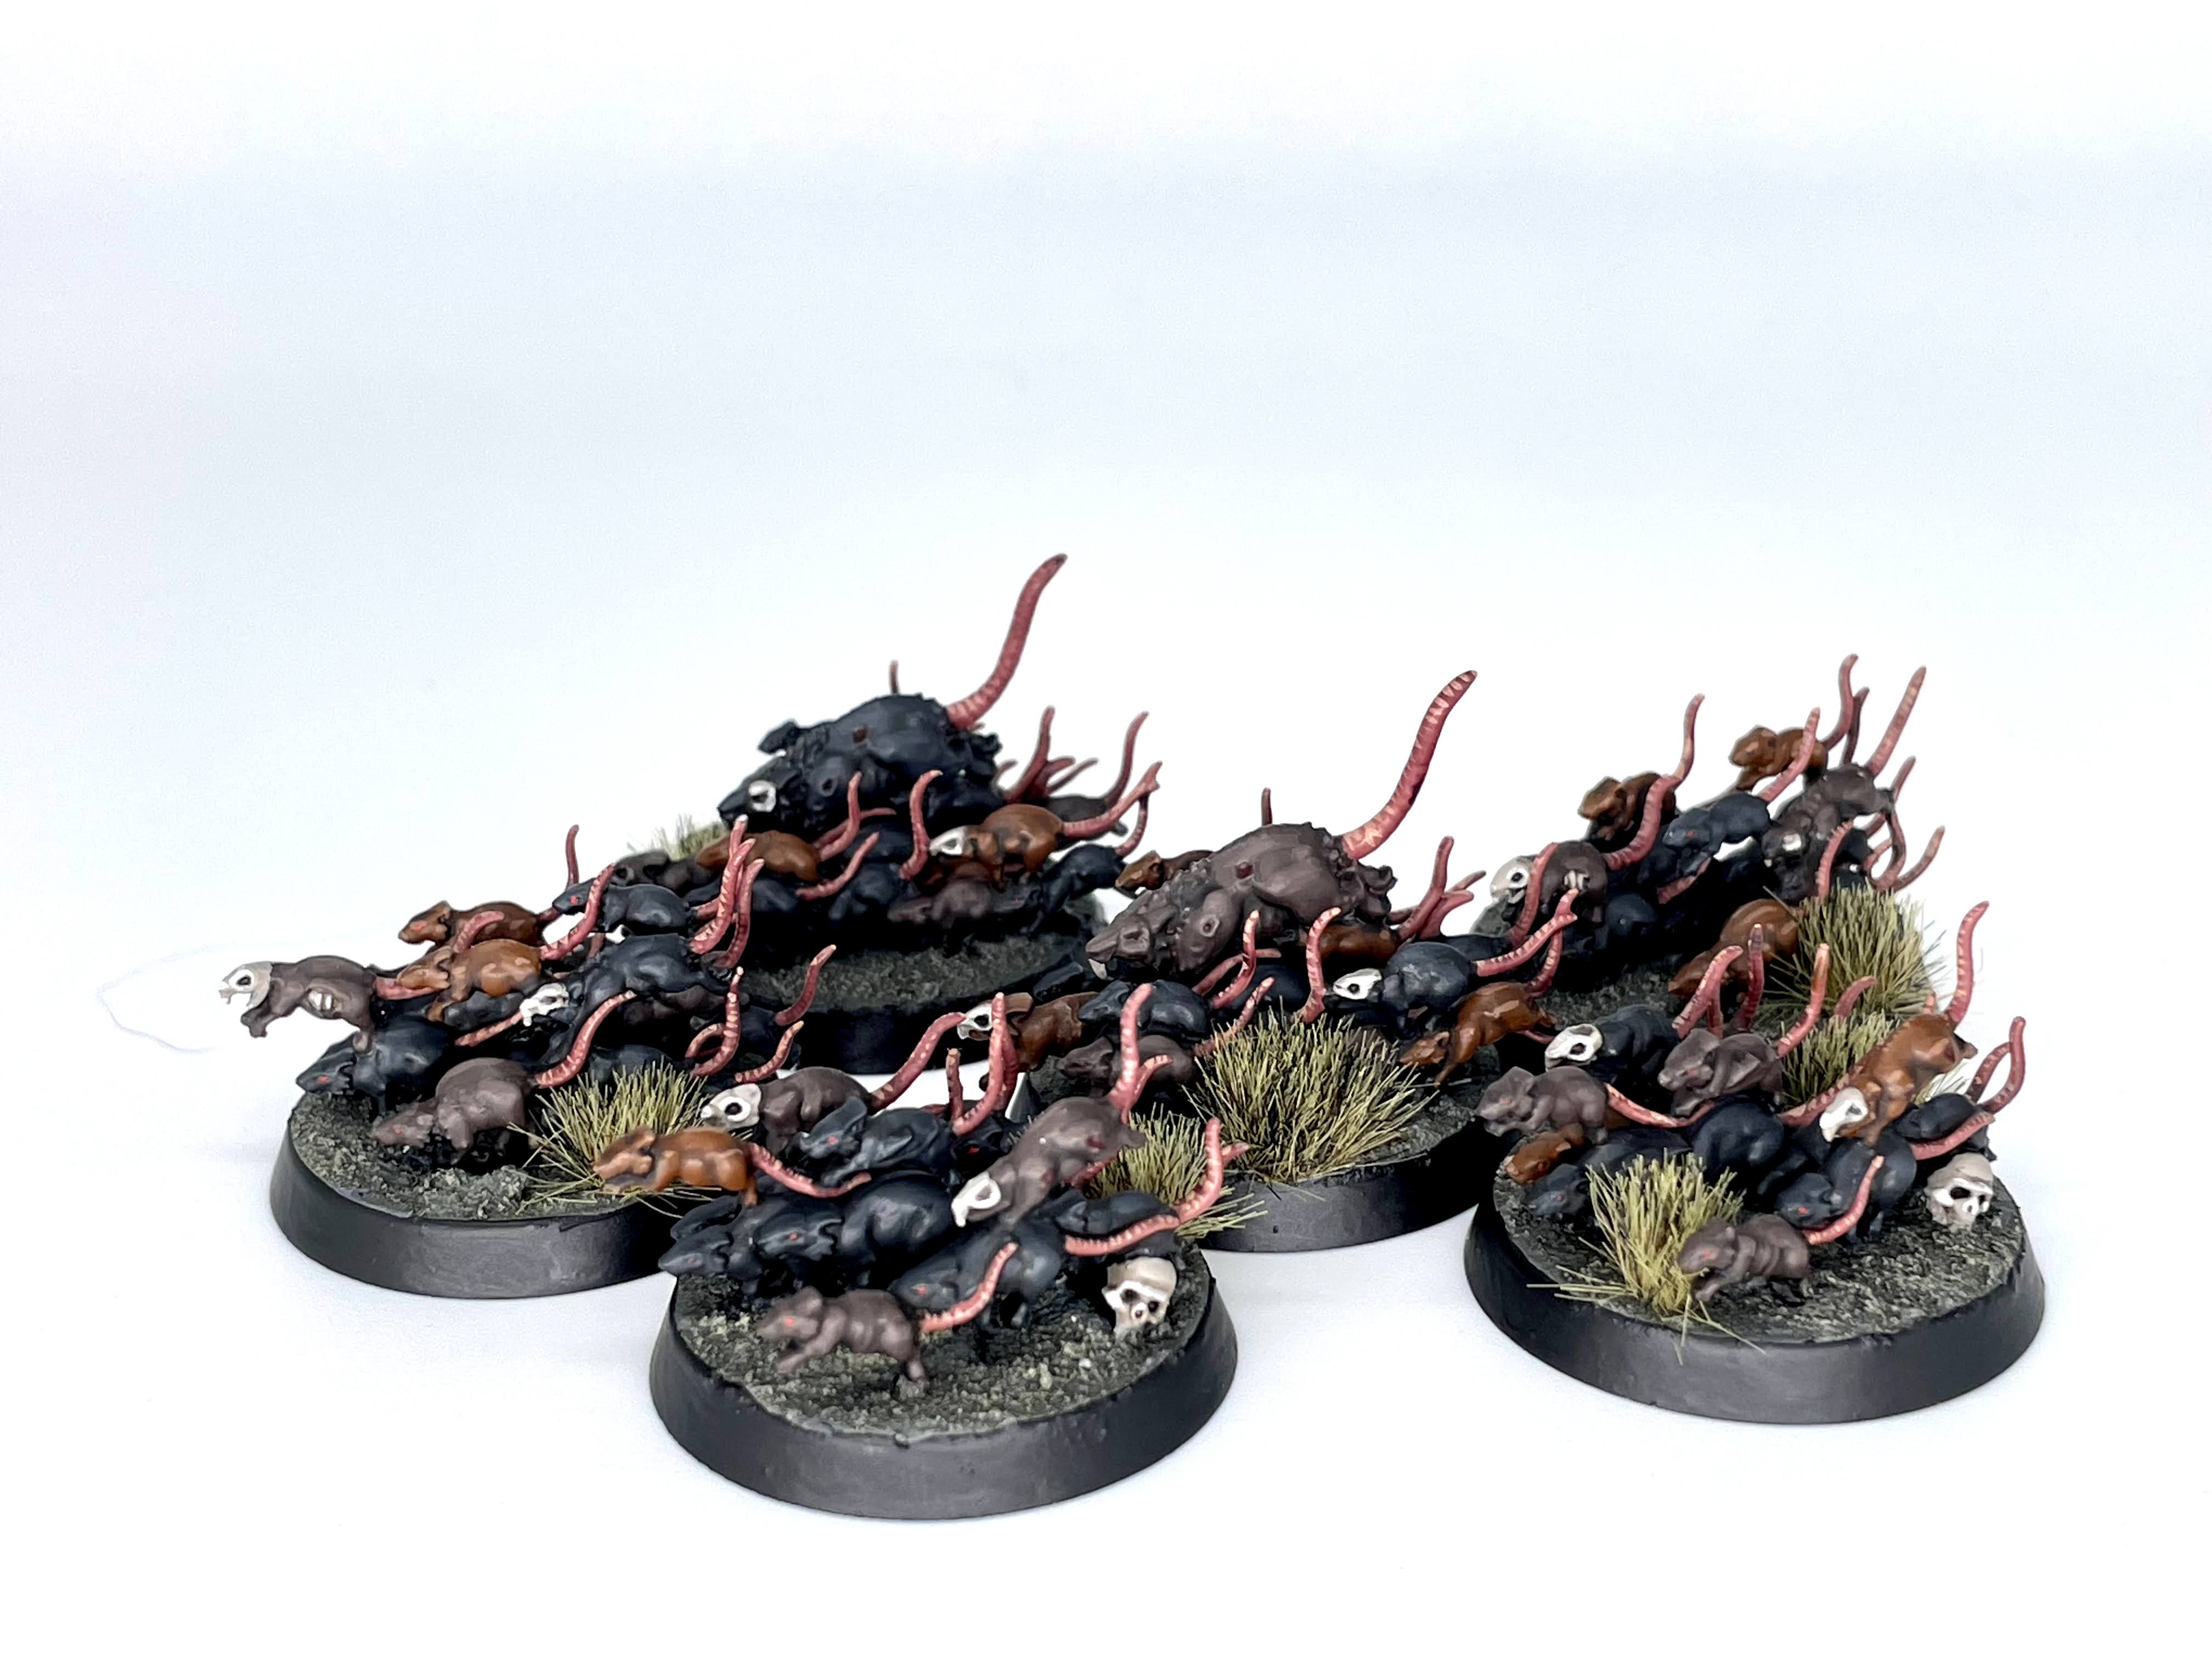
I thought the rats would be a repeat of the bats but it turns out they were pretty fun! I stuck to just three general colors of rat, which kept things simple and repeatable. The swarms seem busier than they really are, and by varying the color of just a few per base I made them look much more random and organic. These were just a simple layering job, and I even washed them all with the same Nuln Oil/Agrax Earthshade mixture which really sped things along.
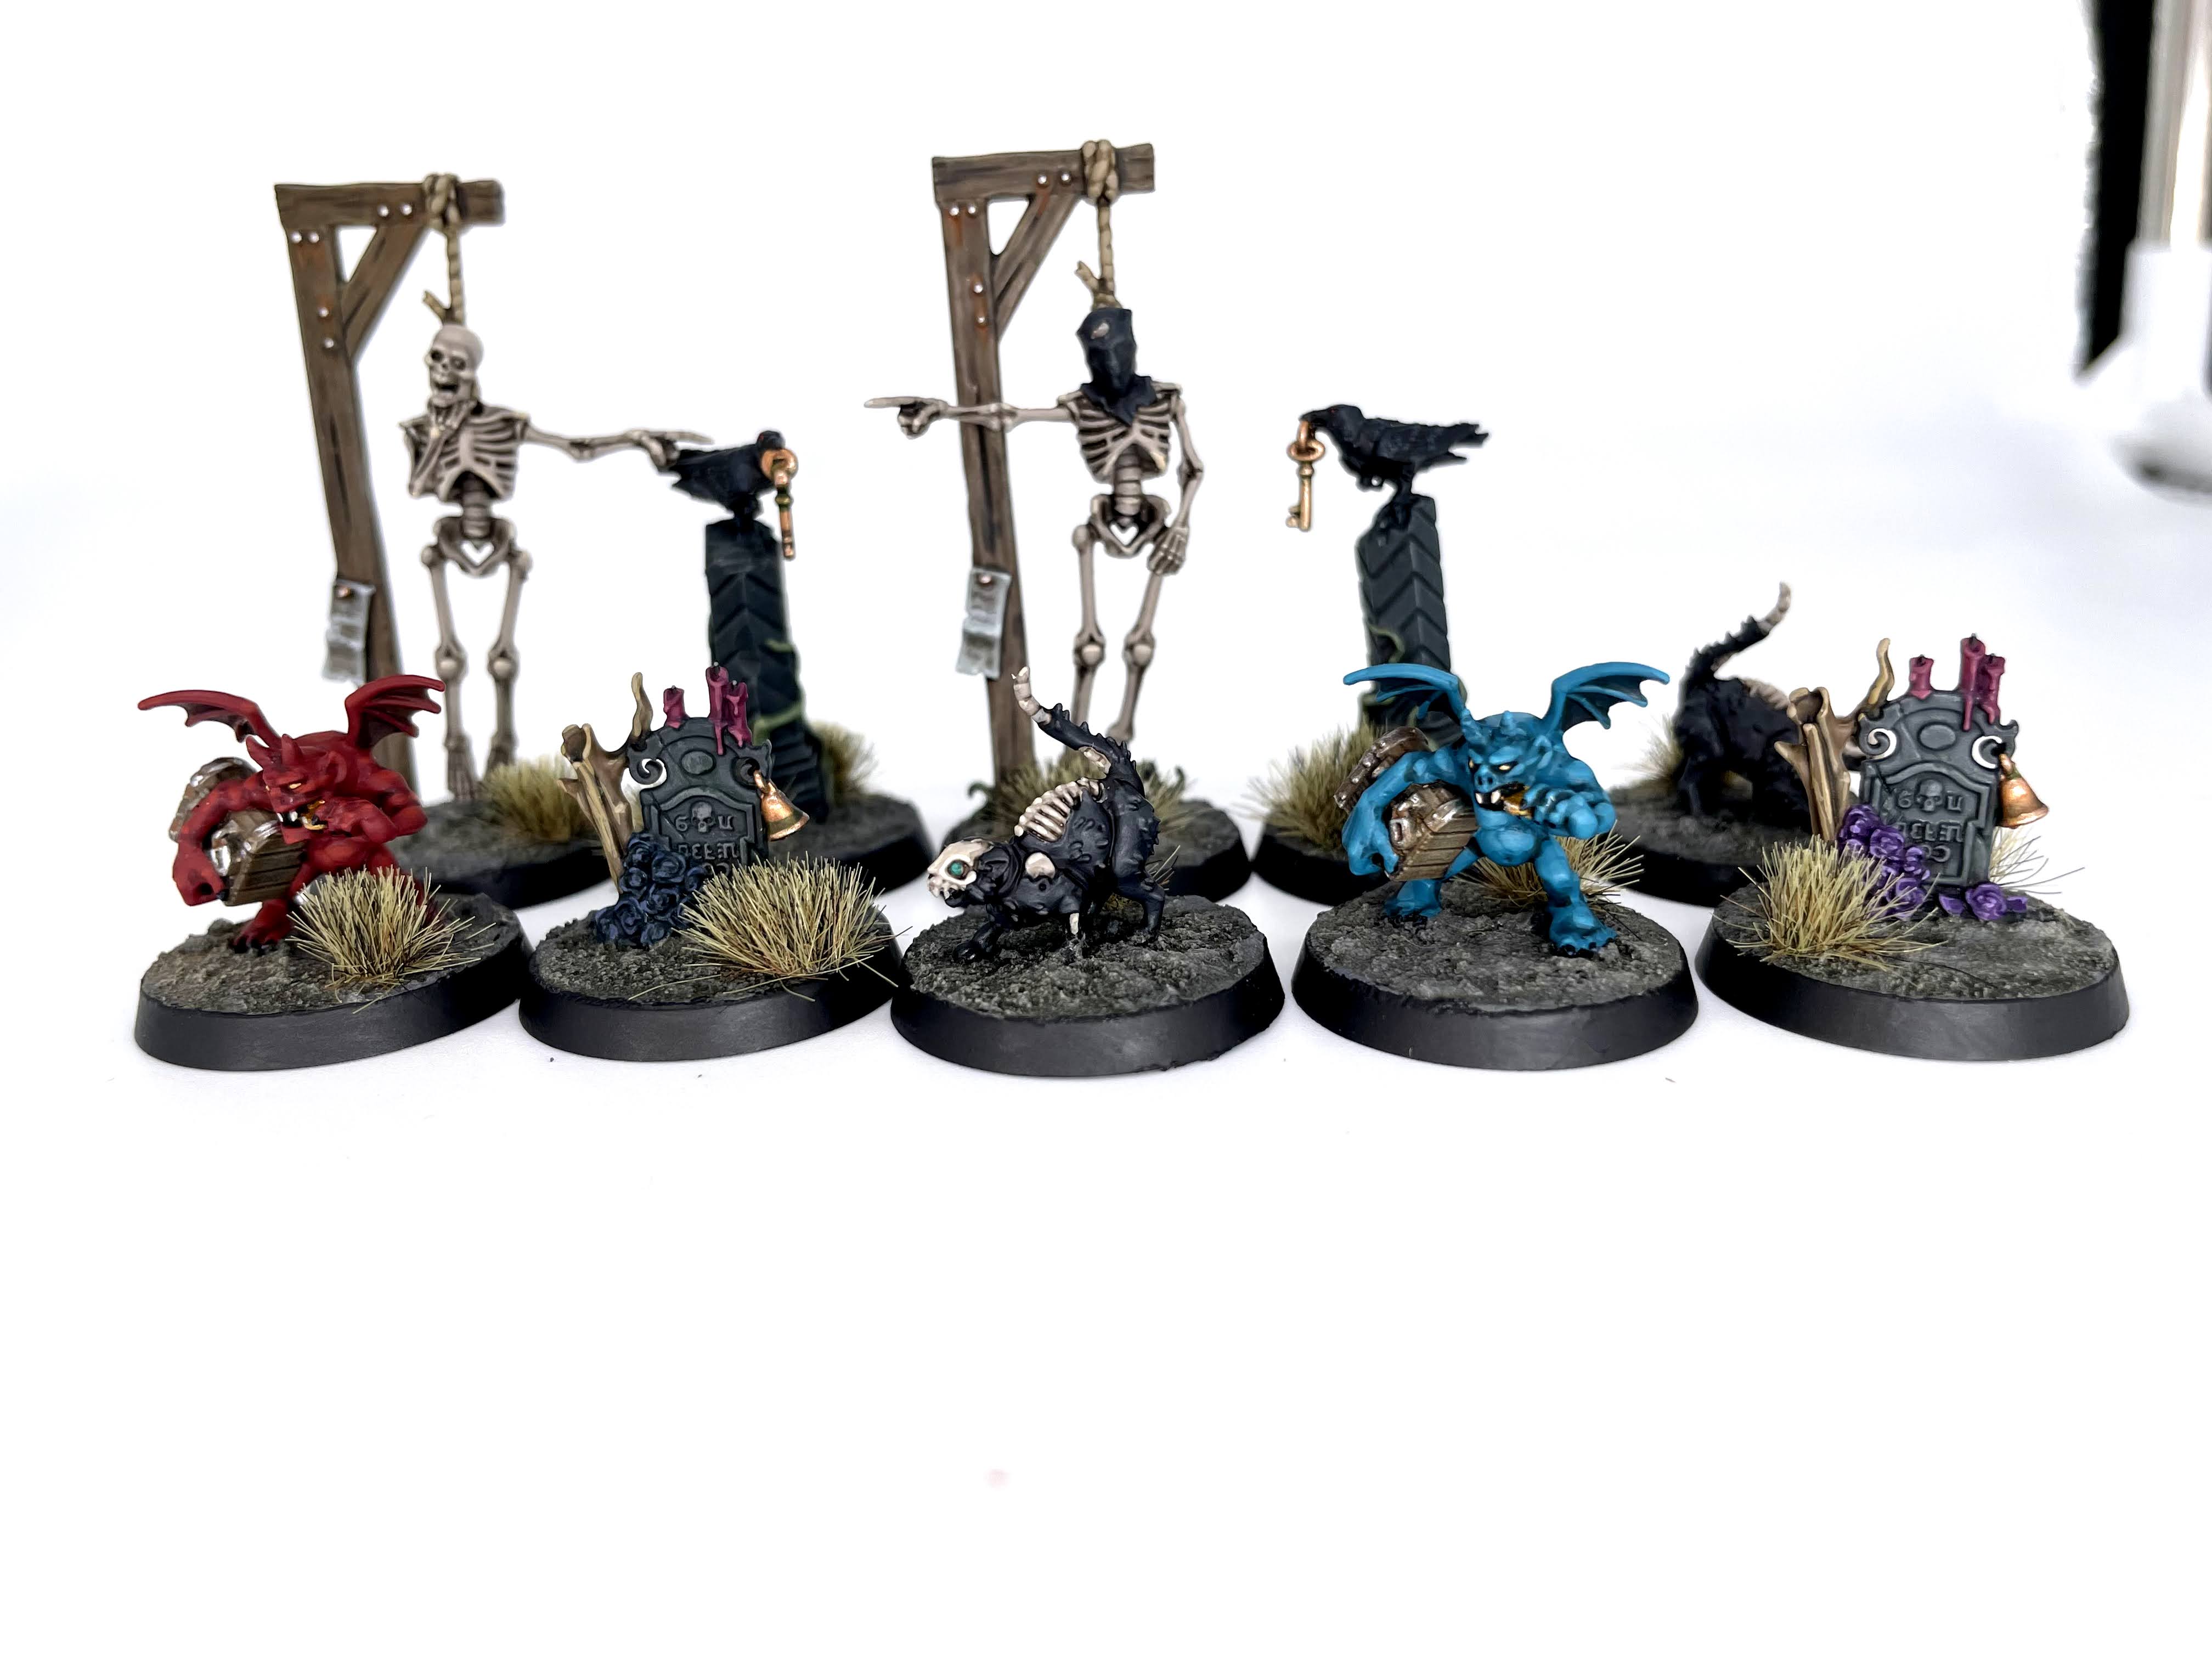
Finally, the objectives. I actually did these as my next mob after the bats because I figured they’d just be easy, but it turns out they were a ton of fun. It’s a fun mix of impish weirdos and terrain elements, and a lot of the surface area is stuff like rocks and wood that I just drybrushed. I painted the little blue demon dude like the Devil from Devil World, a game I’ve never played, and painted his friend in red to make him look like a player 2. They even have cute little butts!
With everything painted, I’ve gotta say my favorite models are Brutogg Corpse-Eater and the Ulfenwatch. They’re probably the models I brought the least of my own influences to, but where I got to respectively act on both my whims and what I’d pieced together over the course of this two month project.
The Future
Probably playing the damn game, I imagine. Unfortunately, there doesn’t seem to be much official support for Cursed City coming down the line. Extremely big if here, but if there are new releases for it I’ll be more than happy to snap them up and add them to the collection. Blackstone Fortress’ expansions all disappeared pretty quickly, and I’d hate to miss out on more cool stuff. Should that not come to pass though, I’m perfectly happy being able to look at a Warhammer project and actually call it complete. My Ultramarines will stop expanding once they stop putting out new Marine models or I die, but with this sweet little self-contained project I’m happy to call it done. It was freeing to be able to really go wild using colors and techniques on models I’d never need to replicate, and it provided a massive reset that not only gave me time to get excited about 40k again, but let me scratch so many itches that I’d never want to pursue in a whole army.
