
Frenzy is one of the most interesting skills in common use in Blood Bowl. It has great potential to cause damage, create positional options, and equally to cause mis-position and even turnovers! In this article I’m going to look through the myriad ways in which having a rabid, blood-crazed player on your team can influence the game of Blood Bowl.
The Basics
Every time a player with Frenzy performs a block and their target is pushed back, the Frenzy player must follow-up, and if the target is still standing they must block them again.
The most important aspect of this skill in its general application is the ‘must’. We must follow-up and we must block again, and these are the conditions that create many of the nuances of effective Frenzy use.
When can we not get a second Block?
- If our opponent uses Fend, we cannot follow-up and thus do not get the second block.
- If our opponent has Foul Appearance, we must roll it again before making our second block.
- We do continue to get the second Block against Stand Firm players who elected not to be pushed back.
Applying in play
Our base use case with Frenzy is to find a lone opponent, ensure we have a 2D block, and then enjoy hitting them once or twice and hopefully get a knockdown. If our Frenzy user is a big guy like a Minotaur or Rat Ogre, or a ST4 type like a Ulfwerener or Khorne Bloodseeker, then that 2D block will typically be easy to come by, but if we are using a ST3 (or lower!) player, then we must be careful how we position our assists to ensure they still aid us on any potential second block. Let’s look at a simple example:
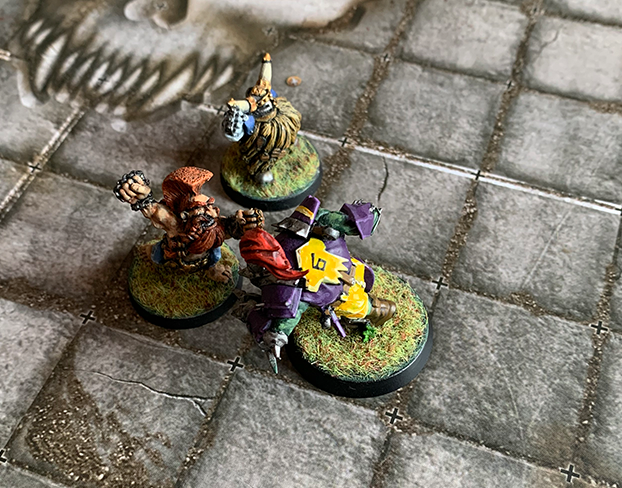
Our Troll Slayer has a 2D block thanks to an assist, but if we only get pushes on the first block we will push the Orc away from our assist, and our follow-up block will result in a 1D.
In this example, our assist has been positioned so that in the event of a push on our first 2D, we will still get 2D on the second block.
Getting into Trouble
As we have seen above, if we do not naturally outstrength our opponent, positioning of our assists is vital to ensure our follow-up block continues to be a 2D. When we use Frenzy in any more crowded area of the pitch the calculation of the position and block dice can become considerably more complex, and the potential to follow-up into a 1D or -2D block can increase enormously.
There are other positional pitfalls that can arise. For example, our second Block might lead us into base-to-base contact with an opponent we really do not want to be basing, or it might lead us to be surrounded by opponents, or left on the edge of the pitch, etc.
Amongst higher-level players, awareness of the pitfalls of Frenzy is such that players will often attempt to create positions in which opposing Frenzyers unwittingly lead themselves into these kind of situations. These are called ‘Frenzy Traps’.
Let’s look at a couple of ways things can go wrong:
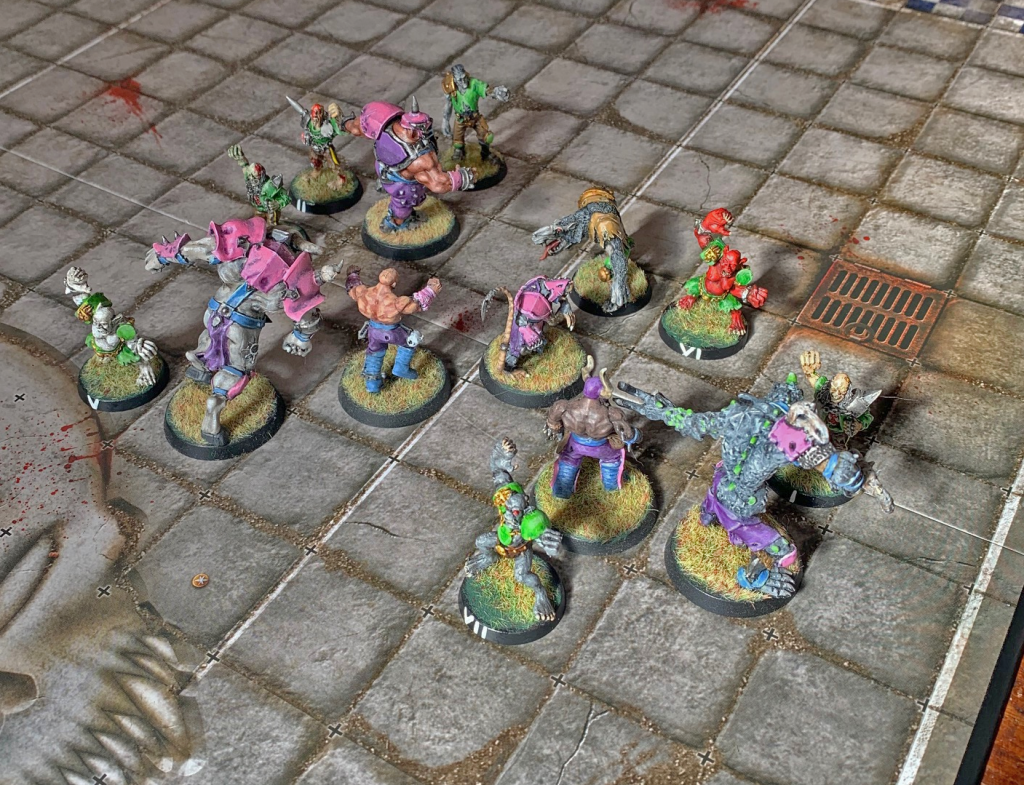
In this example, even with so many bodies around and most players seemingly marked, the single unmarked marauder in the centre means that if the Werewolf takes the 2D block on the Skaven, the follow-up block will be -2D.
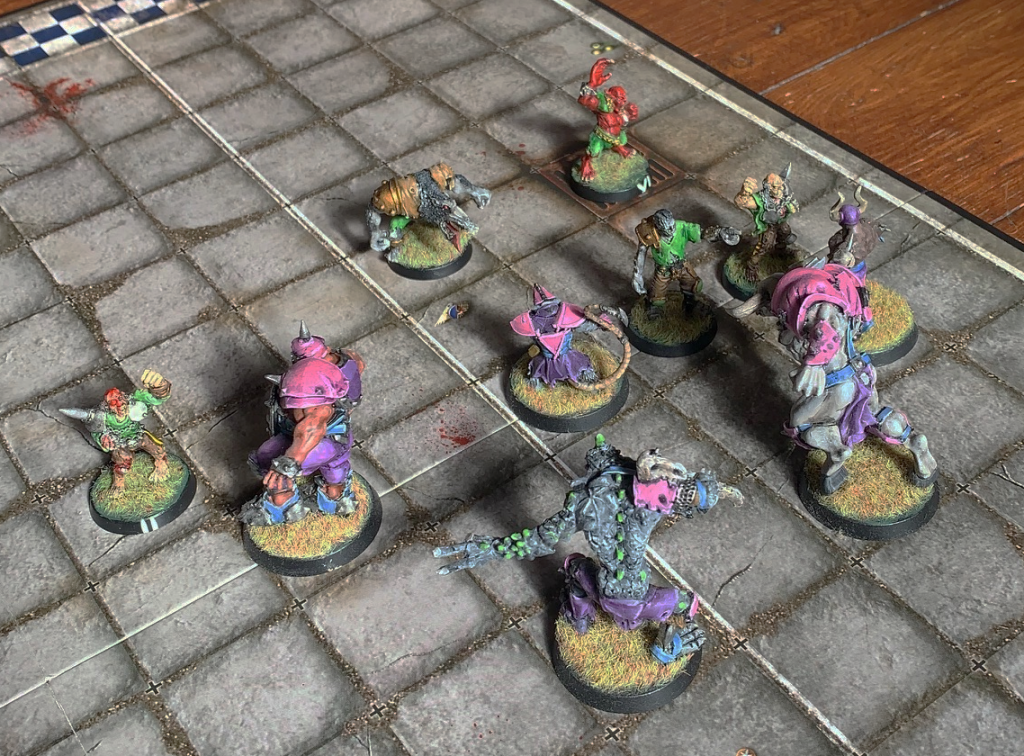
In this example, a Werewolf Blitz on the Skaven might seem tempting, but if we find pushes on the first block, then any pushback or pow on the second block will take us into base to base contact with at least one of the Chaos big guys, leaving us having to dodge away or face a big hit in return.
Surfing
One of the most popular applications of Frenzy is to ‘surf’, or Push opponents off the pitch edge and into the crowd. This is one of the most effective methods of player removal in the game. The mere threat of being surfed by a Frenzyer can have a huge impact on the positioning of our opponent, who must constantly be on the lookout for any way in which their players might find themselves within a square or two of the pitch edge.
Let’s look at some common ways Frenzy can create surfs.
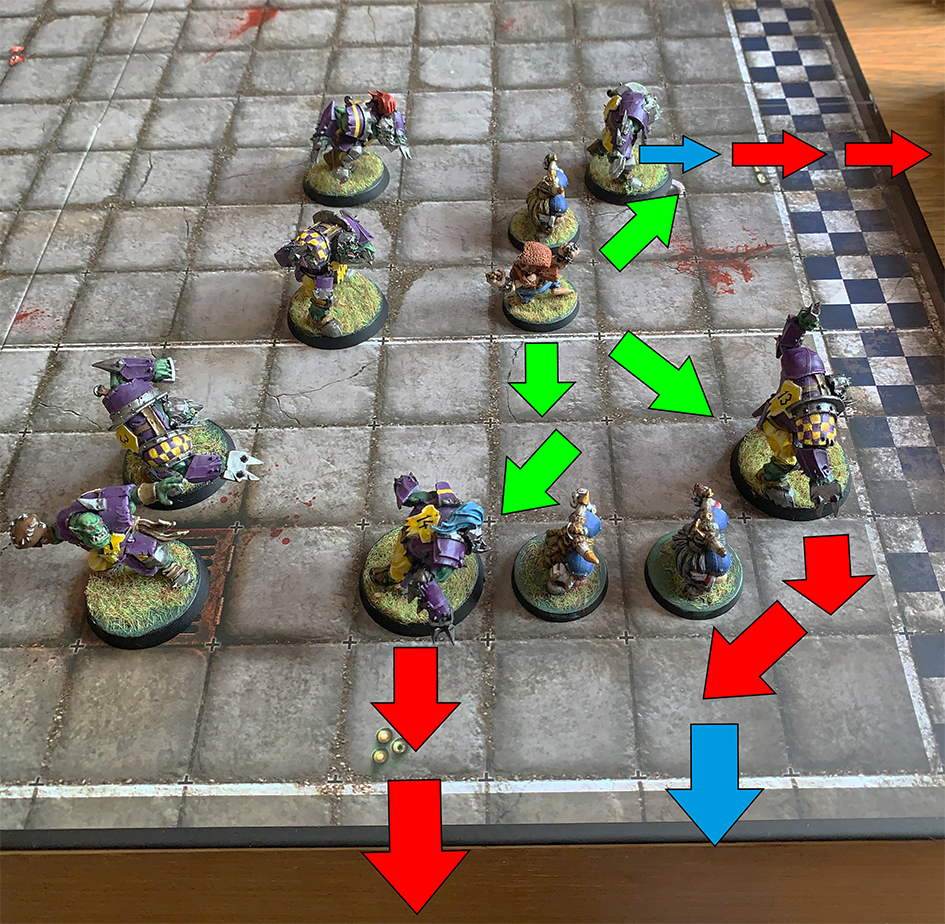
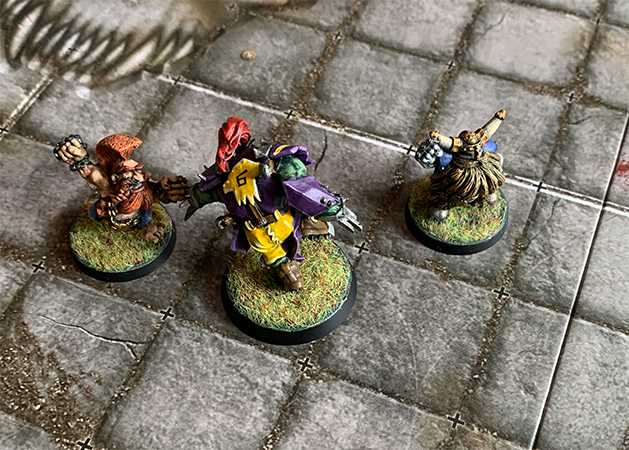
This image shows three different ways the Dwarves can try and surf Orc players. The first is the simplest and most obvious. The Troll Slayer blitzes the Orc Blitzer with 2D thanks to an assist, and just needs a push on the first block, and then a push, defender stumbles, or pow on the second to take it off the pitch.
In the second example, the Troll Slayer blitzes the Orc Big’gun, and with a little help from Dauntless and an assist gets a 2D block, which causes a push, and then with another push we move the orc diagonally to position it on the edge of the field. The final block to surf (sadly only a 1D) is then made by the Dwarf Lineman.
Finally, and I would not recommend it, but the Orc Lineman at the top of the screen can also be surfed. A 1D block from the Dwarf Lineman pushes the Orc close to the endzone, and the Troll Slayer then Blitzes, needing two pushes on 1D blocks to complete the surf.
As you can see, once you start looking for players within surf range and thinking creatively with Frenzy, many possibilities reveal themselves.
Being Counter-surfed
The great danger of surfing with Frenzy is that our compulsory follow-up often puts our own player in the same sideline spot that just saw our target removed. Thus we need to think carefully before we begin a frenzy surf attempt as to how we will avoid this pitfall.
The easiest way, if we are Blitzing, is to ensure we have enough Movement to step away from the sideline. The next method is to ensure that the position of our surfer’s team-mates prevents them being targeted (by screening or caging them). This can actually be more difficult than it seems, as the more bodies you put near the sideline the more you might create opportunities for your opponent to make chainpush surfs of their own (which we’ll discuss further in a moment). The final method is to have a complementary skill on our surfer that prevents or mitigates the threat of the counter-surf. Stand Firm and Sidestep can be invaluable in this respect.
Chainpushes
Frenzy has fantastic utility as a method of creating and executing chainpushes. It’s ability to both set up and execute a chainpush in one block action is very powerful, as is the potential to double chainpush. The possibilities for positional advantage this creates are endless, but it has a notable specific application in enabling many One Turn Touchdowns. Let’s start by looking at its use in open play.
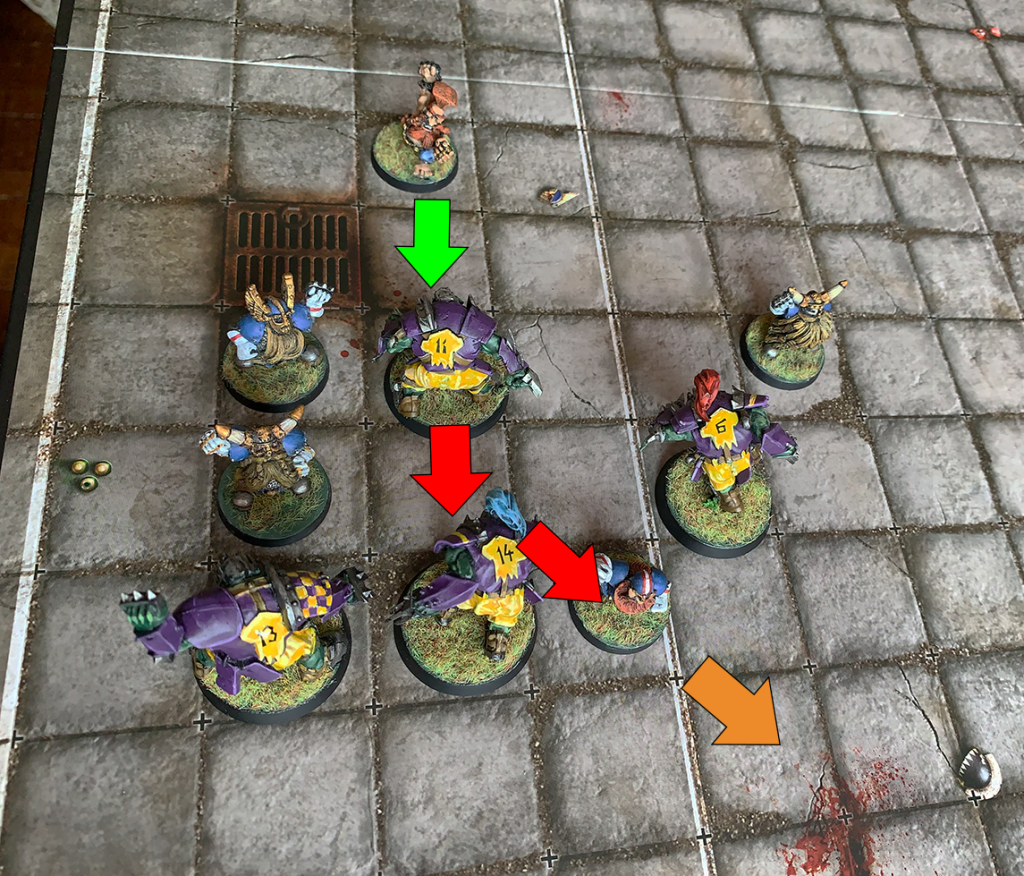
In this example, the Dwarven Runner is stuck between two Orc players and would need to dodge out to score. By Blitzing the Orc lineman with our Troll Slayer, a push creates a chainpush on the second block. Another push (hopefully a pow or pow/push this time to get a knockdown) allows us to push the Orc into our Runner, pushing him clear of the melee, and hopefully allowing him to walk into the end zone without any further dice rolls.
One-Turn Touchdowns
Frenzy has fantastic value in the world of one turn scores, as it can create the extra pushes some teams need to even make such scores possible, and it can also make things easier for those who already have a good shot. There are many, many variations of setup for one-turning, depending on your team, your opponent’s team, and the skills in play. They are also extremely complicated, so I will defer to the excellent resource that is the FUMBBL one-turn touchdown guide to show you how it is done. There are several examples there, including a setup that works for all teams with two frenzyers on the roster (great for Dark Elves, Dwarves, Necromantic and Norse).
Tournament Play
In Tournament play, where the number of skills is limited and getting value from those you select is even more important, Frenzy’s wide utility has led to great popularity. Frenzy’s ability to generate extra blocks has particularly interesting application as a ball-hawking skill comparable to the likes of Tackle, Strip Ball and Wrestle, to the extent that it is sometimes known as the ‘European Tackle’! Now, as we have seen above, there can be considerable pitfalls to attempting to use Frenzy in the kind of crowded situations in which we typically find the ball, but let’s look at how it compares with our other options in some typical situations.
In our first examples here we are looking purely at the chance to get a knockdown without suffering a turnover ourselves. I am focusing on 1D Blocks as this is the most likely practical use case.
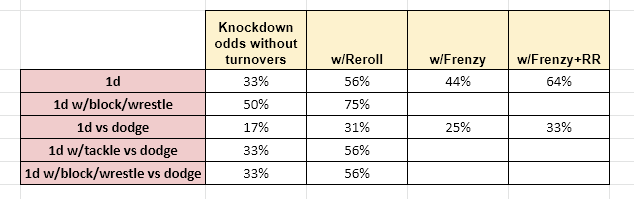
We can see that Frenzy provides good value while being not quite as effective as the traditional core skills.
In the second example, we look at chances to strip the ball or put it on the floor via knockdown.
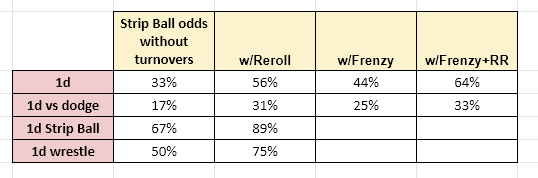
Frenzy cannot challenge the power of a dedicated skill like Strip Ball, but of course Frenzy is not countered by Sure Hands.
And in all the above scenarios, if we create 2D Blocks, Frenzy can actually pull level with skills like Block because our increased opportunity to find pushes gives us many more opportunities to turn these into our desired result.
What is clear is that Frenzy provides a significant boost to our chances in varied situations, and of course it provides a great deal of additional utility. It is easy to understand why it has gained popularity as a do-it-all skill.
Into the Crowd
With the recent addition of Khorne, Frenzy has become more ubiquitous on Blood Bowl tables, and between the various other teams who were already enjoying it, and the rise of its selection in Tournament play, knowing its strengths and weaknesses has become more important than ever. Hopefully you’ve been able to control your bloodlust for long enough to absorb some of the observations above. Thanks for reading and take care near those sidelines!
If you have any thoughts on this or any of our other Blood Bowl content we’d love to hear from you, either in the comments, or at Contact@Goonhammer.com
