Battletech is a very swingy, random game sometimes. There are far fewer dice rolls per turn than in something like 40k, and the game lacks rerolls in its core rules. This means that the only thing you have total control over is your movement, which becomes the most important part of the game as a result.
Movement as a phase is not slightly more important than the other phases, in my opinion it is much more important than any other phase. This is the phase where you set up shots, present threats, punish mistakes, and generally get to react to what happened out of your control in the previous shooting and physical attack phases. There are very few dice rolls in the movement phase, aside from getting up, walking into a swamp or other body of water, or taking a ride on the great Inner Sphere slip-and-slide (paved roads). This lack of dice rolls makes this the phase that you can plan for the most, and generally is what separates good and bad players of Battletech. Declaring good targets and focus fire is important, but “Shoot the little guys first” and “Shoot as many mechs at one enemy as you can” are easier to figure out than exactly how to present good threats and set up good shots.
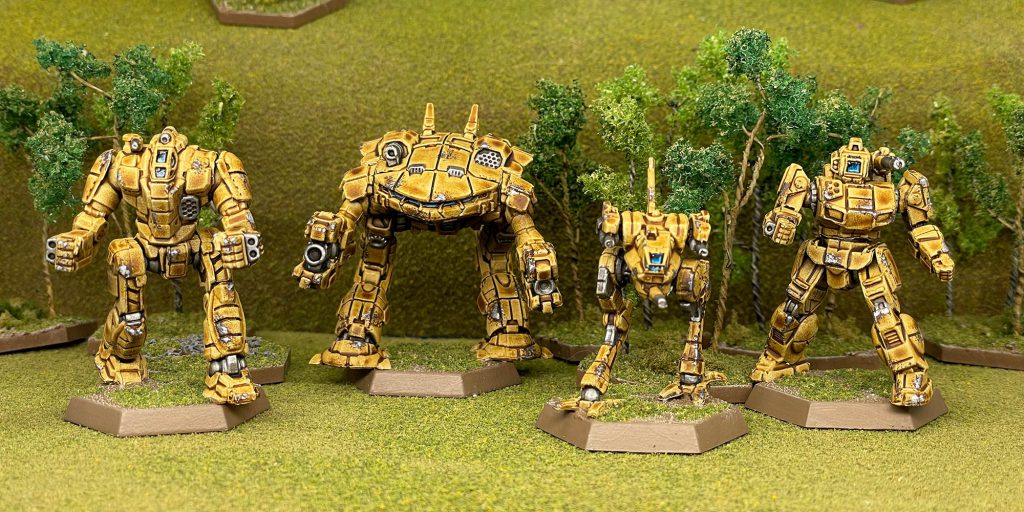
Table of Contents
Initiative
The first thing to go over for the movement phase is Initiative. Initiative works a little differently in Battletech compared to most games. In 40k, you roll off once at the beginning of the game and have the person who wins take their entire turn before passing back to the other person, while in Battletech, players alternate activating units in each phase, with the player who LOST initiative activating first. This may seem weird, but the important thing to remember is that it is far better to go second in Battletech. This is because all actions in Battletech resolve simultaneously. In the Shooting phase for example, all attacks are rolled, and then all damage is applied simultaneously at the end of the phase, so there is no advantage to having shot earlier. There is instead an advantage to going later, as it lets you see more of your opponents army move, and lets you move/declare targets reactively, so you can respond to what your enemy just did. If you win initiative it is much easier to keep your mechs out of melee with the enemy, and much easier to dodge shots or take evasive action. Some tactics only really work if you won initiative like this, though most of the best tactics have variations for losing initiative, and with skill you can present enough threats that your opponent can’t save all of their units from them at the same time.
There are 4 general movement tactics that, in my opinion, are the most important to learn to start winning games, as well as one general simple principle. The simple principle is that higher TMM (Target Movement Modifier) is very nearly always better. TMM is basically your opponent’s penalty to hit you, and as you may know from other games or experience with this one, hit modifiers are very very strong. You want the biggest TMM number you can get, because the more you can shift the game’s math, the better. There are exceptions, because sometimes being in a good position will be more important, but its generally safe to try to move as far as possible to get that number as high as possible. The 4 general tactics are Threat Saturation, Evasive Action, when you should and shouldn’t jump which I couldn’t think of a catchy name for, or WYSASJWICTOACNF, and the Bullfight. I’ll try to go over how to apply them both when losing and winning initiative. We have some diagrams this week, which should really help out with demonstrating this.
The four mechs we will be using for this demonstration are, from left to right, a BNC-3E Banshee, a Mad Cat Prime (or Timber Wolf if you start foaming at the mouth at the concept of artillery fire), a Griffin GRF-1N, and a Puma Prime (or Adder if Rock’Em Sock’Em Robots send you into a conniption fit). These have a range of movement values and should be good for comparison.
Threat Saturation
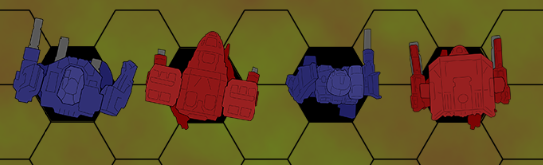
This is honestly probably the most important tactic in this entire article. I’d recommend reading all of it, but this will win you more games than any other thing you can learn. Threat Saturation is the principle that it isn’t enough to put your opponent in a bad position in one place, you have to do it in more than one place. This is due to how the initiative system works in Battletech. Because you can’t control exactly who wins initiative, you can’t count on getting to move first. Lets use some examples.
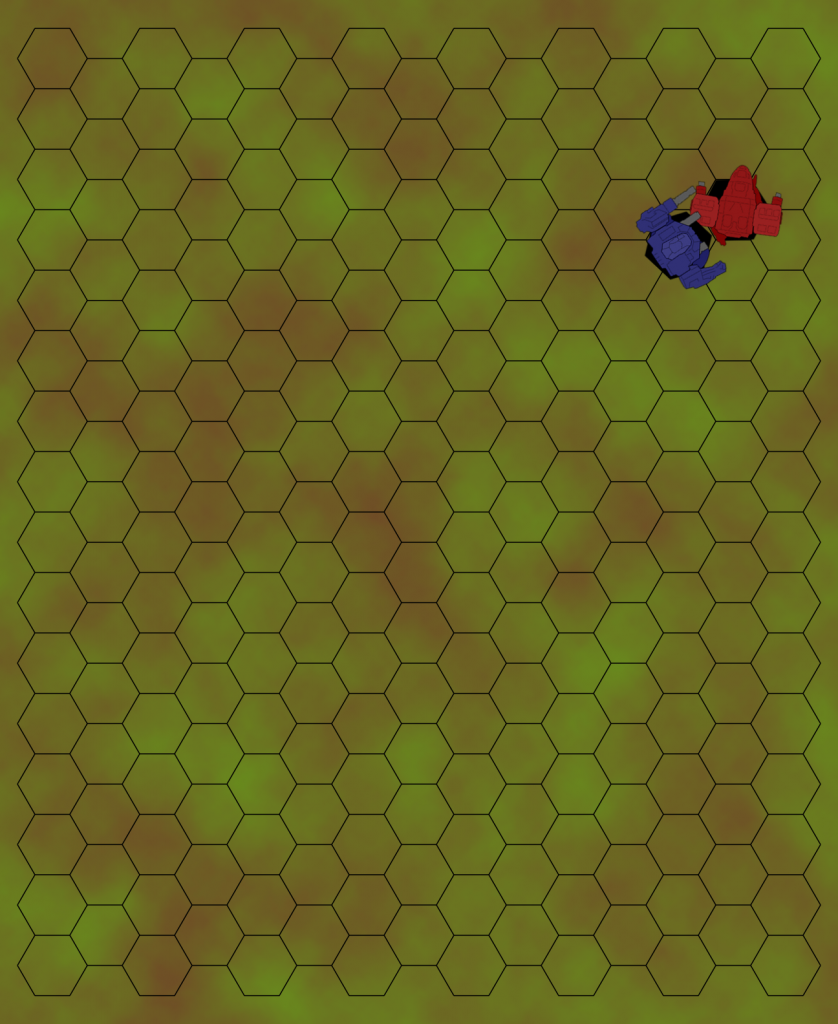
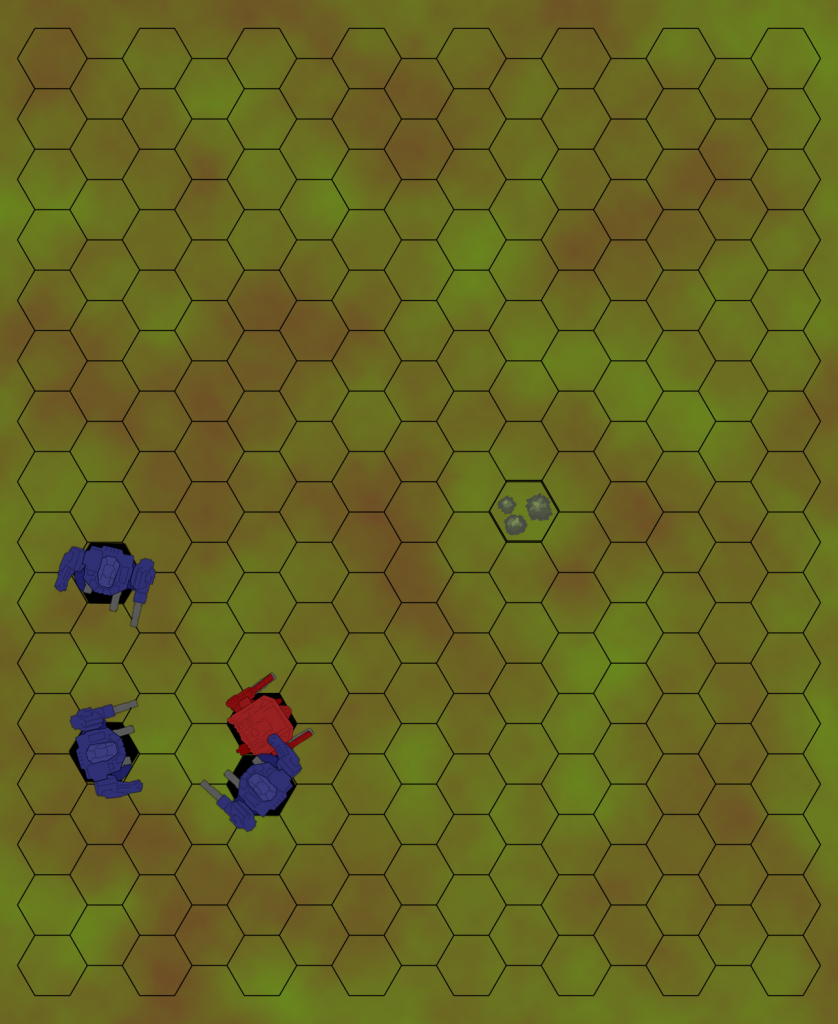
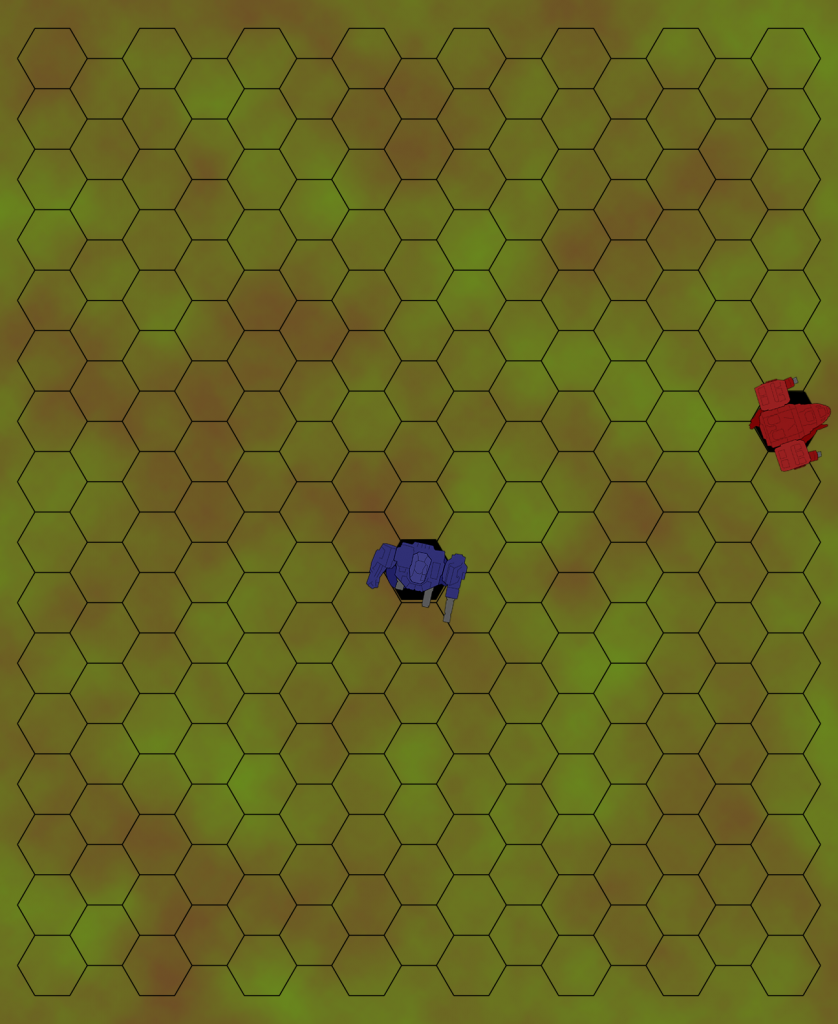
As you can see, we have a Banshee and a Mad Cat at close range to one another. If the Banshee wins initiative, the Mad Cat will have to move first, so the Banshee can follow it and can land a few hits, possibly from behind it, possibly with some added punches if the Mad Cat cannot get away, like this.
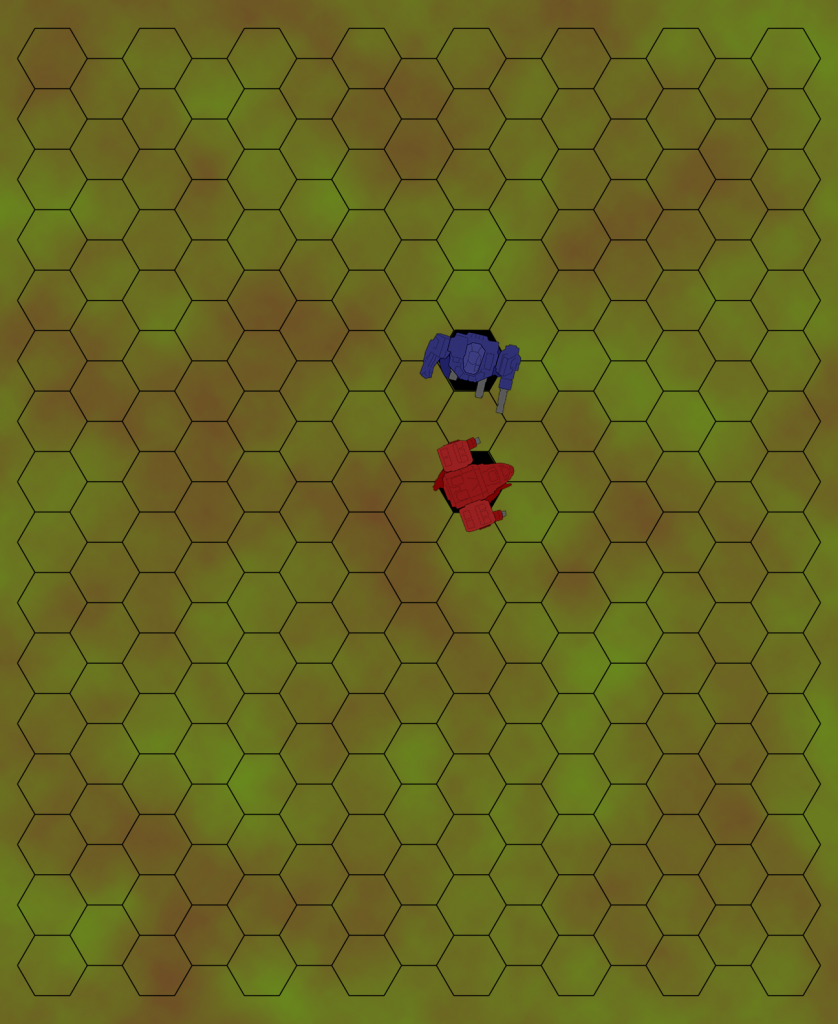
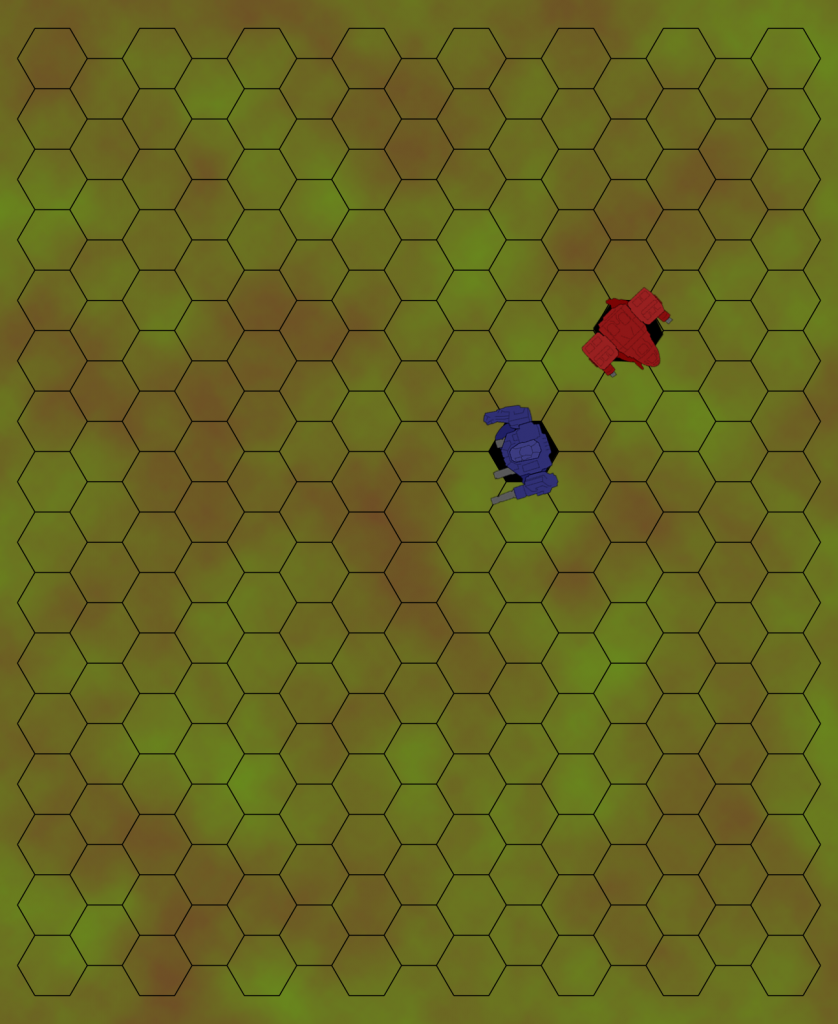
However, if the Mad Cat wins initiative, it forces the Banshee to move first, and the Banshee will have a lot of difficulty positioning itself where it will have a good shot with its weapons, and can basically never find an opportunity for physical combat like this, as it has no idea where the Mad Cat is going. The Mad Cat can simply find out where the Banshee is going to be, and then simply not be there, leading to a situation more like this.
So, what do we, as the player of the Banshee, do to make this situation better for us? Well, we make problems somewhere else. Lets say that, instead of the above situation, we have one more like this.
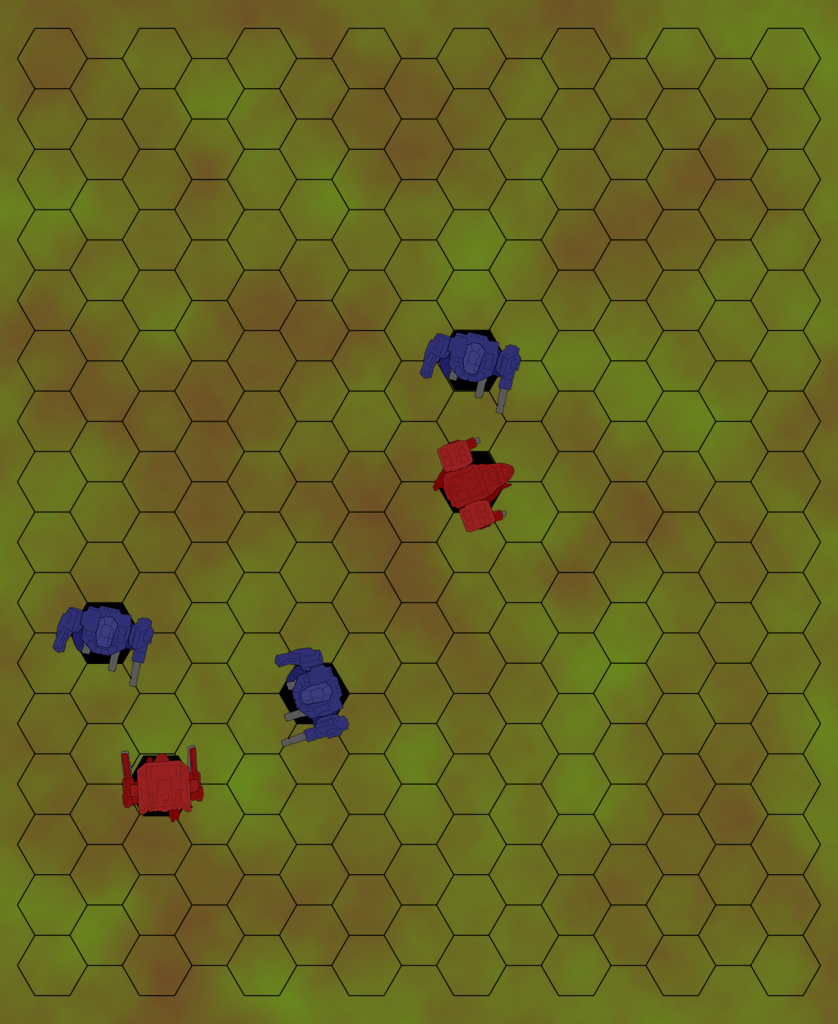
As you can see, instead of just having one Banshee threatening one Mad Cat, we also have a pair of Banshees threatening a Puma off to one side (Banshees are incredibly cheap, the clan side actually has a BV lead here. The second most important lesson of this article is to take more Banshees). This means that, even if the Banshee player loses initiative, one of those two mechs is going to have to move before all of the Banshees have to move, meaning that the player with the Banshees can always get a shot and/or some punches in.
It would be even more catastrophic if the Banshee player won initiative, but as you can see we have gone from a situation where the Banshee has a 50/50 chance of either doing good damage or bad/no damage, to a situation where either the Banshees have a 50/50 chance of doing great damage or adequate damage. This applies to any mechs and any force, though it is much easier to do when you have the more numerous force, and the faster force. This is one of the reasons I would recommend to take a few light mechs in every force, to increase your Threat Saturation. You do need to generally set this up a turn in advance though, which is what makes it less intuitive to new players. It is important to always be looking for situations where you can threaten more than one enemy unit at a time, and when you see one, make every effort to set it up for next turn. Think about where your opponent can go next turn, and try to move to punish that. For example, in the below diagram, you should be looking to split your Banshees up to sit on either side of the pair of clan mechs, so that they can’t get away from all of your mechs.
Evasive Action
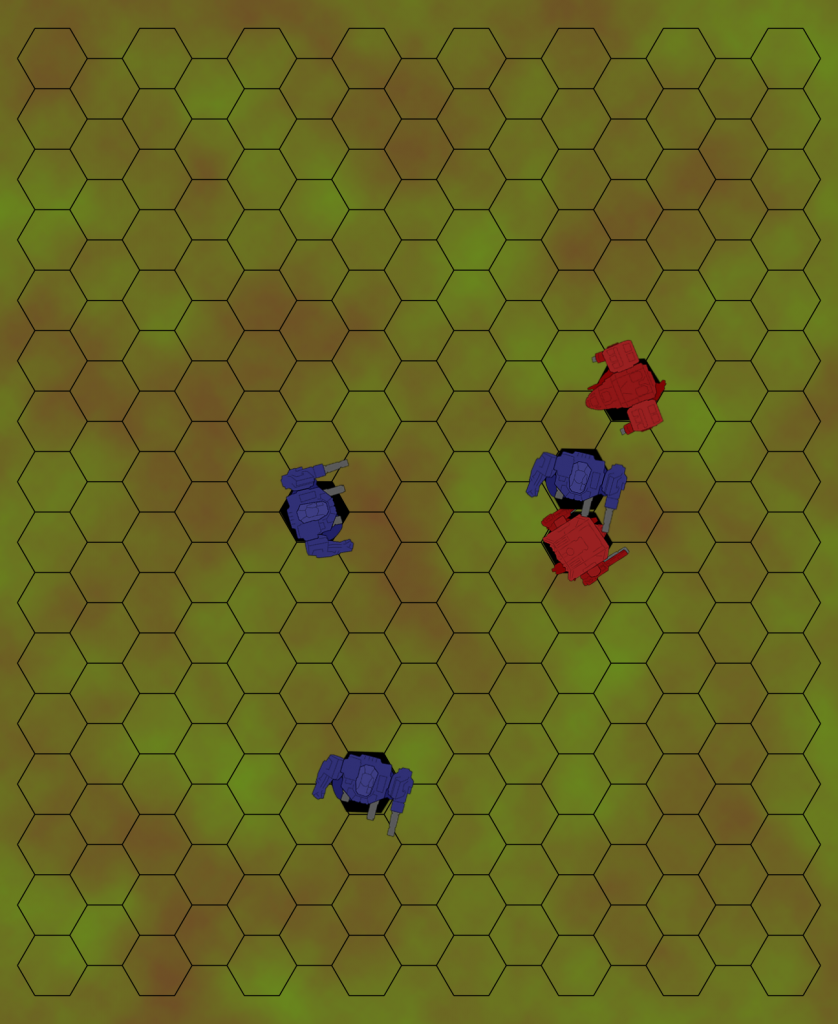
Evasive Action is the art of not getting shot. This can either be by breaking line of sight, or by building as high of a TMM as possible. This is a complex topic, but there are a few basic tactics that, if you keep them in mind, should help you save more mechs. Lets look at this diagram.
As you can see, our poor Puma has been surrounded by Banshees, presumably after being abandoned by his Mad Cat friend up above. How do we make him as hard to hit as possible? We could have him run in a straight line, and the Banshees have misplayed and allowed him to do that. This would build him a 3 point TMM, making him harder to hit, but would expose his rear armor to the enemy. In addition, these are BNC-3Es, which have a minimum range on their guns, and his movement has allowed them to mostly keep him at short range without taking any minimum range penalty, which is bad for him.
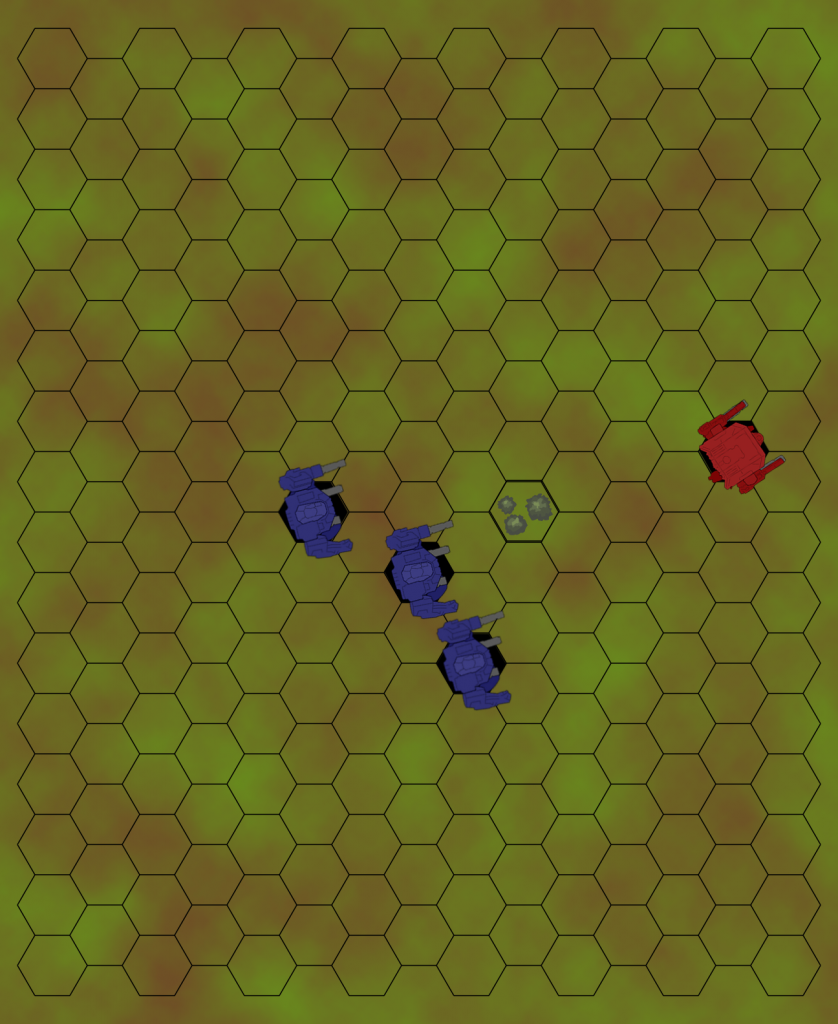
If, instead, we have him dip into the woods a few hexes before, he only gains a 2 point TMM, as he only moved 6 hexes, but now his left and front armor is facing the enemy, keeping them from hitting the thin rear armor, and the +1 to hit from the woods means that he is effectively still at a 3 point TMM, but is in a better position to fire back, and has his thicker armor facing the enemy. In addition, his opponent is forced to either take a minimum range penalty, or not move as far forwards, lowering their TMM. His opponent has chosen the minimum range penalty in this case, because having low TMM against a mech with 2 Headchoppers is a pretty dire mistake. One of his Banshees still has a short ranged shot, but it is very difficult to avoid all good shots when outnumbered this badly, your main hope is to minimize the damage coming in as best you can.
It is important to keep in mind that a hex of light woods is equal to a point of TMM, so it is sometimes worth diving into cover and turning to get thicker/more intact armor facing the enemy, rather than just running out the full distance. As your mech gets faster and faster though, literally just running in a straight line becomes a better and better idea. If our Puma was a Dasher (or Fire Moth if you think that Sparta was on to something but needed to be a bit more extreme), it would almost certainly have been better to run in a straight line for more TMM.
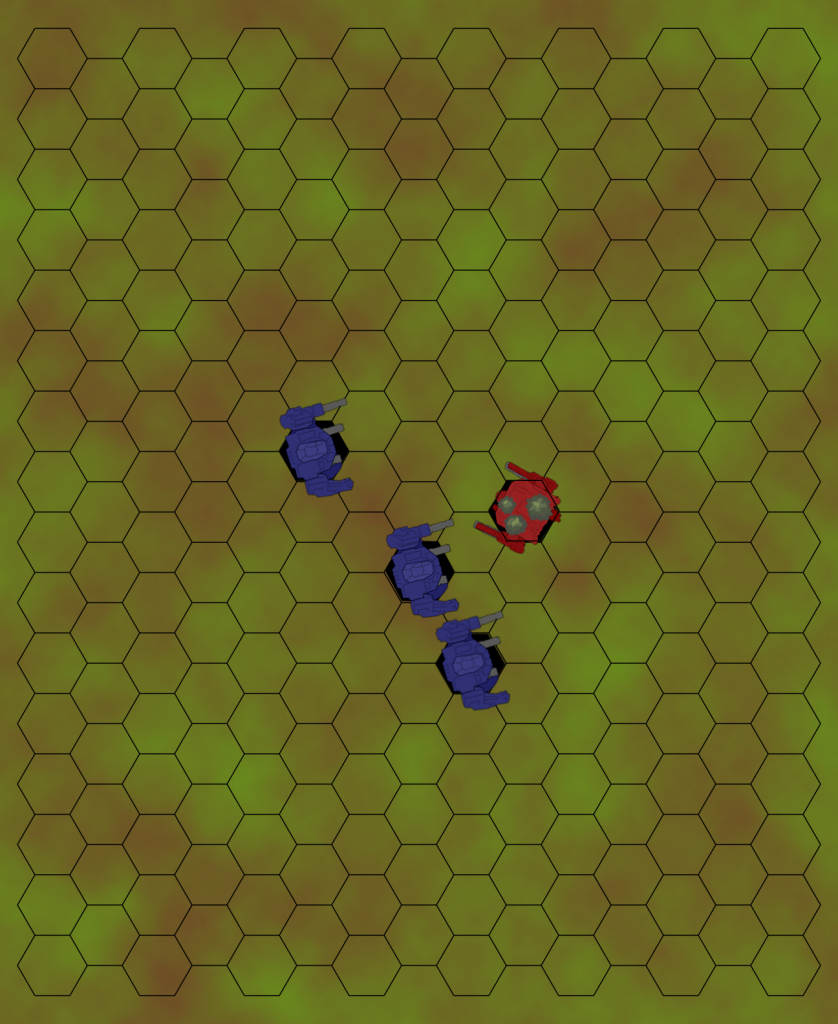
There is another option though, that our Puma couldn’t use. In the above diagram, you can see a Griffin being threatened by a Mad Cat. The Mad Cat will likely seriously hurt the Griffin, so the Griffin needs to get away from it. If Mrs. Griffin runs in a straight line, she can build 3 points of TMM, but it will take her into close range with the Mad Cat, which is not a place she wants to be this turn. However, she has jump jets. Using these, she can just jump over the hill behind her, denying both her and the Mad Cat a shot.
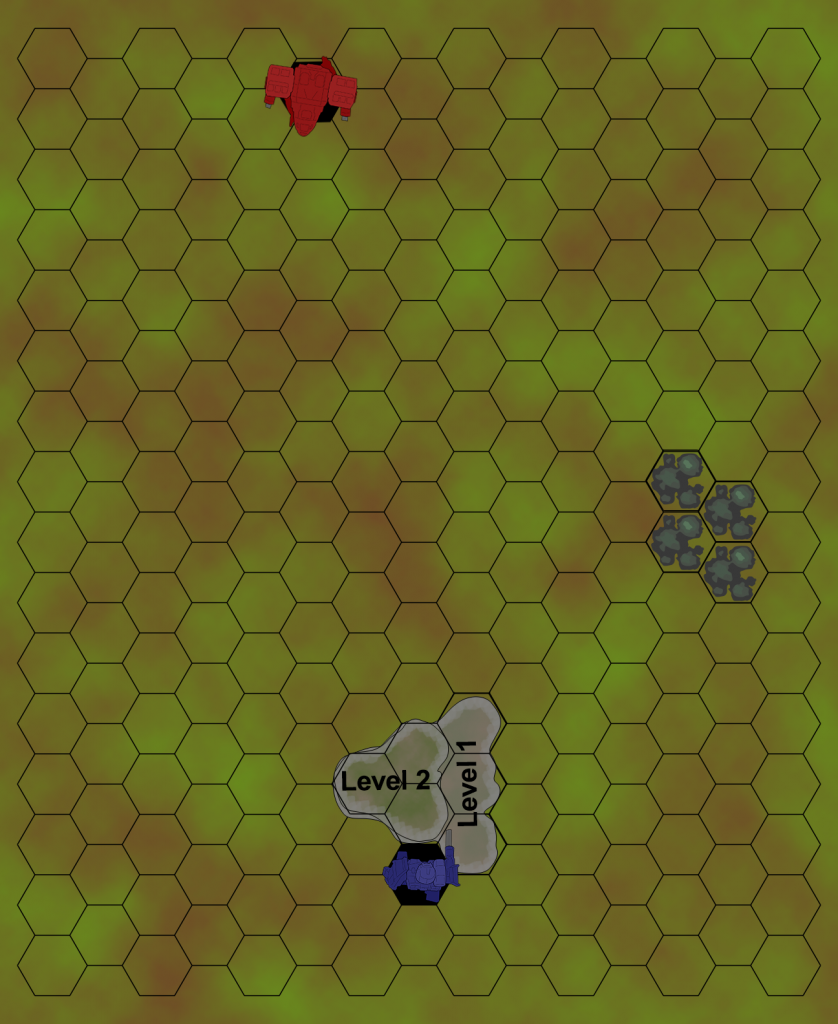
She also could run into the nearby patch of dense woods, building 2 TMM from running 5 hexes and another +2 from the woods, while only taking a 2 point penalty to her own shooting. She could also jump here for 1 more TMM, but at the cost of an additional point of penalty to her shooting, but that may be worth it depending on the specific situation.
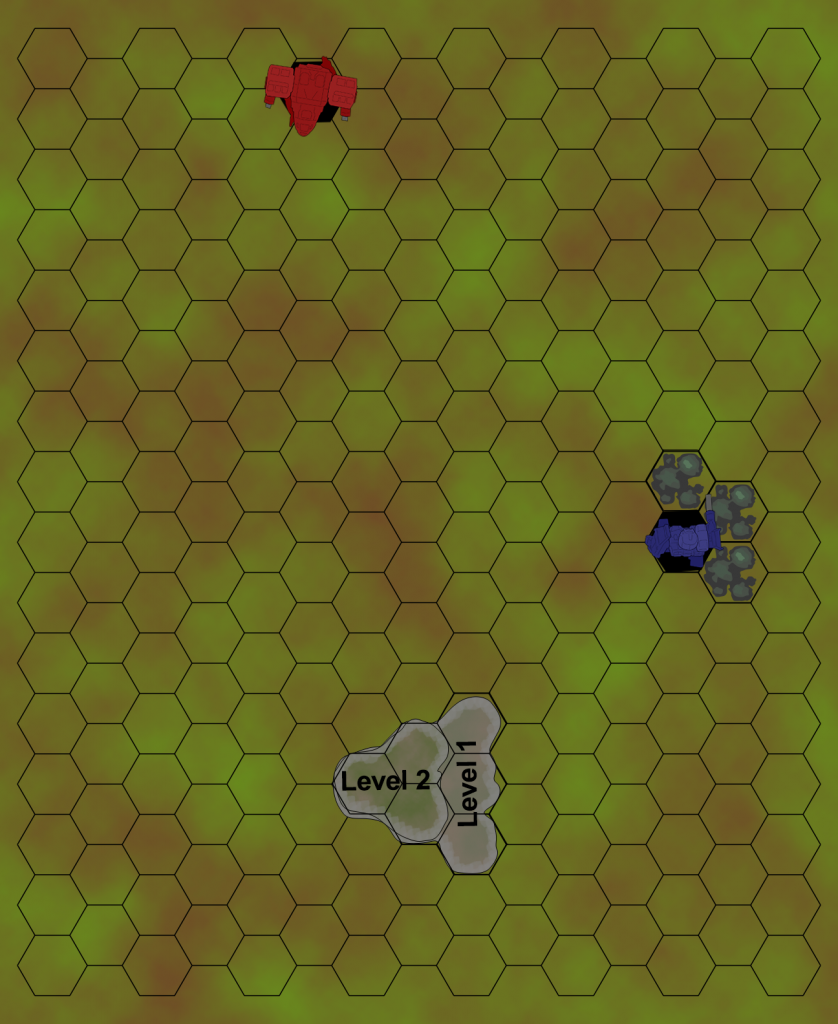
This is slightly better in my opinion, as it makes the shot very hard for the Mad Cat, while also still allowing the Griffin to chip in with her weapons. Generally only break line of sight if your mech is very heavily damaged and any shot taken risks killing it, or if you have managed to get your opponent to chase after a cheap junk mech with one of his valuable mechs, in which case every turn that you deny the good mech shooting is a win, even if it means your cheap Wasp or Koshi (Mist Lynx if honor is more of a lifestyle than a passion to you) can’t make a shot this turn. One shot from a 400-900 BV mech is worth a lot less than one shot from a 2000-3000 BV mech. Some mechs, like the Spider, are frustratingly good at taking evasive action due to their mobility allowing them to get some pretty extreme TMM, while being exactly cheap enough that it is a waste to chase them, while doing just enough damage at their tech level to not be ignorable.
WYSASJWICTOACNF
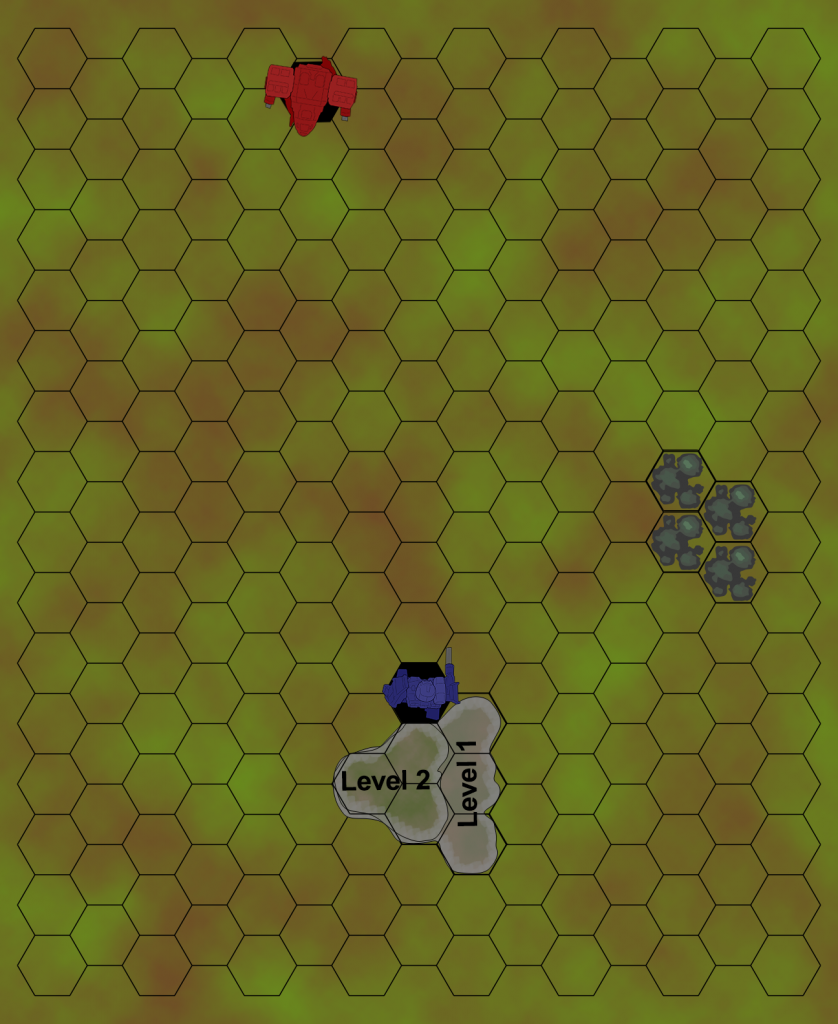
Generally speaking, the question of when you should jump is a pretty easy one. It is only a good idea to jump somewhere if you cannot reach it by running. Running is nearly always better, as you will usually be able to build the same level of TMM on open terrain as you would while jumping, and won’t take as large of a penalty to your own shots. Mechs with Pulse Laser/Tcomp Combos can mostly ignore the jumping penalty though, and so mechs like the Goshawk (Vapor Eagle if you have a fursona assigned at birth by the state) completely rock in this game, and can jump basically freely without any issues or worry other than heat. That said, the Goshawk would still usually be better off running, and I am probably a little guilty of jumping with it a bit too often. The main reason to jump though, is if you are in a map like this.
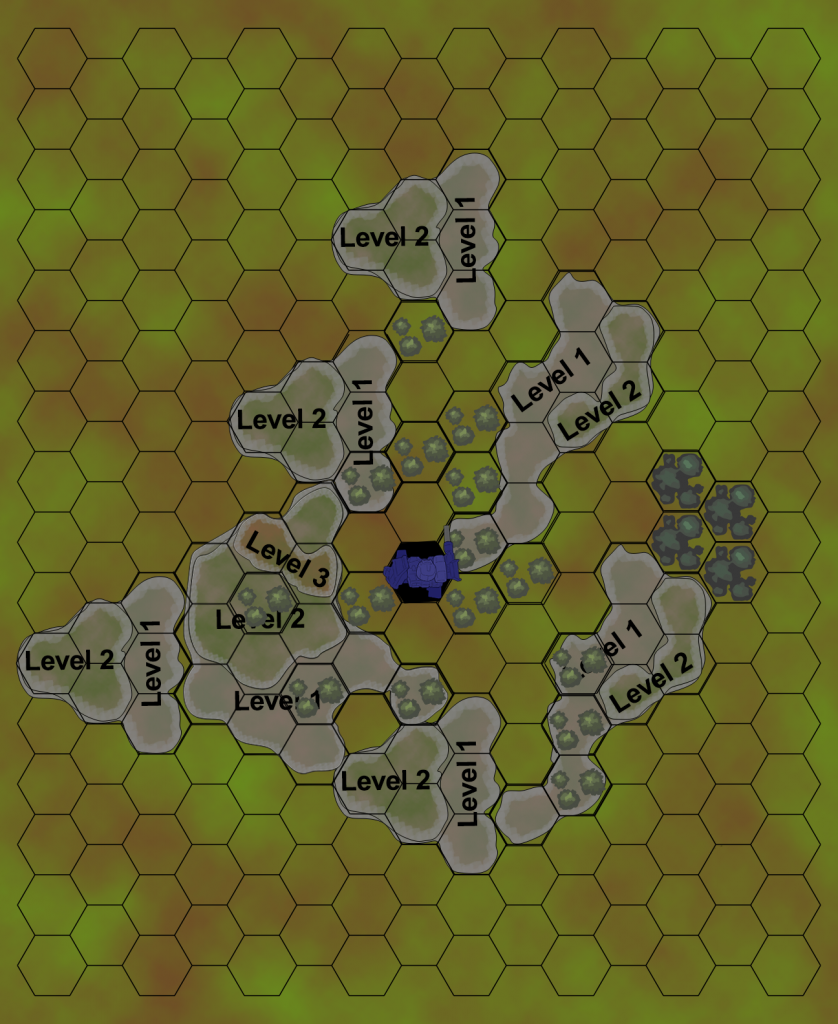
As you can see, the Griffin is completely surrounded with woods and rough, hilly terrain. Walking or Running through this would only get her a short distance and a fairly low TMM. However, with jumping, she can move much further and build much higher TMMs.
This is a huge advantage to mechs with Jump Jets, and is one of the reasons that I generally try to make sure that at least half of my force has jump jets, as many of the maps that I play on have pretty broken up and hilly terrain. Jumping across rivers to avoid taking constant PSRs is another thing to bear in mind, and if you are playing on a City Map, Jump Jets are a godsend. It is still better to run somewhere if you can, but if you can’t get the same distance running as you would jumping, I’d strongly consider jumping.
The Bullfight
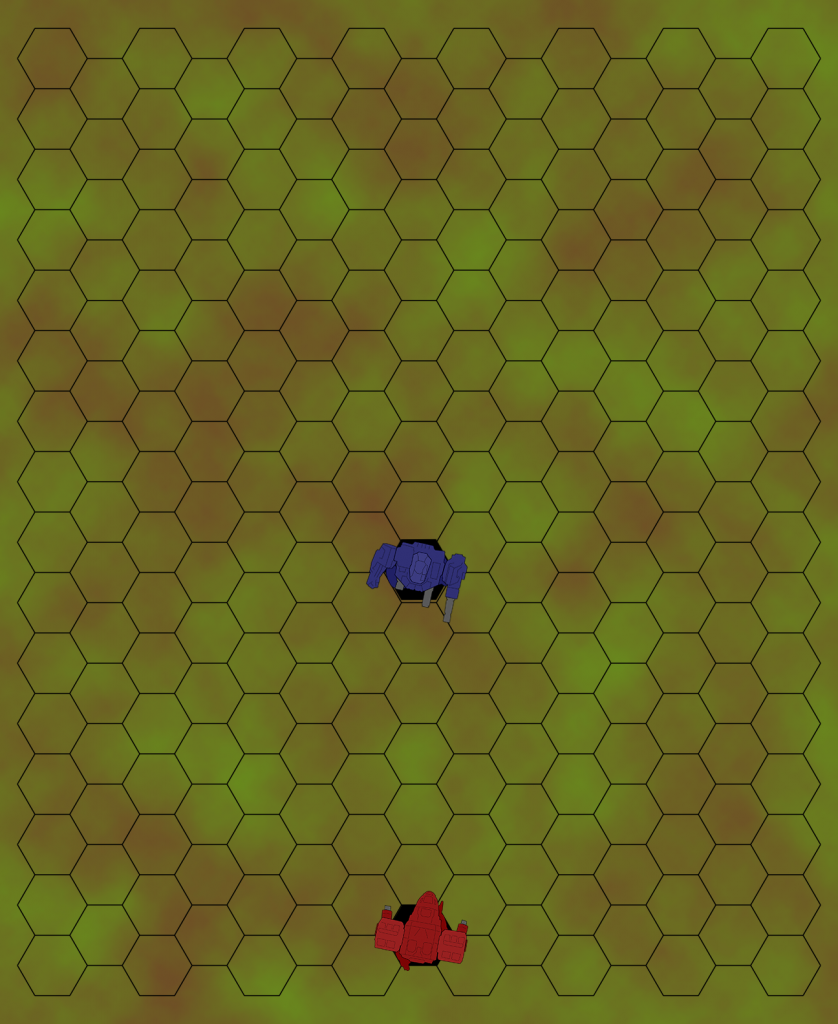
This is a tactic I have been thinking about due to my obsession with and over use of Banshees. The Banshee desperately wants to get on top of an enemy mech and beat it to death, and so the question of how to keep a melee mech from beating you to death has been stuck in my head for a bit. Lets say that we have the below situation

As you can see, there is a Banshee standing directly in front of this poor, defenseless Mad Cat. He has it right where he wants it, and has already punched it last turn. The Mad Cat really needs to disengage, but it has lost Initiative! The Banshee is much stronger up close than it is at a distance, so the Mad Cat has a vested interest in making sure the Banshee doesn’t spend another turn putting the boots to it, medium style. It cannot run straight forwards, as the Banshee is blocking its movement forwards. What you might be tempted to do if you are a newer player is this.
The Mad Cat backed away as fast as possible. However, this is not ideal, as it are still within movement range of the Banshee, who can catch it with a Charge or walk up and punch it depending on how it feels. I have seen this happen in games against me a few times, and there is a better way. Instead, the Mad Cat needs to do this one trick that the honorless Spheroids don’t want you to know.

By turning to the side, you can sprint full speed away from the mech bearing down on you.
This forces the banshee to turn, wasting 2 MP, and as you ran 7 hexes, the Banshee will be 3 hexes behind you.

I call this the Bullfight because the enemy is in front of you, so you dash off to the side as they close in, like a bullfighter. It is generally best to just keep running away as the mech tries and fails to catch you. There are situations where you will not want to do this. You may want to avoid giving rear armor shots to your opponent, which this tactic tends to do. You also may be ok with risking the 1 in 6 chance of a head punch if it means you can keep your thicker armor and bigger guns pointed at the enemy. This is more for the situations where you actively are trying to escape melee, not any situation where melee is happening. This only works if you are faster than the enemy, if you are the same speed or slower the best option is to jump into nearby rough terrain to slow down the enemy, and if you are the same speed or slower and cannot jump this situation becomes more or less impossible to escape from, so the best option is to be proactive and desperately avoid ending up in front of an enemy melee mech like this. This is useful information mostly for Clan players, as their mechs tend to not have full arms so they suck at physical combat, and their mechs also tend to be much, much faster than their IS equivalents.
Conclusion
I hope this helped, movement is the phase where you can improve the most as a player for Battletech. This is only scratching the surface, there is a large amount of very in depth tactics, formations, and general movement that one can learn, but these are the most generic tactics. Most other things you do in the movement phase are heavily dependent on what mechs you brought, while these should hopefully apply no matter what force you have. Unless that force is the Steiner Scout Lance, but if you are bringing that movement is your enemies problem, not yours.
