
This week’s Hammer of Math stakes a claim between the Underhive and the Ash Wastes to take a look at the economics of the Outlander campaign.
While blasting gangers off of walkways is always fun, one of the things that makes Necromunda really special is the progression aspect of any campaign. Whether your gangers are fighting over scraps of territory in a Dominion campaign or building a home in an Outlander campaign the way that your gang builds up their particular support network plays a major role in determining their effectiveness. As a result the economy of a campaign structure is always something that I have been fascinated by. Are there particular campaigns that are just better than others? Are there ground rules that Arbitrators could use to form an ideal campaign structure? It’s not a trivial thing to explore.
Back in July I briefly looked at the economics of an Ash Wastes campaign by examining income generation under various circumstances. It was fine as a first stab, but the challenge with these campaigns is that there is a lot of variability to consider. The campaign rewards are based on various missions which are supposed to be rolled for, many campaigns have territories which can be won or lost, and some of the outcomes can be extremely random. Something more complex than a simple average estimation would be needed; you would need to put together a simulation of an entire campaign.
So that’s what I did. I simulated one million campaign progressions in which the mission was randomly selected and income was generated based on the rewards provided. The specific assumptions will be listed below, as you can imagine they will heavily determine the viability of this model.
The Outlander Campaign
The Book of the Outcast contains an unusual twist on Necromunda campaigns in that the core mechanic doesn’t actually generate income. While players in Dominion campaigns are used to extracting credits from their territories, and Ash Wastes campaigns are all about the wonders of toll roads, the Outlander campaign has players create a homestead which can grow into a veritable fortress. It’s just that none of the Structures a player can make, be it a Critter Farm or a Doc Clinic, produce any income. The closest any come is the Drinking Hole, which makes Hired Guns and Hangers-on cost 50% less when being recruited. This makes the campaign perfect as a stepping stone for simulating the more complex ones; all I have to do is focus on missions.
The structure of the Outlander Campaign is similar to all of the others. Play is divided into three phases. The first (Development) and third (Expansion) phase are three weeks and involve players selecting missions, while the second phase (Downtime) is a single week where players recover, get some free credits, and have a chance to do some side fights for the hell of it. In other words if you ignore side fights a player gets six opportunities to gain income along with a 250 credit bonus in the Downtime phase. Those opportunities are also randomly determined based on a 2D6 roll. On a 2-3 or 10-12 a player chooses them, but on a 4-5, 6-7, or 8-9 a particular mission is played based on which phase the game is in. During the Development phase players aren’t permitted to play missions which involve raiding or attacks, while in the Expansion phase those types are more likely to occur (even though they don’t actually hurt the loser outside of the opportunity cost).
The Missions
The six Outlander campaign missions were selected based on the 2D6 roll; in the event of a ‘player choice’ result the scenario was randomly selected from the three available in the Development phase and the six available in the Expansion phase. I applied a 50% chance of winning or losing and a 50% chance of being the attacker or defender. Obviously the probability in actual Necromunda is highly variable on the relative strength of the gangs, but for the purpose of this idyllic simulation a 50% chance of success should be viable.
- Gunk Tank features a large feature in the center of the battlefield where models must spend a Double Action to gather a gunk token which is guaranteed to set them on fire if they’re hit with a Blaze weapon. Every gunk token taken off the field is worth D6x10 credits, and if one gang forces the other to flee or go Out of Action then they gain an extra D3 gunk tokens. Given how much of a cluster this mission can be I assumed that the winner received D3 tokens worth of credits.
- Mining Expedition has four mining sites where models are forced to make a Double action to roll on a chart and hope they get a 10 or better. Every mining site is worth 2D6x10 credits if exploited, and for the purpose of this simulation I set it so that the loser would gain the income from one site and the winner would gain from 1D3.
- The Big Score is a loot casket dash, with six caskets distributed across the battlefield that are worth 2D6x10 credits each. For the simulation both teams received 1 casket, and the winning team picked up an additional 1D3.
- Market Mayhem is the first of the missions that is only available in the Expansion phase. Assuming an Underhive Market is being used (and it should be used), the Attacker has a HUGE advantage in terms of being able to gain income from both winning the mission (4D6x10 credits) and having multiple opportunities to loot a stall (which provides various bonuses on a D6 roll). The Defender gets 3D6x10 credits if they win. For the simulation the market loot was represented by gaining D3x5, 30, or 30 + D6x10 credits depending on the D6 roll.
- Stealth Attack is another Expansion only mission that has the Attacker raiding the Defender’s settlement to complete an objective. This is translated into getting 2D6x10 credits if the Attacker wins and D6x10 credits if the Defender wins. For the simulation I always added a Gang Stronghold, which provides 3D6x10 credits to the Attacker if they win.
- Settlement Raid is the final Expansion only mission which has the Attacker attempting to grab loot by making it to the edge opposite the attacker’s deployment zone. Every model which makes it to that point gets D3x10 credits, and if they loot 100 or more credits the Attacker is considered the winner. The Defender gets D6x10 credits if they win. This is the other mission which can have a Gang Stronghold so I added the 3D6x10 credits to the Attacker if they won.
The biggest takeaway is that the Outlander heavily weighs in favor of the winner, with the losing side generally receiving nothing unless the campaign has some kind of loot mechanic like The Big Score. While I assumed a 50% win/loss rate where appropriate, in reality a game like this will heavily snowball as the victorious and well-funded gangs steamroll over the weaker ones who can’t catch a break beyond getting 250 credits during Downtime.

The Results
Using the methods described above I simulated one million campaign sequences in Python and plotted the results on a box plot. Box plots are useful for showing the distribution of a collection of values, especially when attempting to compare across particular references. The box is divided into four regions separated by five lines. The outermost lines are the minimum and maximum (excluding any outliers), while the middle of the box plot is the median value. The lines defining the lower and upper regions of the box are the medians of the lower and upper half the data set. Together this establishes the four quartiles of the sample. For those who don’t particularly enjoy descriptive statistics the best way to think of the box plot is a spread of results clumped into four groups of roughly equal size. 
The graph does a good job of showing the distribution of credits earned, but additional information can be gathered from the raw numbers.
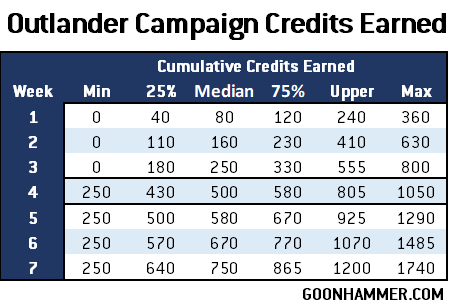
The difference between the “Upper” and “Max” values is that the “Upper” value is a means to exclude outliers which could unnecessarily skew the data. Basically the process is that the distance between the 25% and 75% regions mark the “Inter-Quartile Range” (IQR), and anything that’s more than 1.5 IRQ above or below the 25% and 75% lines is excluded as an outlier. In other words from a statistical standpoint it’s best to assume that by Week 7 the cap of an Outlander campaign is 1200 credits earned, but one lucky guy out of the million simulated made 1740. That little guy? I wouldn’t worry about that little guy.
So what can we gather from this? Outlander Campaigns simply don’t generate a lot of income. The 250 credit boost during downtime makes up a significant portion of the accumulated credits, ranging from between 33% of the median value to around 20% of the 1200 credit upper value. Not only does this limit the ability of a gang to expand, it also imposes an egregious penalty on players who lose gangers. 25% of the simulated gangs earned less than 180 credits before Downtime, which would put them at a severe disadvantage against the top 25% who earned more than 330 credits. A major source of this disparity is that teams who lose games generally get nothing; had this model simulated a full campaign with multiple members and tracked wins and losses it would likely have shown a significant snowball effect where the losing gangs don’t have a prayer of catching up.
In the future I’ll look at other campaigns, including those which contain persistent territory that can be kept or lost. Once I’ve started to gather more data hopefully I can start to develop a sense of what an ideal campaign might look like in terms of income distribution, and what tweaks Arbitrators can make in order to ensure that happens. (Editor note: Fowler here! In my last campaign I made it so no fighters could outright die in the first week, and offered some resurrection packages up early on. I’m of the opinion that a less fatal campaign opening week goes a long way to balance a bit and prevent demotivating snowballing.) One key part of this approach is that the results are only as relevant as the model. If you see anything in the approach I used here that might benefit from some tweaking please reach out to me on our Patreon Discord; I love hearing the feedback of our supporters.
Thanks for reading! If you have any questions or comments feel free to drop us a note in the Comments below or email us at contact@goonhammer.com. That’s also the best way to suggest topics for future articles.
