
This week’s Hammer of Math expands the simulation Kevin made for the economy of an Outlander Campaign and adds the impact of territories with the Dominion, Succession, and Uprising campaigns.
I’ll admit, perhaps spending hours coding a Python script to simulate a theoretical Necromunda campaign is a bit weird. Then again I have kids so it’s not like I had anything better to do on New Year’s Eve, so here we are. The last time I visited this topic I had simulated a theoretical Outlander Campaign where the bulk of the money came in the form of missions. To be applicable to other campaigns I needed to add territories, which meant looking at how they were generated, won, lost, and exploited to generate credits. What’s interesting is that every campaign is a little different in this regard. Some campaigns only generate funds at the beginning of each cycle, while others reward you after each game regardless of how many you have played each week. Some are incredibly generous, others are incredibly stingy, and some completely change how they work depending on the phase.
To recap, I’ve coded a simulation in Python that runs 100,000 theoretical campaign progressions for a nominal gang. Previously the simulation ran a million times but the added trials didn’t shift anything and adding territories slowed things down a bit. Each week the gang collects income after running two missions; one as the challenger and one as the target. For the Outlander Campaign I originally ran just one mission per cycle but it seems like running two games makes more sense so that everyone gets a turn. Of course in reality the number of games played per week varies wildly, and I hope to check that out in a future article. Every mission played has a flat 50% chance of winning or losing, which is also obviously wrong as successful gangs tend to snowball into more victories. I hope to examine that in a future article as well.
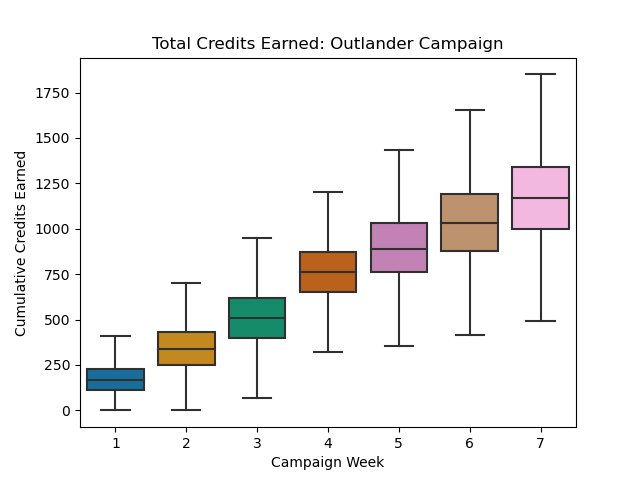
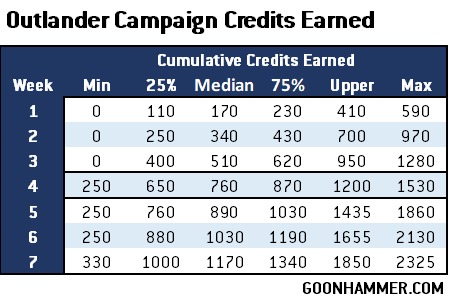
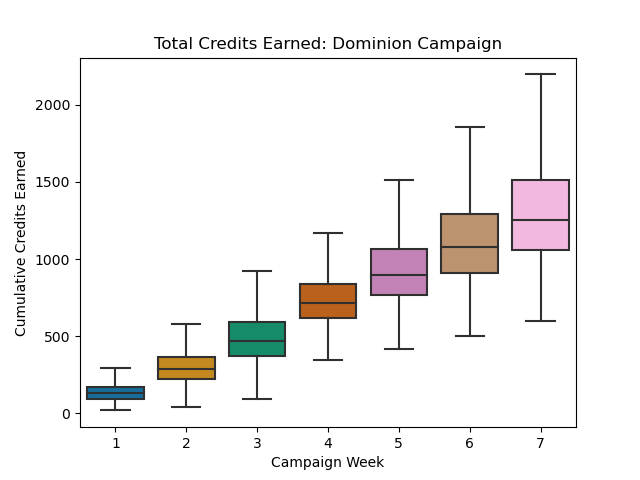
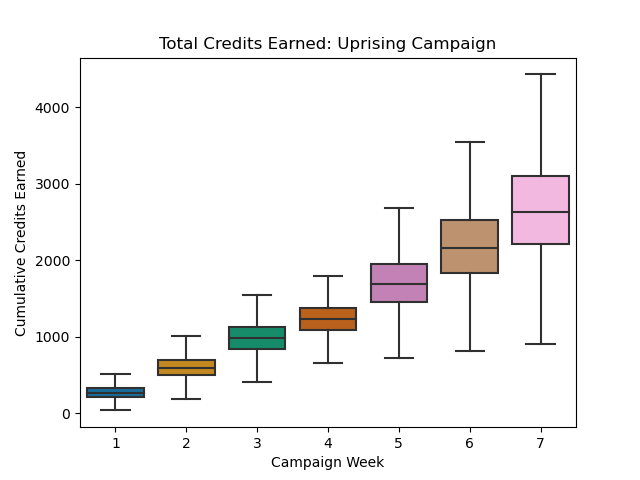
If you haven’t read my previous article then the charts below might be a bit confusing. The charts are box plots. Box plots are useful for showing the distribution of a collection of values, especially when attempting to compare across particular references. The box is divided into four regions separated by five lines. The outermost lines are the minimum and maximum (excluding any outliers), while the middle of the box plot is the median value. The lines defining the lower and upper regions of the box are the medians of the lower and upper half the data set. Together this establishes the four quartiles of the sample. For those who don’t particularly enjoy descriptive statistics the best way to think of the box plot is a spread of results clumped into four groups of roughly equal size.

Outlander Campaign
Since I changed the number of missions played per week it made sense to take a second look at the Outlander Campaign. Unsurprisingly adding a second mission shot the values up considerably; the median credits earned after a full campaign was 750 credits assuming one game per week and with two it’s at 1170. This shows exactly how much impact having some players with more free time than others can impact a game; if one player is getting three games in per week while another is only getting one then the first player is likely to be much further ahead.
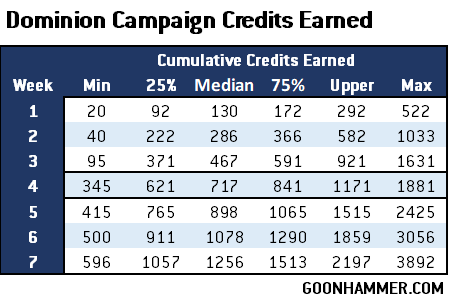
Dominion Campaign
The Dominion Campaign is the original territory-driven game and one that’s still frequently played. Players only start with a Settlement that they cannot lose which provides 1D6 x 10 credits per turn (along with a chance of adding a Juve or Ganger), and additional territories are won through challenges across the first three cycles. The Dominion is an earlier campaign and regrettably it shows with several issues which can easily lead to major imbalance. The biggest one is that there isn’t any kind of limit to the number of games that can be played per week, and each game played results in someone winning a territory (and then gaining income from it and every other territory earned). While any Arbitrator worth their time would put a stop to it, there’s nothing preventing two players from just playing each other a bunch of times and winning all of the territories in the campaign. The winner-take-all mentality means that it’s entirely possible for an unlucky player to go several weeks without getting any territories. And even if they do get territories, there’s no guarantee they actually generate income.
Uprising Campaign
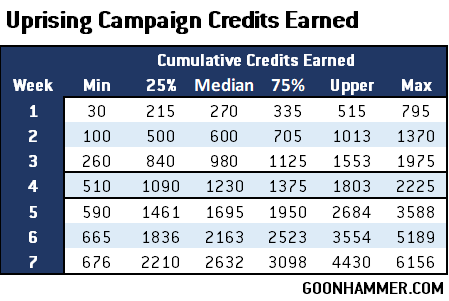
In contrast to the Dominion Campaign, the Uprising Campaign is particularly generous in the early game. Players start with three territories that each provide at least D6 x 10 credits per cycle (territory income in an Uprising Campaign is generated at the beginning of each cycle) and a player cannot lose territory until after Downtime. This means that players in an Uprising campaign have a floor of 9D6 x 10 credits before they get the 250 credit bonus in Cycle 4. Things get interesting after that when the campaign shifts from the Insurrection Phase where territories can generate income to the Damnation Phase where everything is ruined and all of the gangs are starving and scavenging. The second phase is where things can really take off as gangs lose territory and potentially gain huge boons by making Scavenging rolls. The Scavenging rolls can produce everything up to a Champion with 4D6 x 10 credits worth of stuff. To represent things like Juves, Gangers, and Champions I assumed a Juve was worth 30 credits, a Ganger was worth 50, and a Champion was worth 110.

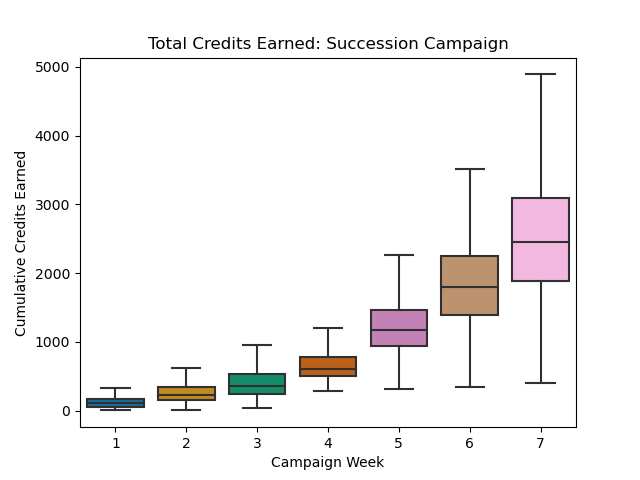
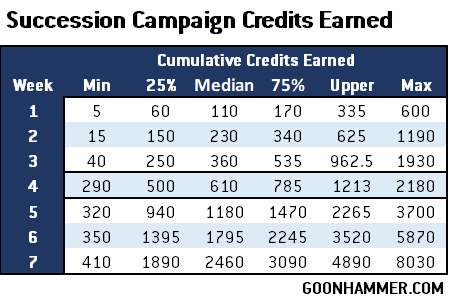
Succession Campaign
The final campaign I took a look at was the latest one that Games Workshop released with The Aranthian Succession: Cinderak Burning. Unusually this campaign doesn’t generate territory (sympathizer) income once per cycle like the last few campaigns; it does so after each game similar to the Dominion and Law & Misrule. This campaign is also interesting because it explicitly includes vehicles (the D3 x 10 credits per wrecked enemy vehicle was not part of the simulation), which requires more funds to purchase and repair. As a result the Succession Campaign can be the most generous, with an upper level higher than any other campaign. It also has the highest level of variance, with a minimum lower than any campaign but the notoriously stingy Outlander Campaign.
Comparing the Campaigns
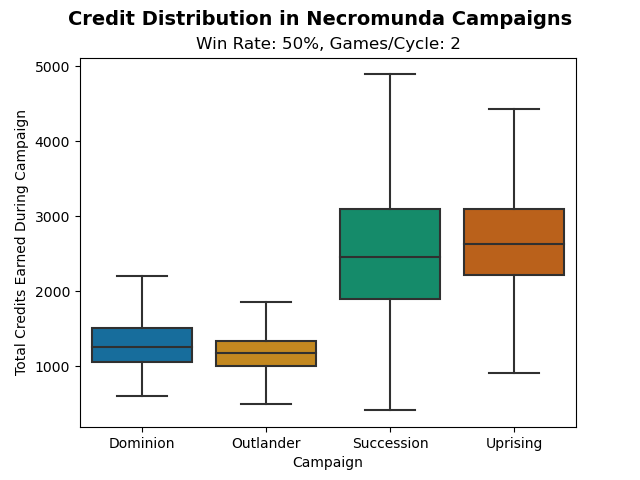
With all of this data we can compare the output of the campaigns, as seen below. The relatively low-return Outlander and Dominion Campaigns are clustered together while on the right we see the vast level of variance of the Succession and Uprising Campaigns as well as the high floor of the Uprising Campaign. The Uprising Campaign is one that I had honestly taken a pass on, but between the interesting mechanics, use of per-cycle territorial income generation, and generous revenue floor it seems like it could be accessible for a lot of players. Plus who doesn’t like Meat or scavenging to survive?
In a future article I hope to take a look at the Ash Wastes and Law & Misrule campaigns, which are obnoxious because the territories interact with each other to provide bonuses. I also think it will be interesting to examine what happens when players play a variable number of games per week. How much of a difference is there between a player with three kids who can only get out of the house once per month and someone who can get in as many games as they want? Finally one of my goals is to examine the impact of snowballing and win probabilities. My plan for that is to change the code so that instead of it being a 50% win rate the probability will be based on the existing value of the gang compared to the previously calculated median. I suspect that this will cause an immense shift in variance that will reflect what players have experienced in real life.
Thanks for reading! If you have any questions or comments feel free to drop us a note in the Comments below or email us at contact@goonhammer.com. That’s also the best way to suggest topics for future articles.
